Quick link: Go to the UpdraftPlus shop to find the Migrator add-on, or UpdraftPlus Premium.
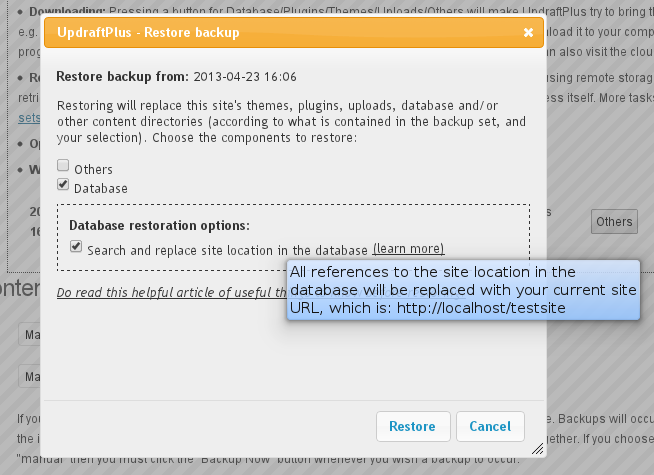
If you have the “Migrator” add-on (or UpdraftPlus Premium, which includes all add-ons), then when you restore a site, you will be given the option to “Search and replace site location in the database”:
Migrating a database
What does this option do? If selected, then after restoring your database, it will then perform a search-and-replace operation upon it. It will first look up the address that the site was living at (i.e. the site whose database you are restoring). Then, it will replace all instances of that location in the database with your site’s new address.
This is a vital step if you are migrating a site from one location (URL) to another. For example, if you are moving a site from your development location – e.g. https://localhost/testsite to your live location – e.g. https://example.com – then after copying all the files and database, you then need to search/replace the database to reflect the new location. If you do not, then your site, though sitting at the “new” location, will contain lots of references to the “old” one. This can cause confusion and bugs. Most professional WordPress developers use the tried-and-tested “searchandreplacedb2.php” script to accomplish this task. UpdraftPlus includes the same code as its own search-and-replace engine to give you the same reliability.
So, in summary, here is how to migrate/clone a site from one location where WordPress is installed to another:
- Make sure that the new site (destination) has UpdraftPlus and the “Migrator” add-on installed (either stand-alone, or via UpdraftPlus Premium). (You can get these products from our shop, here).
- Create a backup on the original (old) site.
- Go to the “Existing Backups” tab and then under this click “Upload backup files”, from here you can then import the backup into the new site, by dragging and dropping:

- After the upload has finished, use the “Restore” button on the new site to begin a “restoration” using the backup set that you just uploaded. Make sure that you tick the “search and replace” button when doing so.
That’s all!
You can see a fuller walk-through, with many more screenshots, here.
Posted in: Add-ons, Advanced usage, Migration, Restoration
![]()
![]()
![]()