UpdraftCentral
What is UpdraftCentral?
UpdraftCentral is remote control for WordPress sites, allowing you to manage lots of WordPress sites from a single dashboard. No need to log in to and juggle lots of dashboards – you can look after them all from a single page, with a single login.
How can I change the order of my sites in my UpdraftCentral dashboard?
You can do this by dragging and dropping them. Pick up the site by tapping on any empty area of its row in the main dashboard, and drag it.
This requires UpdraftCentral 0.6.1 or later.
How do I use UpdraftCentral theme and plugin management?
For a quick and easy guide to using these features, please watch the following video.
How can I allow non-admin users to have an UpdraftCentral dashboard?
(These instructions are valid for UpdraftCentral 0.5.2 and later).
If you want non-admin users to be able to have their own UpdraftCentral dashboard, so that they can add sites and control them, then there are two steps:
1. Add parameters to the short-code
When putting the updraft_central shortcode on a page, use the require_role parameter. This shold be a comma (not space) separated list of roles whom you wish to have access to an UpdraftCentral dashboard. Example:
2. Add a code fragment
The first step will allow users to see a dashboard. To also grant them permissions to use it, you will need to add a bit of code to your site, either as an mu-plugin, or to your child theme’s functions.php file. (You can Google these techniques if they are new to you).
add_filter('updraftcentral_user_can', '__return_true');
That fragment will grant non-admin users who are logged in the ability to UpdraftCentral. This explicit step is possibly slightly annoying, but required for maximum security. (Without it, it would be theoretically possible for a malicious logged-in user to use the facilities of UpdraftCentral, if he was sufficiently skilled, even though not permitted by your short-code). If you are only wanting to add this facility to some users, and not all users, then you will want to inspect the UpdraftCentral source code to see the full potential of this filter.
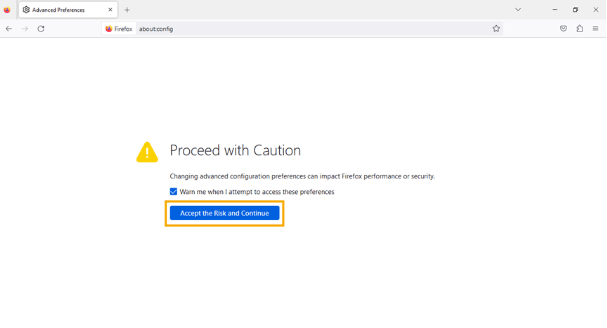
How do I set clipboard permissions for different browsers?
Giving your browser permission to access the clipboard makes it easy for you to copy the information that you need to connect to UpdraftCentral. Enabling this feature will save you time; instead of manually copying the generated connection key, you’ll see an icon that will copy it for you in one click. Use this guide to set up your browser correctly. Simply select your browser from the list below, and follow the instructions:
Chrome
- Open Chrome browser settings here
- Select Security & Privacy > Site Settings > Permissions > Clipboard
- Select Allow
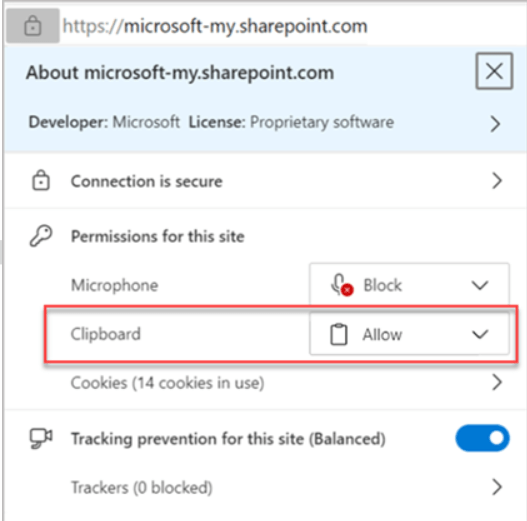
Edge
- Select the lock icon in the address bar
- Change the Permissions for this site > Clipboard setting to Allow
Firefox
- Open Firefox Browser
- In the address bar, type ‘about:config’ and search
- A page will appear with the option ‘Accept the Risk and Continue’
- For the following two Parameters change the preferences as True:
- dom.events.asyncClipboard.readText
- dom.events.testing.asyncClipboard
If you’re struggling to implement these steps, then as a Premium user, you can reach out for ticketed support. Free users can seek support via the WordPress forum.
What features does UpdraftCentral have?
As well as centralized and remote control of all your UpdraftPlus backups, restorations and migrations, you can also manage and update the themes, plugins and cores of every website you manage.
Built with the latest, state-of-the-art technology, UpdraftCentral is crammed full of features that ensure that you enjoy the best possible user experience:
• As a single-page/dynamic JavaScript application, it won’t annoyingly refresh the page on every action. And because it runs in the front end and on full-screen mode, you won’t have the wp-dashboard getting in your way.
• It sends all communications directly from the browser, rather than through a back-end server, making it much faster and more efficient than traditional management applications.
• For maximum security, all communications between sites are RSA encrypted and signed, and every connection has a unique key-pair. It can be run by localhost, so as an extra security precaution, you can have the dashboard website (i.e. the one that controls all the others) off the public internet.
• It’s mobile-ready and responsive, built to run on any device from day one.
• It’s also extensible and developer friendly: it uses WordPress hooks widely, and all its JavaScript is documented with JSDoc.
UpdraftCentral Premium only:
• A sophisticated WordPress user management system that enables you to create, edit and delete users to contribute whilst giving you full control over their levels of access and permission.
• Fully supported via a professional, fast, ticketed support service and active forum.
• Choice of Cloud hosted. With UpdraftCentral Cloud you have all the features of UpdraftCentral Premium, but we do all the hosting and maintenance of the app for you.
What does it require to run?
If using the UpdraftCentral dashboard via updraftplus.com, all you need is a modern web browser – any version that has not been end-of-lifed by its maker should be fine. (For Internet Explorer, that means IE 10 or later).
For a self-hosted version, your webserver will need to be running PHP 5.3 or later, and WordPress 4.0 or later.
Controlled sites, whatever your version, must have UpdraftPlus 1.12.2 (free version) or 2.12.2 (paid version) or later installed, and can use any PHP version that WordPress runs on, and any WordPress version as far back as 3.2.
How do I install and add a site to UpdraftCentral?
On the sites that you wish to control, you need to have an active copy of UpdraftPlus (the backup/restore plugin) installed.
There are three ways to use UpdraftCentral:
1) Create a new UpdraftPlus account setup option via the UpdraftPlus plugin.
2) Via self-hosting (not via UpdraftPlus.com): Installing the dashboard plugin on your own site.
3) The easiest option: Via your UpdraftCentral dashboard at UpdraftPlus.com (i.e. on our site).
The following video walks you through these three options, or you can read the descriptions below.
1) New UpdraftPlus account setup option via the UpdraftPlus plugin
Make sure you have installed the UpdraftPlus plugin on your WordPress site.
After installing the plugin, press “Settings” in your UpdraftPlus plugin and scroll down to the UpdraftCentral box. Here you can enter and register your email account and password for an UpdraftPlus account and connect your site to the UpdraftCentral Cloud.
Press the “Connect this site to UpdraftCentral Cloud” button, enter your preferred email and password and press “Connect to UpdraftCentral Cloud”. You have now created your own UpdraftPlus account (which can be logged into using the details you just entered) and have connected your site to the UpdraftCentral dashboard.
2) Your dashboard hosted on UpdraftPlus.com
If you want to use UpdraftCentral via your dashboard on UpdraftPlus.com, first make sure you are logged into the UpdraftPlus.com website. Next, navigate to the UpdraftPlus plugin on your WordPress site and press “Advanced Tools”, then “UpdraftCentral”. To connect the site to the UpdraftCentral dashboard in UpdraftPlus.com, just press the blue “UpdraftPlus.com” button to generate a key.
Next, select “Create” and copy the generated key. Finally, go to UpdraftPlus.com/My Account/My UpdraftCentral to access your dashboard. From here you can add a new site using the key you just copied. Just press the plus button, paste the copied key into the box, press “Add website” and your site will be added to your UpdraftCentral account.
You can also purchase some more licences to add to your free allowance!
3) Hosting your dashboard on your own WordPress site
You can also install and activate the plugin in the normal way, via the “Plugins” page in your WordPress dashboard. For the free WordPress.org version of UpdraftCentral, search for the plugin and install (its plugin page is here). For a paid self-hosted version, install via the “upload” facility in that page.
On all the sites that are to be controlled, you will need to install and activate UpdraftPlus via the “Plugins” page in your WordPress dashboard. For the free version you should search in the WordPress.org directory using the search facility on that page – For a paid version, install via the upload facility.
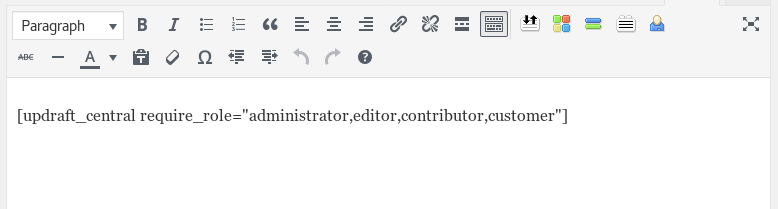
In this plugin, highlight and copy the [updraft_central] short-code and then press the “Pages – > Add New” link. Next, create a short-code widget on your new page and add the copied UpdraftCentral short-code you just copied and save the page. When you visit the new page you just created, it will now show the UpdraftCentral dashboard.
To add your site, go to your UpdraftPlus plugin and and press the “Advanced Tools” tab and the press “UpdraftCentral”.
Press the “Self-hosted dashboard” button, enter your site address and press “create” to generate your UpdraftCentral key. Copy this key and return to your web-page containing the dashboard. In the dashboard, press the plus symbol, paste the copied key into the box and press “add website”. Your site has now been successfully added to your self-hosted UpdraftCentral dashboard.
If you wish non-admin users to be able to use UpdraftCentral (each user has their own list of sites – this won’t give them access to your list of sites), then use the require_role attribute, e.g.[updraft_central require_role="administrator,editor"]
What version of UpdraftPlus do I need to have installed?
On sites that you want to control from your UpdraftCentral dashboard, you will need any version of UpdraftPlus from version 1.12.2 (free version) or 2.12.2 (paid version) onwards is compatible. (This requires a release from March 2016 onwards). Both free and paid versions can be controlled by UpdraftCentral.
How can I control a site that has access controls (e.g. brower password, IP address restrictions)?
This FAQ is about trying to connect your UpdraftCentral remote control dashboard to a site which has additional access restrictions beyond WordPress’s ordinary login mechanism. For example, perhaps it requires a browser password to be entered, or is restricted to specific IP addresses.
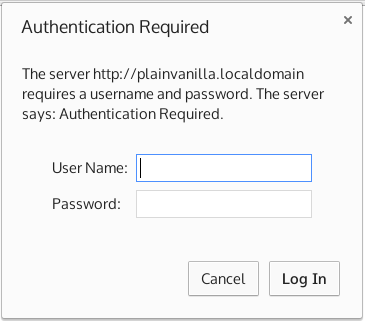
Example of being asked for a browser password
There is no “one-size fits all” answer to this question. This is mainly because:
- there are many different possible access restrictions
- different webservers are configured in different ways
- different web browsers also behave differently and
- the CORS protocol which handles direct authentication (UpdraftCentral, by default, connects directly from the browser to your managed site) interacts with HTTP authentication in complex ways. We have collected together relevant information below, based on all our testing and experience.
- web browsers also have security restrictions on processing of non-https content on https dashboards
Some of the information below is quite technical. Not all of it is relevant to every situation. You ca solve most problems just by tweaking the available options in the UpdraftCentral site configuration, and, as a last resort, trying the “via mothership” connection mode (see the relevant section below).
The most common case: Apache with password-protection
Here’s the short summary of what to do in the most common case: that your webserver is Apache, and protected by a password that’s configured in your .htaccess file. In that case, just complete all of these steps…
- Stick a <LimitExcept> container around your “Require” statement in .htaccess, so that it does not apply to OPTIONS commands.
- Add some extra lines to your .htaccess, so that Apache will send some extra headers that are needed
- Turn off the “Send CORS headers” option in the site configuration for the site in your UpdraftCentral dashboard.
Here’s how the .htaccess file then looks, with Apache 2.4; if copying this, then remember to change the lines indicated to fit with your setup:
# Added a rewrite to respond with a 200 SUCCESS on every OPTIONS request.

RewriteEngine On

RewriteCond %{REQUEST_METHOD} OPTIONS

RewriteRule ^(.*)$ $1 [R=200,L,E=HTTP_ORIGIN:%{HTTP:ORIGIN}]]
# Add the necessary headers. Remember to tweak your site configuration in UpdraftCentral so that UpdraftCentral does not send CORS headers - otherwise, there will be two sets, and it will break.

# Adjust the next line so that it has the address of the server that your UpdraftCentral site is on, including either https:// or https:// as relevant (but not the full path)

Header always set Access-Control-Allow-Origin "https://localhost"

Header always set Access-Control-Allow-Methods "POST, GET, OPTIONS"

Header always set Access-Control-Max-Age "1000"

Header always set Access-Control-Allow-Headers "authorization,x-secondary-user-agent"

Header always set Access-Control-Allow-Credentials "true"
AuthType Basic

AuthName "Authentication Required"

# Adjust the next line so that it points to your .htpasswd file

AuthUserFile "/home/mysite/public_html/.htpasswd"

<LimitExcept OPTIONS>

Require valid-user

</LimitExcept>
If this isn’t your setup, then read on for the more detailed discussion…
SSL dashboard (mothership) controlling non-SSL websites
If the site that your UpdraftCentral dashboard is on (which we call the “mothership”) is using SSL (which is the case for updraftplus.com), then all communications to the controlled site go via the mothership. They cannot be sent direct to the site, because web browsers’ “mixed content” security policies forbid SSL sites from contacting non-SSL sites. As such, regardless of what connection mode you set in the UpdraftCentral settings, if you access your dashboard via SSL, then UpdraftCentral will handle the connection in “via mothership” mode. Please bear that in mind when reading the below! This being so, in this case, none of the material about CORS below will apply (as explained further down).
IP address restrictions
If your webserver restricts access based upon IP addresses, then you will need to add the IP address that you are browsing from to the list of allowed IP addresses. (Connections in UpdraftCentral come directly from the browser, not from the server that the UpdraftCentral dashboard is installed on (a.k.a. the “mothership”) if these are different). If that is not possible (e.g. you are on the move, with limited access to configure your webserver), then you may wish to switch UpdraftCentral’s mode to route all connections via the mothership and allow the IP address of the mothership – see the section on doing so further down.
In Apache 2.4, this is done with statements like the below:
<RequireAll>

Require all granted

# Change the IP address on the next line to yours

Require ip 1.2.3.4

</RequireAll>
Older Apache versions have a different syntax.
Browser passwords (i.e. HTTP authentication)
If access to your website is protected by a password (i.e. not just the ordinary WordPress login password – but a pop-up in your browser that is before you see anything from WordPress), then UpdraftCentral will need this in order to be able to connect.
Settings for configuring a browser password are in the expert section of the “Add Site” window. They can also be edited later by editing the site configuration. Note that it is normal for your browser to also ask you to type in the username and password as well. Whether UpdraftCentral’s configured password, or the one you enter in your browser directly, gets used, can depend upon some complicated (under the hood) interactions.

You will also see the option “Send CORS headers” in this section. Normally, this option should be on. It tells UpdraftCentral on the controlled site to set the headers that are required by the CORS protocol (the protocol which controls what resources a web browser is allowed to fetch from a controlled site). However, CORS and HTTP authentication have some difficult interactions. If you are sure that you are entering the correct username and password, then you should open your web browser’s developer console. If you see errors there about CORS, then try turning off this option. Note, though, that it may also be necessary to add new configuration directly to your webserver. More information on this is below. Also, you can try the “Via mothership” connection mode, also described below. That connection mode eliminates the complexities of the CORS protocol entirely.
Setting CORS headers on password-protected sites
CORS is a protocol for making sure that a web browser can only run code from authorised sites. UpdraftCentral is normally able to handle all of this automatically. However, on password-protected sites, there can be a chicken-and-egg situation:
- UpdraftCentral on the remote site can’t be contacted without the password, and thus it can’t set the needed authentication headers
- But, without the needed authentication headers, the browser won’t allow the resource to be accessed at all, and so won’t even ask for the password
In many cases, UpdraftCentral can detect this issue and work around it, or provide appropriate advice. This cannot be done, however, in 100% of cases. In such cases, you may need to tweak your webserver’s configuration to help.
If you have this problem, then your web brower’s JavaScript console will be mentioning problems to do with CORS and/or access controls.
There are two important things: 1) That your webserver sends CORS headers 2) That your webserver only sends one lot of CORS headers. Please read on for advice. If all else fails, then you can switch UpdraftCentral’s connection mode to route all traffic via the webserver that you have UpdraftCentral installed on (i.e. the “Mothership”) – see the section below on “UpdraftCentral connection mode”.
It’s best to configure your webserver to not require password authentication for an HTTP OPTIONS request. These requests are used by browsers to work out whether the request is allowed. By turning off authentication for OPTIONS requests, this allows UpdraftCentral on the remote site to be reached and to respond that the further requests (which will be password-protected) should be allowed through. This is generally safe to do. OPTIONS requests do not send commands or pass information.
To do this in Apache, edit the Apache configuration where the password is being required, and add a <LimitExcept> statement to cause it to not be required for an OPTIONS request, plus smoe further lines to make Apache return a 200 status code instead of a 401 (unauthorised) code on these requests. Here is an example below of a normal Apache password configuration in an .htaccess file:
AuthType Basic

AuthName "Authentication Required"

AuthUserFile "/home/mysite/public_html/.htpasswd"

Require valid-user
And here is the same configuration, but now with the <LimitExcept> command added so that it will not require a password with an OPTIONS request, and the other extra lines:
# Added a rewrite to respond with a 200 SUCCESS on every OPTIONS request.

RewriteEngine On

RewriteCond %{REQUEST_METHOD} OPTIONS

RewriteRule ^(.*)$ $1 [R=200,L,E=HTTP_ORIGIN:%{HTTP:ORIGIN}]]
AuthType Basic

AuthName "Authentication Required"

AuthUserFile "/home/mysite/public_html/.htpasswd"

<LimitExcept OPTIONS>

Require valid-user

</LimitExcept>
In the lighttpd webserver, you can do similiar things like so:
$HTTP["request-method"] != "OPTIONS" {

auth.backend = "htdigest"

# (etc. - the rest of your authentication configuration)

}
If you need to get your webserver to send the CORS headers, then go to the UpdraftCentral site configuration, and turn off the option for UpdraftCentral on the remote site to send them (otherwise, you will have two sets – which breaks the CORS protocol). Then, add webserver configuration to send these directly. Here is an example for Apache – you will need to change the origin header to specify the server (but not the full path) for the site that has the UpdraftCentral dashboard on it; in the example below, the dashboard is on https://localhost
# Change the next line to match where your UpdraftCentral dashboard is hosted

Header always set Access-Control-Allow-Origin "https://localhost"

Header always set Access-Control-Allow-Methods "POST, GET, OPTIONS"

Header always set Access-Control-Max-Age "1000"

Header always set Access-Control-Allow-Headers "authorization,x-secondary-user-agent"

Header always set Access-Control-Allow-Credentials "true"
With the lighttpd server, it is easiest to leave the option for UpdraftCentral to send CORS headers (in the site configuration on), and only configure lighttpd to send those headers with OPTIONS requests, with a fragment like the below (again, remember to edit the origin header):
$HTTP["request-method"] == "OPTIONS" {

# Edit the origin header to indicate the address of the site with your UpdraftCentral dashboard

setenv.add-response-header = (

"Access-Control-Allow-Origin" => "https://localhost",

"Access-Control-Allow-Methods" => "POST, GET, OPTIONS",

"Access-Control-Max-Age" => "1000",

"Access-Control-Allow-Headers" => "authorization,x-secondary-user-agent",

"Access-Control-Allow-Credentials" => "true" )

}
Remember that, if this all gets too complex, you can change UpdraftCentral’s connection mode (see below), to avoid issues with CORS completely.
UpdraftCentral connection mode
In the vast majority of cases, UpdraftCentral will “just work”. However, sometimes, it may be necessary to go into the advanced settings, and change the “connection mode” for a particular site, in order to be able to control it.
Normally, UpdraftCentral will connect to the site directly from the browser, for the fastest possible results. However, on some setups, this may be problematic – e.g. if your site only allows access to specific IP addresses and your browser is on a floating IP, or if you use HTTP authentication and are unable to configure your server to send the necessary CORS headers to get this to work (see the relevant sections above for information on what this means). In this case, changing your connection mode may help. A description of the available modes is below.
The available connection modes are:
- “Direct (authentication method chosen automatically)” – this is the default. It contacts the remote site directly via AJAX (cross-site request). In the event of an HTTP username/password being entered in the configuration, it will decide itself on the best way to try this. This decision is based on your web browser, because different web browsers behave differently in this case.
- “Direct (authentication via jQuery)” – this also contacts the remote site directly. It’s identical, unless there’s an HTTP password. If there is, it’ll use the method of sending HTTP authentication that works in most web browsers. This can support any method of HTTP authentication (e.g. basic, digest, NTLM) that your web browser supports.
- “Direct (manually constructed authentication)” – also direct, and uses (if necessary) the HTTP authentication method that works in Firefox, and possibly other browsers too. If the site does have HTTP authentication, then only HTTP “basic” authentication can work; digest (or other) forms of authentication are not supported.
- “Via mothership (slower, but better compatibility with some awkward setups)” – this works like traditional remote control plugins do. It sends the request via AJAX to the mothership (i.e. the UpdraftCentral plugin on the mothership), which then sends it on to the remote site. If HTTP authentication is needed, it can support HTTP “basic” authentication and “digest”, as long as your mothership is running PHP 5.4+; if running an earlier version, then digest (or other) forms of authentication are not supported. It is slower, because of the relaying of the request and reply (instead of direct browser-to-site communications).
How are payments for the managed UpdraftCentral dashboard taken?
If you purchase a subscription to access the UpdraftCentral dashboard on updraftplus.com, then this is paid for using PayPal or a card. In the case of card payments, payments will be processed automatically each month or year (depending on your choice). We do not store your card details under any circumstances; rather (for card payments) we use stripe.com, one of the web’s most trusted and most widely-used payment vendors, complying with the highest standards for card security. You can cancel your recurring payments at any time by logging in at updraftplus.com.
If you purchase the self-install plugin for hosting the dashboard on your own site (i.e. running your own mothership), then this is a one-time purchase (and hence has a one-time charge).
I want to use UpdraftCentral in “full screen” mode, so that I don’t have screen space used by all the other things on my site.
Tap on the full-screen icon in the top-right of your UpdraftCentral dashboard. Tap it again to leave full-screen mode. Alternatively, double-click the “U” logo in the top-left.
I accidentally deleted my site or connection keys, and need to reconnect.
This is done via adding the site again as a new site, following the same procedure as for a new site.
How can I disconnect a site from an UpdraftCentral dashboard?
A site can be disconnected from either end. If you have access to the UpdraftCentral dashboard, then you click on the site’s menu, and choose the “Remove site” option. The connection will then be destroyed (specifically, the encryption keys used to make the encryption are deleted). If you have access to the site that is being controlled, then you should go to UpdraftPlus, and to the “Advanced” tab, and delete the encryption key for the connection.
What are your future plans?
We have big plans for UpdraftCentral. It has been coded to be modular and extensible, allowing us to add features for controlling much more of WordPress.
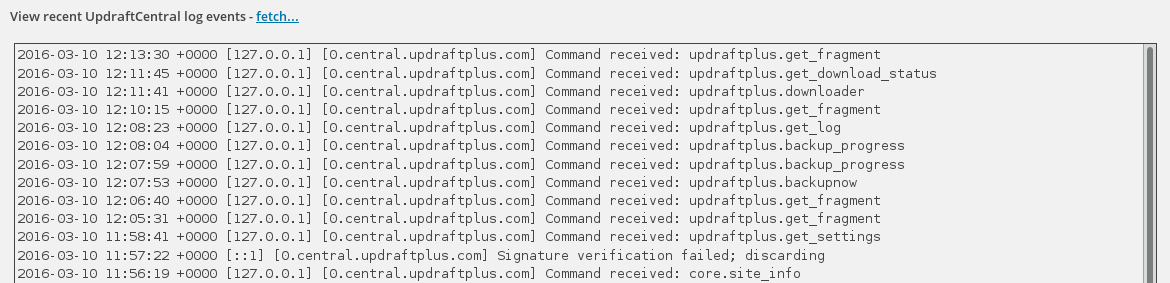
How can I see the event log for managed (child) sites for UpdraftCentral?
If you want or need to see the event log for a managed (i.e. child) site with UpdraftCentral, then do this:
1. Go to the UpdraftCentral key management in the managed site
Log in to your WordPress dashboard on the managed site. Go to the UpdraftPlus settings page, and to the “Advanced Tools” tab (the easiest way to do this is using the drop-down menu on your admin bar, after logging in).
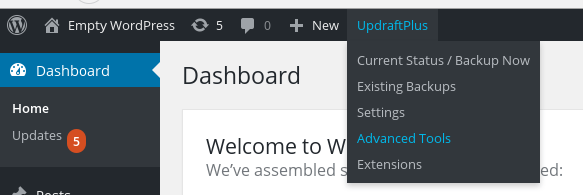
Within the “Advanced Tools”, scroll down to the “UpdraftCentral (Remote Control)” section.
2. Click on the link to fetch the log at the bottom
At the bottom of the UpdraftCentral section is the words “View recent UpdraftCentral log events” (or similar), and a link next to it. In the screenshot below, it is at the bottom, with the word “Fetch…”. Click on it!

This should then show you your recent log events, most recent first. It shows you the time of the log event, the IP address of the site that sent the command (which should be your mothership site’s (i.e. dashboard webserver’s) IP address), the key that was used (these correlate with the list of keys further up the page), and then the log data.