The world of online course creation can seem daunting to a new instructor. Creating courses might be your forte, but making a website to sell them might seem like a difficult and daunting task. Fear not, as this blog will help you set up an create an eLearning course site with WordPress.
We understand that most people might not be adept at coding or do not have the resources to create a full-fledged website by themselves. That is where WordPress comes in. Little needs to be said about the popularity of WordPress, as it is one of the most popular CMS platforms in the world. WordPress lets users have a large number of nifty plugins and themes and can assist in setting up a site by simply dragging and dropping elements, without much need for coding.
For this blog, we are going to go through a comprehensive view of tools that will let us set up an LMS site with ease.
Why have an LMS site?
eLearning has seen a huge increase in popularity recently due to Covid and the rise of remote working/teaching. Business analytics forums state that 1.2 billion students were affected by the closure of educational institutions worldwide during the pandemic. Filling the gap with a fast and well-designed solution for students is the right way to make an impact in this massive market.
What do you need to start off? We are going to talk about two main elements in this article:
- Robust LMS plugin
- Innovative design pack
This may seem like a small list of tools to start with, but trust us they will be more than enough.
Making the right plugin choice
To build our LMS site on WordPress we need to be careful about the plugins that we use. While some plugins are paid versions only, they also usually offer free counterparts under the “freemium” model. We are only going to focus on an LMS plugin that offers us enough functionality without having to spend any money. But how do you determine if a plugin is right for you? An LMS plugin should offer some basic features that we need to start with:
- Functional course building
- Easy to use quiz building
- Student interaction with email
- Easy payment integration
- Certificates
- Theme starter pack integrations
Taking into consideration these features, we suggest using Tutor LMS. Tutor LMS offers these features on its free version for users. Although there are more features on the paid version, we will only look at the free features of plugins in this blog.
Installing the required plugin
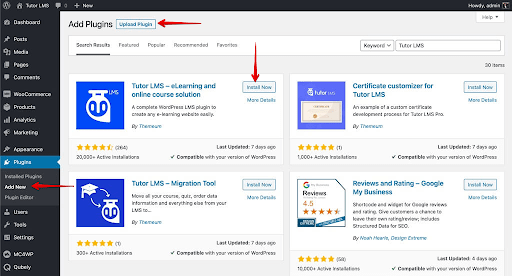
Now that you have decided on the choice of plugin, lets go ahead and start setting it up. To install Tutor LMS navigate first to your WordPress admin panel. From the admin panel go to Plugins > Add new, search for Tutor LMS then install and activate the plugin. In a few seconds, it should be ready to be used.
Beautifying with a theme
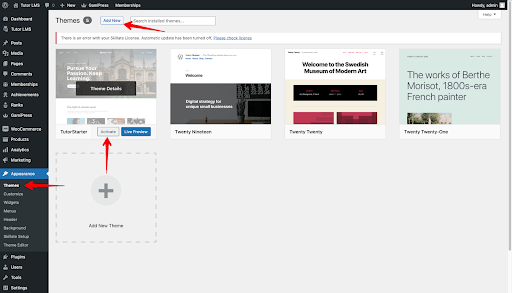
Before heading on to configure our LMS plugin, you must first decide on a theme for your site. The Tutor Starter theme not only is free, but it also was made to be integrated with the LMS plugin – Tutor LMS. This makes life a whole lot easier. To install Tutor Starter from the WordPress admin panel we find the Appearance tab. From there we click on Add new and search for “Tutor Starter”. Go ahead and hit install and activate.
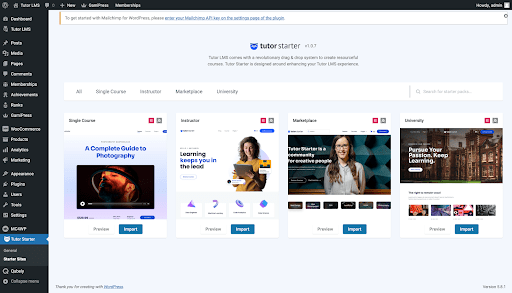
You need to add one more plugin before you can start utilizing Tutor Starter properly. In the same way you installed the other plugins, you need to navigate to ‘Add a new plugin’ and search for TutorMate. TutorMate is a companion demo importer plugin for the Tutor Starter theme. After finding it from Plugins > Add new, click to install and activate it.
You are now geared up and ready to go. Next, ass a starter pack from Tutor Starter to your WordPress site. From the WordPress admin panel, go to Tutor Starter > Starter sites. Here you can find 4 unique demo starter sites for different types of sites according to what you want to create.
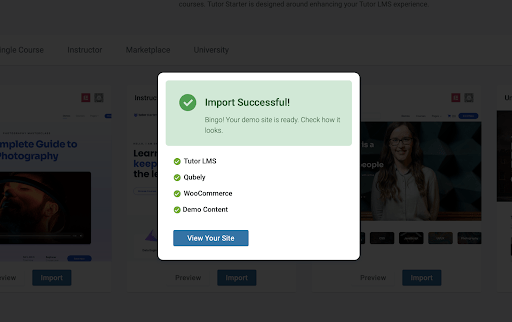
You can preview the site before you choose to import it. When you have decided which site to import simply click the Import button. This will bring up the following popup.

From here you can choose to launch with either the Elementor or Gutenberg page builder. For this blog, we are going to go ahead and run it with Gutenberg. Tutor Starter shows us if we are missing any plugin/add-ons when we try to make this installation. So if you are missing Qubely and WooCommerce, they will be automatically installed and activated.
Once the import is complete you can see the site by clicking “View your site”.
To edit the page, go to the WordPress admin dashboard and select Customize your site. This takes us to the customization page where you can access all the background changes, widgets, and much more.

Configuring the back-end
Next you need to add some content to the site. Here starts your main journey to create content for your LMS site. To set up our courses, navigate to WpAdmin > Tutor LMS > Courses. From the courses menu, we select Add new to add a new course to the site. You are then taken to the main course menu. Here input the course name, add a course description, add a video if needed and any other information. There is also a featured image section that can utilized to let students know what the course is about.
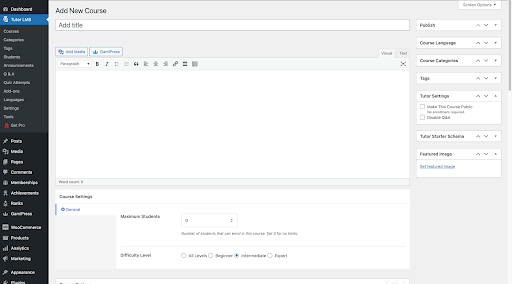
Now comes the most important task to setting up your course – adding topics and quizzes. To add a quiz first you need to create a topic. Scroll down on the course menu to the course builder section where you can find a button that adds a new topic. Once you have added a new topic, you can now add a lesson and/or a quiz to that topic.
Adding a lesson

Clicking the lesson button brings up the pop up that lets you configure the lesson. Add the lesson title, the actual lesson text and the lesson video, should it be required. We can even add attachments to the lesson.
Create the quiz
After you have created a lesson, for evaluation you will also need to add a quiz. Right beside the lesson button, click the Quiz button to show the quiz pop up menu.
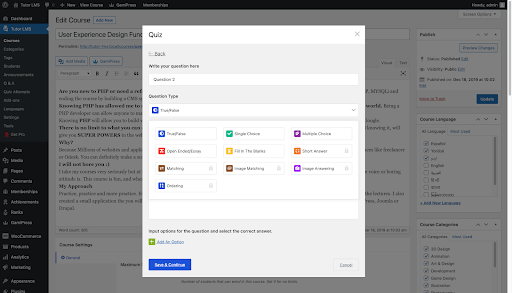
First, add a quiz name and hit Save & Next. The next tab gives the quiz question option where you can configure what type of questions you want to set for students. Next, select the name of the question and access the drop-down Question Type menu that shows all the different types of questions that can be set.
The options on this pop up are easy to navigate and self-explanatory, so setting it up is a breeze regardless of what type of question selected.
How do you monetize your course?
Once you are done with the basic setup of the course, what then comes next? The basic setup is followed by adding payments options to the course in order to generate revenue. To achieve that, you will need to integrate WooCommerce as it is one of the most popular eCommerce solutions. It is very easy to use and integrate and also FREE.
WooCommerce integration and sales
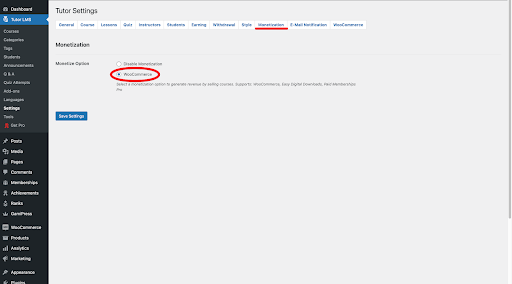
For selling your courses as a product on your LMS site, you need to have a payment system such as WooCommerce added. As previously stated, WooCommerce is automatically installed, so you do not need to separately go through the installation process. To activate WooCommerce on Tutor LMS head to Dashboard > Tutor LMS > Settings > Monetization (Tab) > WooCommerce (Enable).
You have now activated WooCommerce for your LMS site. But how do you link the course to WooCommerce so that it can be paid for? You need to first create a Product to sell through WooCommerce. Go to the WordPress admin panel where you will see a new Product tab. From there, you can add a new product. You can set the name, price and even sale price of the said product.
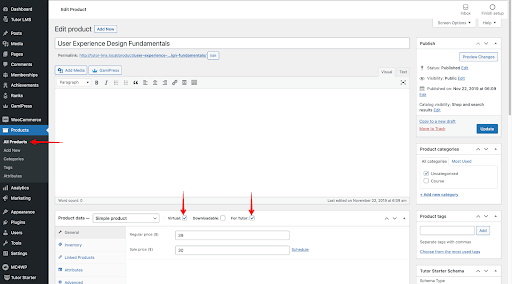
To finalize the monetization process, you must link this product to the course we want to sell. In order to do this, you need to edit the course and scroll down to the Add Product section, where you can find a drop-down menu of the product you created and link it to your course. Make sure to select the paid option and you are all set!

For any other course you want to monetize, just follow these steps and you should have no problems..
Market your courses
The next task is to market your course to potential students, making sure that your product reaches its desired customer.
- Identify your target students
- Advertise your courses efficiently for maximum outreach
- Promote your course as industry-standard material
- Offer sales to increase student
- Get affiliate personnel to promote your material elsewhere
While this is definitely not a comprehensive list, these tips could help you get on track with marketing your course.
Backing up your site
Now you have set up your eLearning site, it is important to remember to back it up using UpdraftPlus. As the world’s leading and most trusted backup plugin, UpdraftPlus can be trusted to keep your site and all the hard work you put into creating it, safe and secure.
Just download the free plugin, or upgrade to UpdraftPlus Premium, for total peace of mind.
Best of luck with your site and if you have any queries, feel free to comment below.
![]()
![]()
![]()