There are many reasons why someone would want to migrate their WordPress website, running from trouble with your hosting company, a name change for your business or a new and better branding approach.
When you are ready to migrate your website, the last thing you want is to lose all the valuable Google ranking work you have done in the process. Losing your Google ranking would undo all the progress you may have made up until that point. The good news is that there are steps you can take to avoid losing your place on search engines due to a website migration – in this article, we will walk you through each of those steps using Updraft Migrator, to ensure you do not lose all the ranking work you have done so far.
It is crucial that you pay close attention to the steps below, as even the slightest mistake when transferring a website can have significant consequences.
Things to note before you begin the site transfer
Turn off any proxies
Before beginning your website migration process, you should turn off all proxies that are between you and your site. Proxies such as Cloudflare, Pmsproxy, Opera Turbo/Off-road mode, GoDaddy’s “Preview DNS” proxy, etc., should be disabled until after the migration is complete.
Ensure you are migrating to equivalent sites
UpdraftPlus migrator tool is designed to migrate between equivalent sites. As such, if you are using a WordPress Multisite Network, then you would need to ensure the source and destination domains are set up as networks.
Disable caching
Turn off all caching and minifying plugins before you begin the migration process as they can be a cause of migration problems.
Setup backup settings
Before using UpdraftPlus for the first time, you may want to visit the settings tab on the UpdraftPlus dashboard. On this tab you can choose your backup schedule, backup location, and what files to include in the backup process.
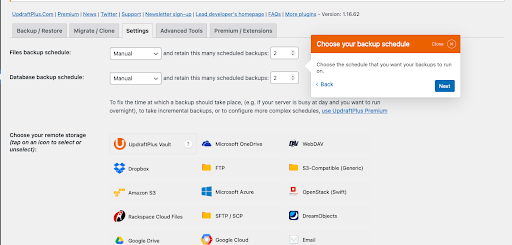
Here you can choose how frequently you want your files or database to be backed up. File backup frequency ranges from hourly to monthly, while database frequency ranges from every 2 hours to monthly. Similarly, you can decide where you want to store your backup files and choose between storing them on your server, offline or third-party cloud services.
How to migrate a WordPress website using UpdraftPlus
WordPress consists of files and database tables; if you move the files, you have moved the site. The following steps describe the processes you can use to transfer these files and database. To use the Migrator tool on UpdraftPlus, you first need to upgrade to the UpdraftPlus Premium package or buy the Updraft Migrator add-on.
Note: for the purpose of this blog, ‘source site’ will refer to your original domain, and ‘destination site’ will refer to the site you are migrating to.
Install UpdraftPlus
To migrate your site, first install the UpdraftPlus Premium WordPress backup plugin on both the source and destination websites. To do this, follow our installation guide and video that will take you through all the necessary steps.
Backup your source domain
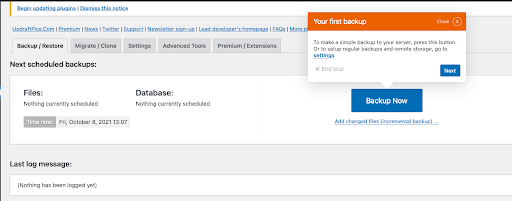
After activating the UpdraftPlus plugin, on the backup/restore tab of the plugin page, click the backup now button to backup the files on your website.
Copy the source website
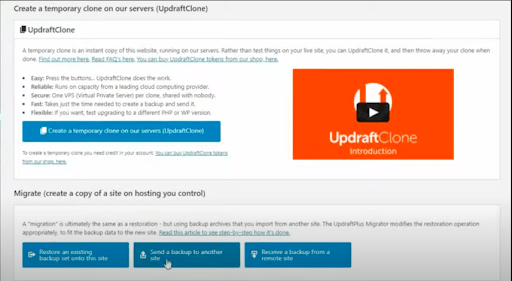
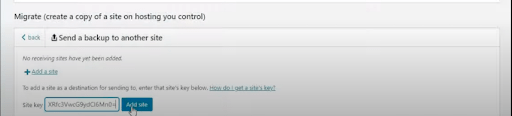
Click on the UpdraftPlus migrate/clone tab to copy the files and database of your source website. Scroll down and click on the “send a backup to another site” option.
Clicking on the “send a backup to another site” button brings up a dialogue box for you to provide a “site key” for the destination website.
Generate site key from the destination site
To get the site key, open the migrate/clone tab of the UpdraftPlus plugin on your destination site, select the “receive a backup from a remote site” option, and click on the “create key” button.
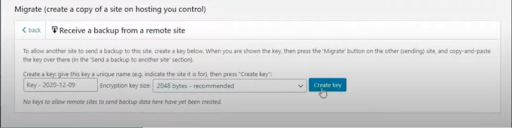
Clicking “create key” will generate a unique code for your destination website. Highlight and copy the code.
Note: you may want to change the key name to something memorable.

Upload site key to the source website
On the source site, click on the “add site” button and a dialogue box will appear for you to add the destination site key. Click in the box to add the site key, and then click on the add site button to the side of the box to add your destination site.
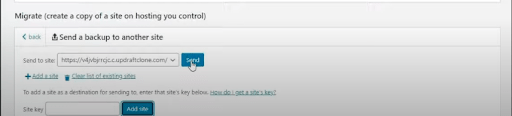
After you add your destination site, click on the send button to send a copy of your primary site.
Ensure you select every aspect of the source website that you intend to copy. You will find options such as themes, plugins, database, etc. To migrate the entire website, be sure to tick all the boxes.
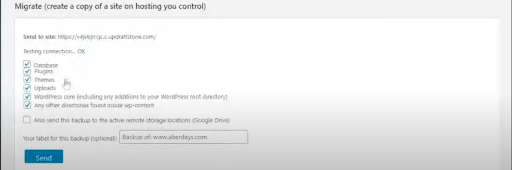
Finally, click on the send button to complete the cloning process.
Restore backup files on your destination site
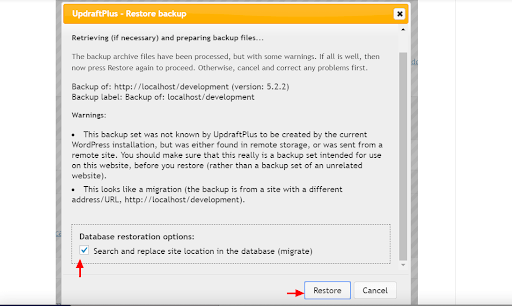
On the backup/restore tab of your UpdraftPlus plugin, you should now find the backup file. Click on restore and select all the check-boxes to complete the website transfer. Remember, for a full site migration you must tick ALL the boxes.
UpdraftPlus provides the option of automatically converting all the URLs to that of the new domain. This can be done by ticking the “Search and Replace site location in the database” option.
Note: To see the changes after moving your website, you would have to log out and log back into your destination site. After this, you can check and see your source site as “cloned successfully.”
How to migrate your domain without losing Google ranking
As you could see in the steps above, it is quick and easy to transfer your site using UpdraftPlus Migrator and can only take a couple of minutes. But believe it or not, that is the easy part.
Being careful enough to ensure there is no long-term negative effect on your search engine rankings and user experience requires extra steps. Here are the things you should do to prevent negative results after a website migration.
Update your website URL
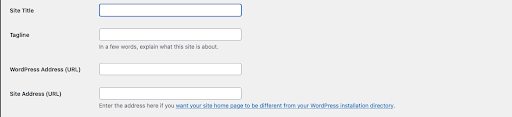
After migrating a website to a different domain, you would need to update the website URL and domain name. If the file transfer is within the same domain, you may not need to worry about that, however it is good practice to check that the URL is correct.
To do this, navigate to WordPress Settings on your site and click on General. Here you can replace the old domain with the new one, or confirm the domain is correct. UpdraftPlus migration also takes care of updating all the links within your destination site, so you do not have to check that internal links are still working properly.
Note: UpdraftPlus takes care of the URL and links, but it is still a good idea to double check.
Use 301 redirects
301 redirect helps to permanently redirect traffic from one website to another. They can be used to transfer over the full ranking power to your new destination address. Applying 301 redirect is crucial to save all the back-links to your previous domain.
When you switch domains, you may still have significant traffic moving to the previous domain. But by using 301 redirect, all that traffic will be redirected to your new site. However, to do this, you have to ensure that you don’t delete the old website.
Update Google search console and Analytics
To save your rankings, it is crucial that you inform Google of the recent changes. This means that you have to inform Google of the website migration from your previous site to your new site by sending a request.
Upon receipt of your request, Google will verify your new domain, and then ask for redirects to help preserve your site authority and exposure. Next, add the new domain as a property on Google Analytics to continue tracking traffic.
Submit sitemap
After updating your new domain on Google search console, you would need to update the sitemap to allow proper indexing of the pages on your new website. Doing this will help your website to be crawled quicker by search engine bots.
Pay attention to the details
Don’t forget, the devil is in the details. Little errors and unchecked boxes can damage your SEO efforts. Remember small issues, such as optimizing the images on your website and ensuring you have double checked basic SEO requirements before submitting your sitemap.
Be sure to track and fix all 404 errors. 404 errors are as a result of deleted or removed pages. Google penalizes websites with too many 404 pages, so you need to make sure any 404 issues are resolved.
Final thoughts
After your website migration is complete, you may want to access the front-end of the destination website to check if everything is working properly. You should open as many pages as possible, make purchases, change options, Submit info on the contact page, click links etc. to make sure everything is working as intended.
Even after following all the steps in this guide, you might notice a slight drop in traffic initially after the website migration. This is because the site’s new posts will be crawled under a new domain name with a low domain authority. However, this should only last a couple of days to a week if you follow the steps closely.
![]()
![]()
![]()