How to use Advanced Custom Fields with WPML
The Advanced Custom Fields and WPML plugins have both proven to be very popular with WordPress users. At the time of publishing this article, the WordPress plugin repository shows 1+ million active installation for the ‘Advanced Custom Fields’ plugin. For such a popular plugin, it’s seems like WPML would make it a priority to provide a compatibility bridge for users – and now they have!
With Advanced Custom Fields (ACF) users can easily add meta box(es) to a post, page, custom post type and even categories. Meta boxes can be incredibly useful when you want to show additional information regarding the resource.
If you are building a multilingual website in WordPress, you obviously want these ACF meta boxes to work efficiently on the translated versions of your post, page, etc. In this article, we show you the steps on how to configure and use ACF with WPML, as using both plugins together makes for a great experience as it integrates with the website seamlessly.
Installation
Section titled InstallationOnce you have decided on building a multilingual website with ACF, grab a copy of the following plugins and install (but don’t activate) them on your WordPress dashboard.
- Advanced Custom Fields
- WPML
- Advanced Custom Fields Multilingual
The ‘Advanced Custom Fields Multilingual’ plugin can be found in the download section of your WPML account page. After you have installed all 3 plugins, activate the ACF and WPML plugins. Keep the ACF Multilingual plugin deactivated as you will need to complete setting up WPML first.
WPML setup on the WordPress dashboard
Section titled WPML setup on the WordPress dashboardAfter activating the WPML plugin you will see a notice on top of the page that asks you to ‘Configure WPML’.

Press this button and it will redirect you to the WPML setup page. Here you will find the default option is set to the language you selected at the time of WordPress installation.
For this example, it is set to ‘English’.

Press ‘Next’ once done.
Select your language
Section titled Select your languageIn step 2, you can select your secondary language. A user can select more than one option if they intend to display their website in multiple languages. For this example, let’s say you just wanted French as a secondary language. You would tick that option from the list and press ‘Next’.
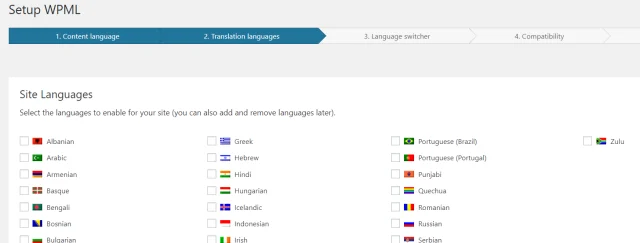
For the third step, select the default setting and press ‘Next’.
Complete the fourth step as per the plugin instruction.
For the final step, add your WPML registration key and press the ‘Register’ button to finish the setup.
After finishing the setup, you will be redirected to the WPML setting page. Scroll down to the ‘Language URL format’ section and choose the URL format you want.

Now go to your plugin page and activate the ‘Advanced Custom Fields Multilingual’ plugin. This plugin does not have any settings to configure and should work quietly in the background.
Advanced Custom Fields with WPML
Section titled Advanced Custom Fields with WPMLWhen using Advanced Custom Fields (ACF) with WPML, you will want to show the same ACF meta boxes for both the primary and secondary languages. By doing this, it ensures a consistent functionality for both the backend and frontend. To do this, you just need to put translated content in the secondary language.
We will create a meta box for the primary language (English for this example), which causes the meta box to appear on the assigned page.
After translating this page in our secondary language, the same meta box should now appear on the translated version of our page.
Let’s take a look at this whole process in action
Section titled Let’s take a look at this whole process in actionFirst, create a page called ‘About Us’ and publish this page.
Next, head over to the ‘Custom Fields’ menu and add one meta box for the ‘About Us’ page.
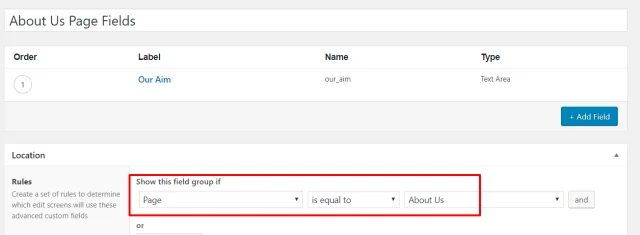
Now go to the edit screen of the ‘About Us’ page, where this meta box should appear. Add some content in the ‘Our Aim’ field.
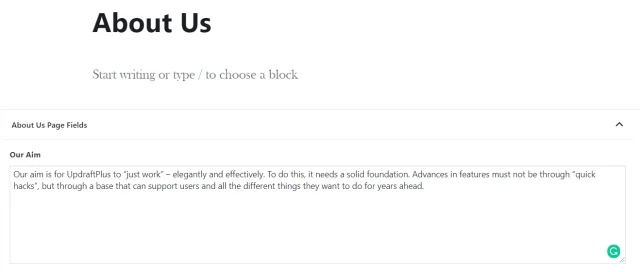
Next, you need to create the French version of this page. To do this press the ‘+’ icon under the ‘Translate’ column. This box is on right side of your edit screen.
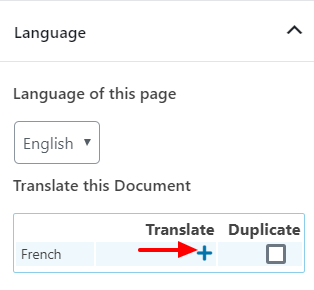
You will now be redirected to the new page. Add the page title ‘About Us’ in French and publish the page. Reload the page and you should see your ACF meta box and also see original content of your primary language in textual format. You can now add a French translation for this content.
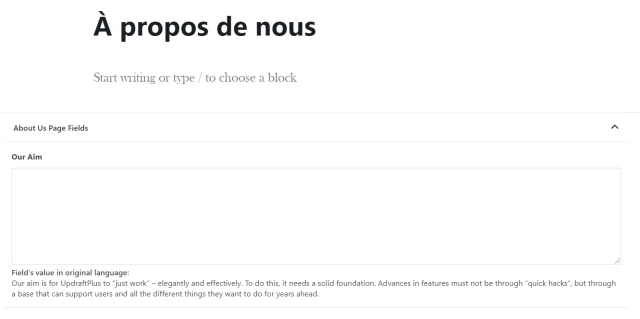
That’s it! You are now all set with the Advanced Custom Fields setup, with WPML functionality.
If you have any comments or questions, we would like to hear your thoughts in the comment section below.
About the author

TeamUpdraft
Our team consists of WordPress developers, marketers, and industry experts committed to providing you with the resources and skills you need to succeed online. Whether you’re just starting out or seeking advanced strategies, we’re here to enhance your WordPress journey and support you at every stage.
Categories
TeamUpdraft
We’re the team behind some of the WordPress community’s most loved WordPress plugins.
Developers, designers and website owners trust us to back up, migrate, optimize and secure more than 5 million WordPress websites worldwide.
More stories
-

Best WordPress cache plugins to speed up your site
Looking for the best WordPress cache plugin? We’ve done the hard work for you by testing the top five contenders to help you choose the right one for your site.
-

Fix these 4 WordPress caching mistakes to speed up your site
These 4 common caching mistakes could be the reason. From missed preload settings to bloated images and database clutter, we break down what’s going wrong – and how WP-Optimize helps you fix it with just a few clicks.
-

Top levers to pull to secure your WordPress website
WordPress security is spiraling, with 2025 on track to smash all previous records for vulnerabilities. But protecting your site doesn’t need to be complicated – or expensive. This guide shows you the highest-impact, lowest-effort ways to lock down your WordPress site before it’s too late.
-

7 reasons why your WordPress site is slow (and how to fix them)
Is your WordPress site slow? Uncover seven typical reasons behind slow load times and learn how to fix them quickly.
