By backing up your WooCommerce database, you are safeguarding critical store data. This includes product specifics, order details, customer information, and store configurations.
Think of those backups as recovery points in case of any breach or system failure. They’ll help you restore your operations and maintain business continuity.
That said, there are two approaches to backing up a WooCommerce database. You could either export the data manually or automate the entire procedure.
Manual backups involve hands-on file management using tools like phpMyAdmin. You get to visualise your database structure and decide which components to save.
Automatic backups, on the other hand, are non-technical and consistent. You could set them up through a WordPress plugin or managed hosting service. Once you’re done, the backups proceed to run by themselves at regular intervals.
This guide covers both manual and automatic backups in detail. It breaks down all their methods, requirements, pros and cons. So, read on to learn what, where, when, and how to back up your WooCommerce database.
Table of contents
How to manually back up your WooCommerce database
Requirements for manual WooCommerce backups
Steps to manually back up your WooCommerce database
How to create automatic WooCommerce database backups
Requirements for automating WooCommerce database backups
Steps to automatically back up your WooCommerce database
Using a backup plugin
Using a managed hosting service
Conclusion
FAQs
How to manually back up your WooCommerce database
The manual backup process happens in web hosting control panels like cPanel or Plesk. You just need to access their database management tools and then use them to export the data. They allow for the targeted preservation of database tables.
Keep in mind that manual WooCommerce backups don’t depend on plugins. So, you won’t have to worry about installing or paying for them.
On the flip side, however, manual database backups are both tedious and time-consuming. They must be done regularly, and each instance requires significant physical effort. Any missed instance could result in data inconsistencies.
These complexities extend even to the restoration process. Recovering manual backups is slower and more labour intensive compared to automatic backups. That, of course, makes them less reliable for business continuity.
Requirements for manual WooCommerce backups
To back up your WooCommerce database manually, you’ll need the following:
- A server management platform such as cPanel or Plesk.
- Access credentials including the database name, username, and password. These are located in the WordPress configuration file, ‘wp-config.php’
- A database management tool like phpMyAdmin.
- Sufficient storage space on your computer. For added security and redundancy, consider copying to cloud storage solutions.
Steps to manually back up your WooCommerce database
Step 1: Access phpMyAdmin
- Log into your hosting provider’s admin area and open their control panel. Most of them prefer to use the cPanel.
- Within the cPanel, proceed to the ‘Databases’ section. You might find it under ‘Database Tools’ or a similar category.
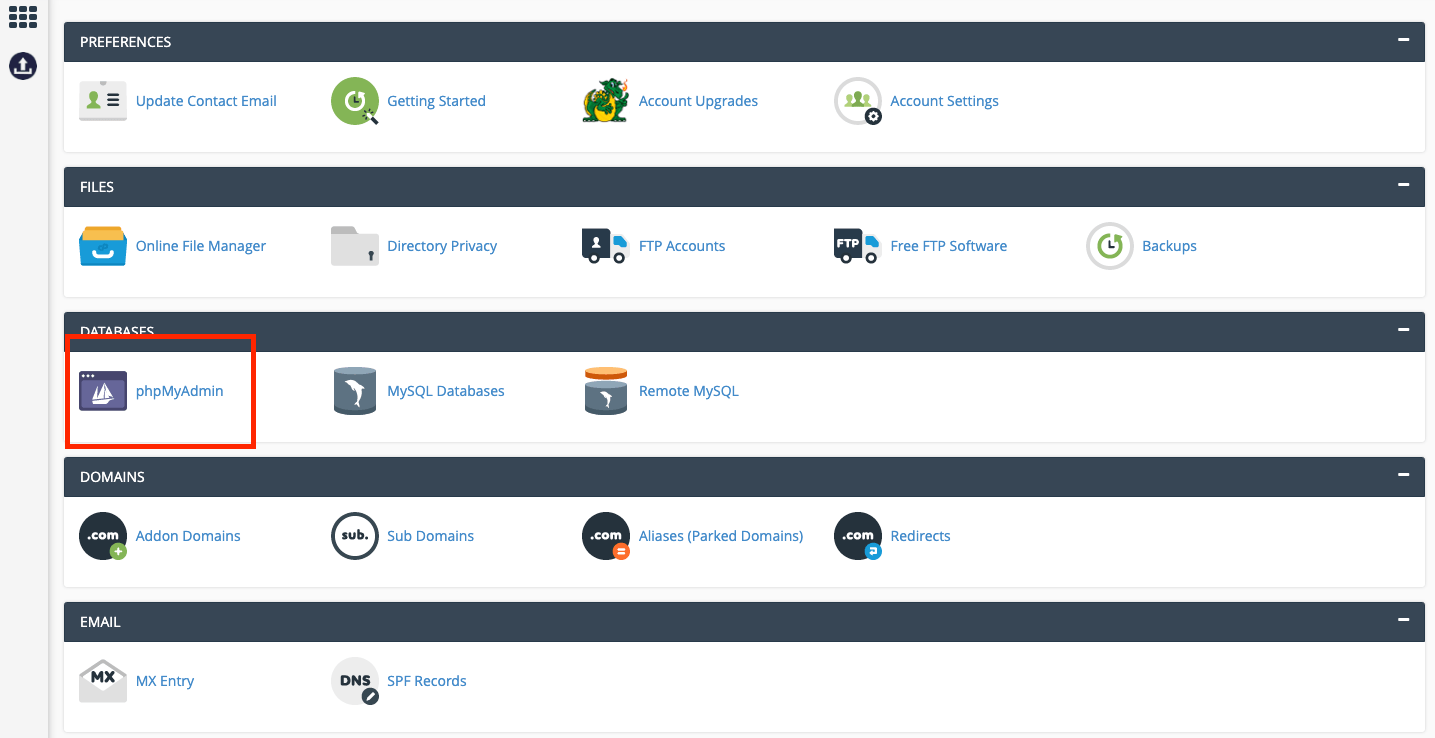
- Look for the ‘phpMyAdmin’ icon and click on it. The system will open the phpMyAdmin interface in a new tab or window.
Step 2: Select your WooCommerce database
- On the phpMyAdmin interface, you’ll see a list of databases on the left side of the screen.
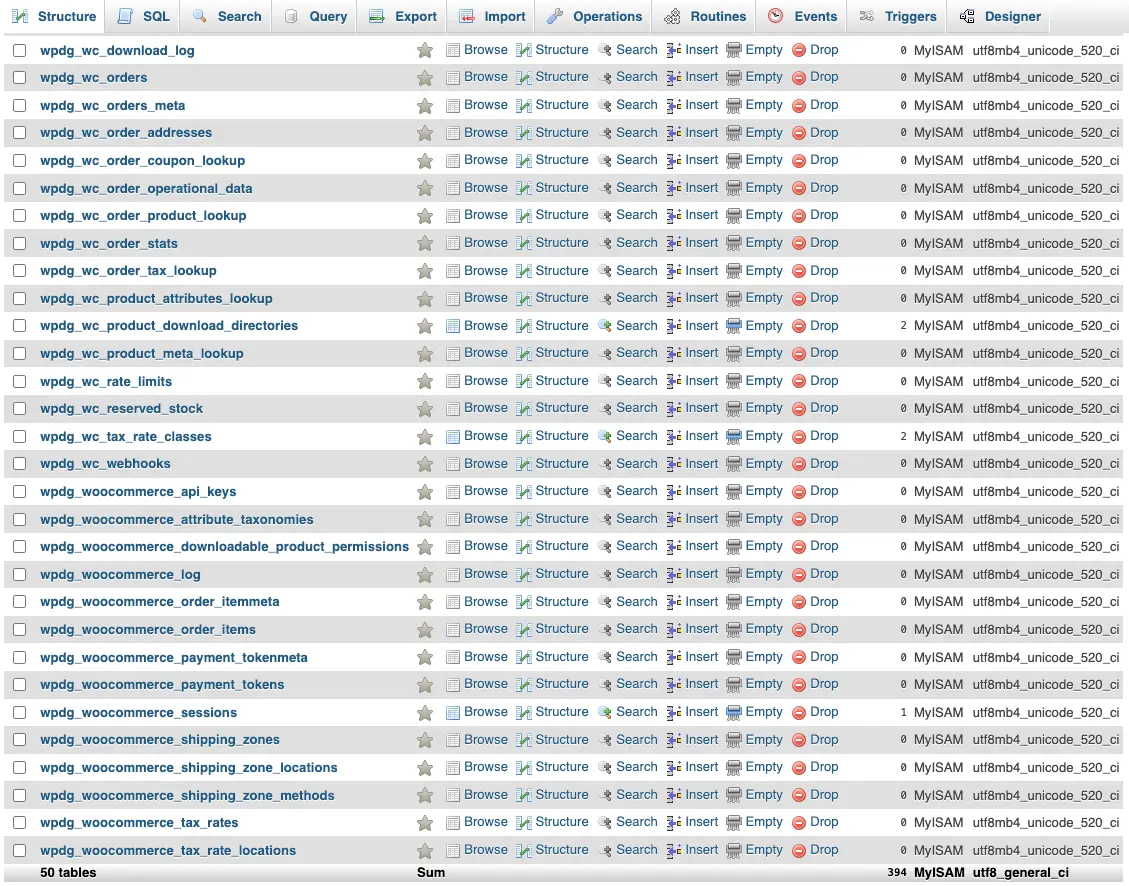
- If you have one database for your website, it will probably be named after your domain or username.
- This formula doesn’t apply to everyone, though. If your database was set up using your host’s WordPress installer, it might have a custom prefix other than ‘wp_’. They sometimes randomise names for security purposes.
- If you’re unsure about which database to choose, consult your hosting documentation or ask your WordPress host for help.
Step 3: Select the tables
- Click on your chosen database to display its tables. They contain different segments of your WooCommerce data.
- For instance, product information is in the ‘wp_posts’ and ‘wp_postmeta’ tables of your WordPress database. ‘wp_posts’ tables hold product titles, descriptions and publication statuses. Then ‘wp_postmeta’ stores your product metadata.
Step 4: Configure your export method
- Go to the ‘Export’ tab in phpMyAdmin.
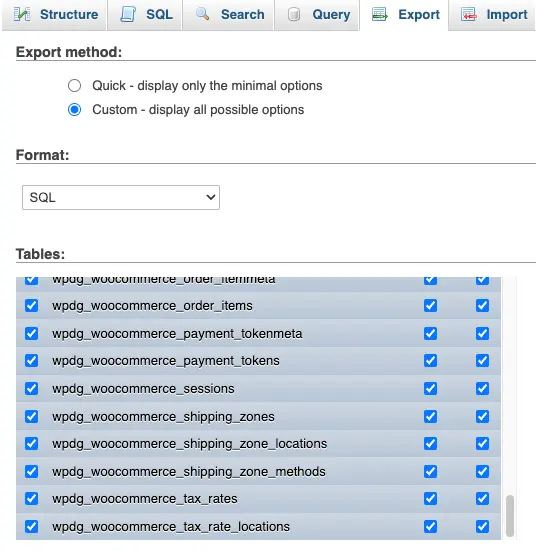
- By default, all tables in the selected database are highlighted for export. So, for a complete backup, you might want to keep the option unchanged.
- If you understand your entire database structure, you can unselect the ‘Select all’ default option. The system will then leave you to confirm your selections.
Step 5: Choose the database export format
- Under the same ‘Export’ tab, proceed to the ‘Format’ and ‘Output’ sections. They provide options for defining your WooCommerce database backup format.
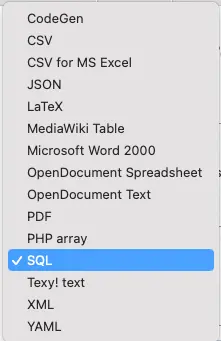
- You can pick ‘SQL’ to get a text-based file compatible with future database restorations.
Step 6: Initiate export of your WooCommerce database
- Click the ‘Go’ button at the bottom of the export setup.
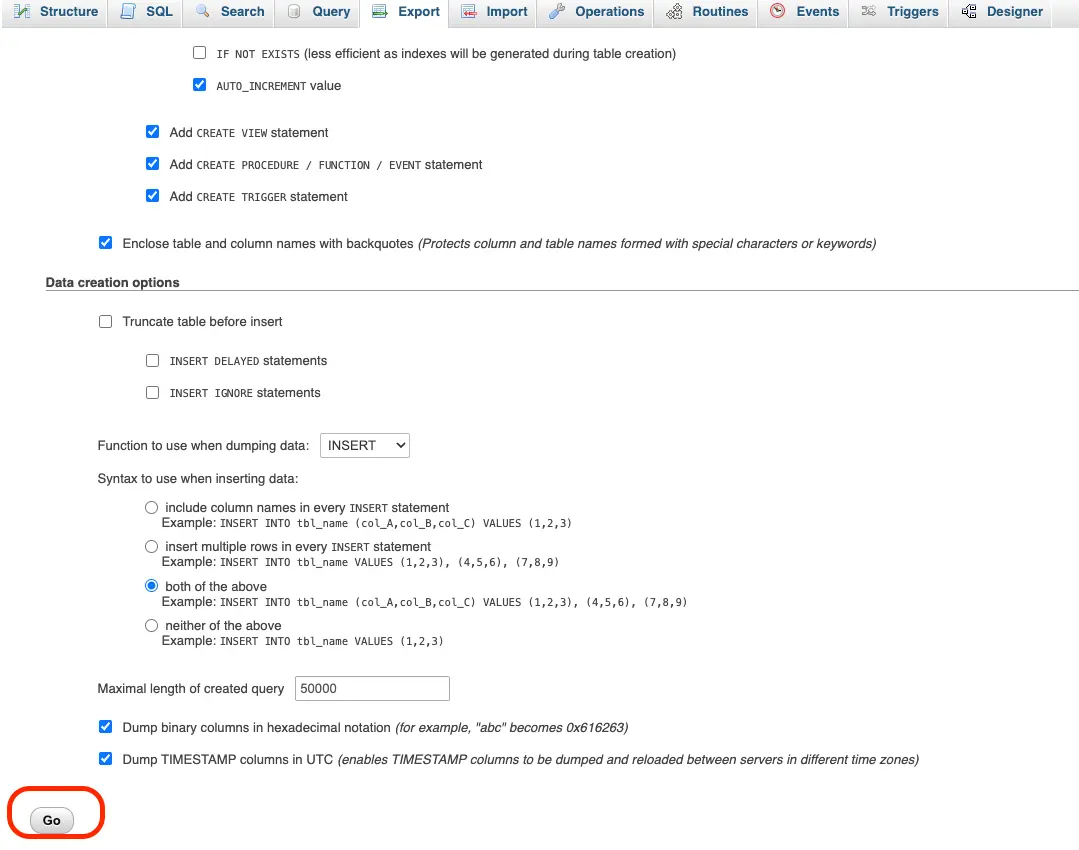
- phpMyAdmin will start creating the database backup file. This might take some time depending on the size of your database.
Step 7: Download the backup file
- Once phpMyAdmin completes the export, a download prompt will appear.
- Go ahead and save the ‘.sql’ file to your computer.
Step 8: Set the backup destination for your WooCommerce database
- Save the downloaded backup file in a safe location on your computer. For added security, consider storing a copy on a separate external drive or cloud storage service.
How to create automatic WooCommerce database backups
Automatic WooCommere backups provide convenience and consistency without the need for manual intervention. They are ideal for stores with frequent transactions, regular updates, or large databases.
Unlike manual backups, automated systems can capture database changes accurately and in real time. You can schedule the backups to run weekly, daily, or hourly based on your disaster recovery plan.
The storage process itself is often incremental, meaning it only captures changes made since the last backup. This allows for more efficient usage of space and bandwidth.
Back up incremental changes made since the last full backup, and schedule backups to run every 2, 4, 8 or 12 hours, daily, weekly, fortnightly or monthly.
Automated backups are also known to scale seamlessly as your business grows. You can, for instance, bump up your bandwidth according to changes in demand. Some providers offer additional features to enhance your backup strategy. Examples include data encryption tools and integration with cloud storage services, etc.
Requirements for automating WooCommerce database backups
When choosing a plugin, make sure it is compatible with your WordPress and WooCommerce versions to prevent conflicts. Also, check for these storage options for your database backups in the plugin:
- Cloud storage services – like Google Drive, Dropbox, or Amazon S3 – are the most popular because of their reliability and scalability. They however come at an extra cost based on the size and frequency of your backups.
- You could otherwise build yourself a self-managed remote server. It offers more control over your backups but requires advanced technical knowledge.
- Some WordPress plugins additionally allow you to store backups on the same server as your website. This practice is not recommended, though – due to the risk it poses if the server fails.
To find the best provider for your WooCommerce database backups, you should evaluate your options based on the following:
- The frequency of automatic backups.
- Data storage locations.
- The number of backed-up copies.
- The backup retention period.
- The level of technical support provided.
- The backup management features
- Security audit history.
Steps to automatically back up your WooCommerce database
Unfortunately, there is no standard procedure for configuring automatic WooCommerce database backups. Each service provider has its own control panel and backup management system.
Nevertheless, here are general guidelines for setting up both plugin-based and managed backups:
Using a backup plugin
Step 1: Register with a third-party storage service
For starters, determine where your WooCommerce database backups will be stored. If opting for a cloud storage service, register an account and purchase sufficient space for your backup copies.
Step 2: Plugin installation and activation
- Go to the ‘Plugins’ section in your WordPress admin panel.
- Click ‘Add New’.

- Search for a WordPress backup plugin
- Install the plugin and activate it.
Step 3: Access the backup settings
- Access the plugin’s Settings page within your WordPress dashboard. Most plugins have embedded the option into their main menu.
Step 4: Schedule backup
- Decide how frequently the plugin should perform WooCommerce database backups. Daily backups are ideal for growing stores, but you may adjust the frequency based on your site’s transaction volume.
Step 5: Select backup components
- Define which elements of your site to back up. Most plugins allow you to choose specific databases and files. So, make sure that you include your WooCommerce database in the backup.
Step 6: Connect to the backup storage destination
- Link the plugin to your selected backup destination. You can do so by providing the necessary credentials or authorisation tokens.
Step 7: Set retention policies
- Choose the number of backup copies to keep and for how long. Going overboard might increase your storage costs, while capping it too low could leave you without a recent restore point.
The world’s preferred WordPress and WooCommerce backup plugin
Choose which files and databases to back up with UpdraftPlus Premium. Back up to remote storage locations like Google Drive and Microsoft OneDrive, and set advanced retention rules.
Using a managed hosting service
Step 1: Open the web hosting dashboard
- Log into your hosting control panel, where you get all the tools and features for managing your WordPress site and server.
Step 2: Launch site backup settings
- Proceed to the backup settings area of the control panel.
- The location of the backup settings varies by hosting provider. But, it’s typically under sections labeled ‘Site Management’, ‘Backups’, or ‘Server Management’.
Step 3: Verify the state of your automatic backups
- Check the settings to confirm the hosting service is actively backing up your WooCommerce database. Some providers run automatic backups by default. Others may need manual activation.
- You should also seek information on the site components included in the backups. Your managed WordPress hosting provider may choose to back up the entire WooCommerce store.
- Remember to review even the backup storage location. You wouldn’t want your database copies held on a local server. They should, instead, go to a secure offsite data center. It might also help to distribute copies across different locations for redundancy.
Step 4: Configure automatic backup settings
If your hosting plan allows customization of backup settings, consider:
- Adjusting the backup schedule based on your site’s transaction volume and frequency. You can set them to run daily, weekly, or monthly.
- Defining the backup retention period and the number of copies.
Step 4: Test the restoration process
Don’t wait until disaster strikes to confirm the reliability of your hosting provider’s backup strategy. You can run tests every now and then to check if your WooCommerce database backups are complete and functional.
Start by cloning your WooCommerce site into a staging environment. You may then restore past backups on it while monitoring the store’s front-end and back-end.
Conclusion
Now that you’ve understood how to back up your WooCommerce database, the next step is finding a suitable solution to facilitate it all. Take your time when auditing web hosts, WordPress backup plugins, or cloud storage providers.
More specifically, aim for a setup that supports both manual and automatic backups. That way, you get to enjoy the consistency of automated processes and the flexibility of manual WooCommerce backups.
FAQs
Why should I back up my WooCommerce database?
Your WooCommerce store contains valuable data on your products, customers and sales. Database backups act as a safety net to recover this data if it is ever lost or deleted.
They also give you the freedom to try new plugins or configurations, knowing you can revert to a working version if needed.
What’s included in a WooCommerce database backup?
- Product titles, descriptions, images, variations, pricing, inventory levels, and categories.
- Order items, quantities, payments, status, and notes).
- Customer names, contact details, billing/shipping addresses and order history.
- Store configurations, tax rates, shipping options and payment gateways
What are the different ways to back up my WooCommerce database?
There are two primary methods of backing up your WooCommerce database – manual and automatic.
In the manual process, you go to your web host’s control panel and open their file management interface. Here, you can select the various WooCommerce files and then export them to your local PC for backing up.
The alternative is using a WordPress plugin or managed hosting service to automate the backup process.
How often should I back up my WooCommerce database?
Back up your WooCommerce database based on the activity level of your store. If it’s busy with a high transaction volume, back up daily or in real-time. For smaller stores with lower activity, consider weekly or bi-weekly backups.
Don’t restrict yourself, though. You can adjust the backup schedule according to changes in traffic and sales.
Where should I store my WooCommerce website backups?
The cloud is the most recommended since it provides off-site storage and global accessibility. This is especially useful for businesses with remote teams or multiple locations.
Cloud backup solutions are also cost-effective for all user categories. They come with storage plans that can be scaled as needed.
How long should I retain my WooCommerce database backups?
The best retention period for your data depends on how often it’s updated, the volume of transactions, and industry rules. A good rule of thumb is to determine how much historical data you need to recover in case of a disaster.
For small stores, two to four weeks is adequate. Growing businesses, on the other hand, may need about three to six months of retention.
