‘Let’s make it live in the staging environment first.’
As a developer, you may have heard this a lot; and if not – trust me, you will hear this a lot going forward.
So, what exactly is a staging server?
If you want to add new functionality or change a specific behavior of an existing live website, you need to first test it on a staging server. It’s like a test environment – where you can experiment without any risks – If everything works fine, then you are free to make the same changes on your production server in the knowledge that it will not have any kind of negative impact on your live site.
A staging server is a test server used to test a website in a ‘production-similar’ environment. This server is a completely safe way to add/change flow for your website, as since it’s just a testing server, it doesn’t matter if it reports any errors or the site completely crashes due to the changes you made. You can figure out where you went wrong, fix the errors and create a stable version of your site.
By using UpdraftClone, you can create a clone of your WordPress website instantly and from within the UpdraftPlus settings. But before choosing UpdraftClone, we will explain briefly why all WordPress site developers and owners should pick this option.
Why Choose UpdraftClone?
To run a staging site, you will require a separate server. In order to do this, you will first need to buy a website hosting package. The charges of website hosting vary depending on the type of host environment you decide to go with. Usually there are 4 types of hosting – Shared hosting, dedicated hosting, VPS hosting and managed WordPress hosting.
Shared hosting: On shared hosting, multiple websites are hosted together on a single physical web-server. The server resources are then shared among all hosted websites.
Dedicated hosting: A physical web server that is dedicated to a single website.
VPS hosting: Virtual private server(VPS) hosting copy dedicated server environments within a shared server. This option is quite popular as it is cheaper than dedicated hosting and provides better performance, reliability and security than shared hosting.
Managed WordPress hosting: This option provides powerful technological options for your WordPress site. This hosting option takes care of the backups, security checks, updating WordPress and much more.
You can purchase any one of the above hosting services to set up a staging site. Once you have a hosting server, you would then need to set the same environment as your live site server. By doing this, it ensures your site will not have any problem once your changes on the staging server are moved to the live server.
Upon setting up your ideal staging server environment, you will have to perform the following steps which will set up the staging version of your site. This will require a fair degree of technical knowledge to achieve.
- Download files and database from the production server.
- Upload files and database on the staging server.
- Run a search/replace in the database matching your staging URL. You will need to replace all occurrences of live URL with a staging URL.
Note: To simplify this migration process, you can use the UpdraftMigrator. This option enables this process in a matter of minutes and is completed within the UpdraftPlus settings.
Even if you only need the hosting server for a day or two, you will usually have to pay a yearly fee at a minimum. For example, it is possible that you could complete all the changes you want to make to your test site in 2 or 3 days. However, you will have to pay for a whole year’s worth of hosting.
Instead of wasting lots of money on paying hosting fees that you will not use, you can use UpdraftClone instead for just the time frame you need it for. This can save you lots of extra time and money, making the whole process much more user friendly..
UpdraftClone will allow you to create a clone with the same configuration as the original site. You don’t need any advanced coding or technical knowledge to configure the staging site as it is all taken care of. UpdraftClone also uses a cloud-based VPS server, which is more reliable and efficient than other servers.
How to clone a site using UpdraftClone
UpdraftClone works on a token basis, which can be purchased in our store. You will need 1 token to generate a cloned version of yoursite for 24 hours. For each subsequent week, 1 additional token is required to keep the site live.
To start and set-up your clone, you can purchase 5 tokens for a 1 month package that will only cost users $12. Within this period, you can host your cloned staging site for a month and test/update any new flow/functionality to your website.
The process of cloning your WordPres site using UpdraftClone is straightforward and easy to do – even for those without expert knowledge of WordPress.
Once you have purchased your Clone tokens, login to the WordPress dashboard of your live site. Head over to the Settings >> UpdraftPlus Backups. Under the ‘Migrate/Clone’ tab, click on the ‘UpdraftClone’ button.

You will be presented with a form in which you will need to connect your UpdraftPlus account. You can connect it through your UpdraftPlus.com credentials or by using a UpdraftClone key.
To get an UpdraftClone key, login to UpdraftPlus.com.
Navigate to the My account >> UpdraftClone.
Click on the ‘Create keys’ button under the ‘UpdraftClone key management’.

Next, click on the ‘Show existing keys’ button and you will see a couple of keys created. You can use a single key to start cloning your site.
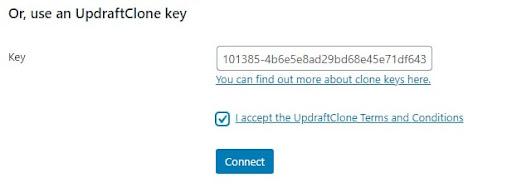
You can choose either option – UpdraftPlus credentials or UpdraftClone key – Just click on the ‘Connect’ button when ready.
On the next screen, all the default settings will display, much like the screenshot below. It also shows you the current running version of PHP and WordPress on the cloned site.
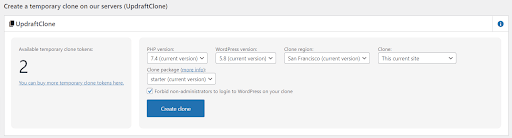
These should be the same settings your live site is using. As such, you should get an exact production-ready environment for your cloned site. Press the ‘Create clone’ button and let UpdraftClone carry out the process of cloning your site on the staging server.
UpdraftClone will show you the cloning progress on the same screen as it may take a couple of minutes to fully clone your site, depending on the size of all the images, plugins, content etc. During the process, you will be presented with the staging URL of the clone version. Your admin and password details will then be sent to you via your UpdraftPlus registered email. This is the URL you can use to work when carrying out changes and updates – risk free.

How to make changes on a cloned site?
Once your website is cloned on a VPS server, you will obviously want to make changes to it. For that, you need access to the filesystem and most probably database. You can get access to these options from your ‘My Account’ on UpdraftPlus.com.
Go to the My account >> UpdraftClone page. Here you will get a list of your clone sites. Click on ‘Manage’ next to the clone you just created.

On the next screen, you will see the options like Database Login, SSH access, SFTP access, etc. In order to update a website flow, you will be required to have filesystem access. Click on the ‘Show SFTP access credentials’.
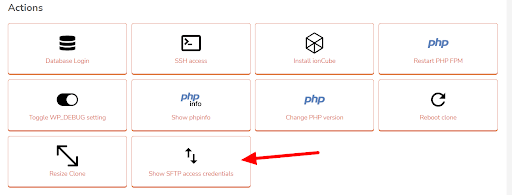
This will present you with the SFTP credentials of your cloned site. Using these credentials, you can connect to the staging site through FTP client and modify the files as per your requirements.
Using the same method, you can enter the database by clicking on the ‘Database Login’ box.
That’s it! You can now test the new changes on your cloned staged site. Once you are done with the changes and are happy that everything works to your standards, you will need to move them to the live site. If you want an exact copy of the new cloned staging site on the live one, then you can achieve this by using the UpdraftMigrator plugin. See the following tutorial, which explains how to migrate a site to another server using UpdraftMigrator.
Happy cloning / staging!
![]()
![]()
![]()