Regular backups are essential for every WordPress site, and UpdraftPlus offers an easy and efficient way to manage them. This guide will take you through the backup process step by step, whether you’re using the free or Premium version of UpdraftPlus.

While both versions follow the same core backup process, UpdraftPlus Premium offers extra features like scheduling incremental backups to save storage space and backing up before updates for extra protection.

Curious about what else UpdraftPlus Premium offers? Check out our detailed free vs premium UpdraftPlus comparison.

Now, let’s dive into the backup process.

How to back up with UpdraftPlus free

First, let’s go over how to back up with the free version of UpdraftPlus, which you can download from the WordPress plugin directory.

While it may not have the advanced features of the premium version, it’s still a very convenient and efficient way to start backing up your website. Everything you need to schedule backups and send them to cloud storage is here.

Step 1: Turn on reporting

Before doing anything else, it’s a good idea to enable reporting. This will let you know whether your backups were successful.

To get started, navigate to Settings in your WordPress dashboard and select UpdraftPlus Backups. Then, go to the Settings tab within the plugin.

settings
Scroll down to the Email section and check the box to enable email reporting. Click Save Changes at the bottom. Reports will now be sent to your admin email.
email-reporting
Upgrade to Premium to send reports to multiple email addresses and receive detailed information, including backup contents, backup size, warnings, and cryptographic checksums to verify the integrity of your backups.

Step 2: Choose a backup location

UpdraftPlus supports numerous cloud backup locations so you can store your backups in a safe, off-site location. It’s a good idea to do this. If something happens to your server or hosting provider, your backup is gone too.

If you still want to save backups to your server, you can still do that with UpdraftPlus. To save to a cloud backup location, go to the Settings tab.

Look for Choose your remote storage and tap the icon for the remote storage you want to use. Follow the relevant instructions to connect UpdraftPlus. For instance, if you’re using Dropbox, you’ll need to authenticate your Dropbox account, for FTP, enter your FTP credentials, and so forth. When you’re done, click Save Changes at the bottom.
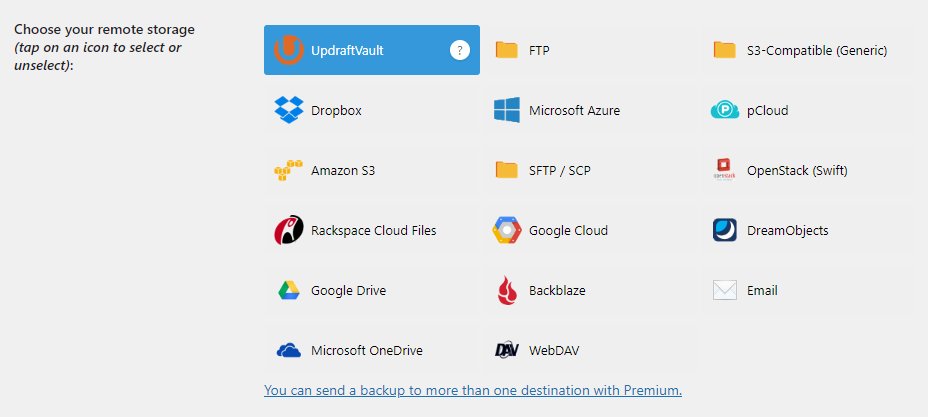
choose-your-remote-storage
UpdraftPlus supports the following backup locations in the free version:

  • UpdraftVault.
  • Dropbox.
  • Amazon S3.
  • Rackspace Cloud Files.
  • Google Drive.
  • FTP.
  • OpenStack (Swift).
  • DreamObjects.
  • S3-Compatible (DigitalOcean
  • Spaces, Linode Object Storage, etc.).
  • Email.
Upgrading to Premium gives you access to these extra storage locations, plus the ability to back up to more than one location:

  • UpdraftVault (1GB of integrated storage is included).
  • Microsoft OneDrive.
  • Microsoft Azure.
  • SFTP/SCP.
  • Google Cloud.
  • Backblaze.
  • WebDAV.
  • pCloud.

Step 3: Schedule your backups

UpdraftPlus lets you schedule backups at regular intervals, so you don’t have to remember to run them manually. It’s a convenient ‘set it and forget it’ solution that ensures your site is always backed up.

From the same Settings tab as before, look for Files backup schedule and Database backup schedule. You can back up the files and database at separate times, which is useful if you don’t want to use too many server resources all at once.

files-backup-schedule-every-2-hrs
In the free version, you can pick from the following scheduling options:

  • Manual backups only.
  • Every 2 hours.
  • Every 4 hours.
  • Every 8 hours.
  • Every 12 hours.
  • Daily.
  • Weekly.
  • Fortnightly.
  • Monthly.
If you need to schedule backups at specific times—like overnight when server resources are more available—or to stagger multiple website backups and reduce server load, consider upgrading to UpdraftPlus Premium.

You can choose how many backups you retain with the free version. UpdraftPlus will delete excess backups so they don’t clutter your server or eat up your cloud storage.

You can also choose which files are included or excluded from backups. Scroll down to the Include in files backup section and untick anything you don’t want to include.
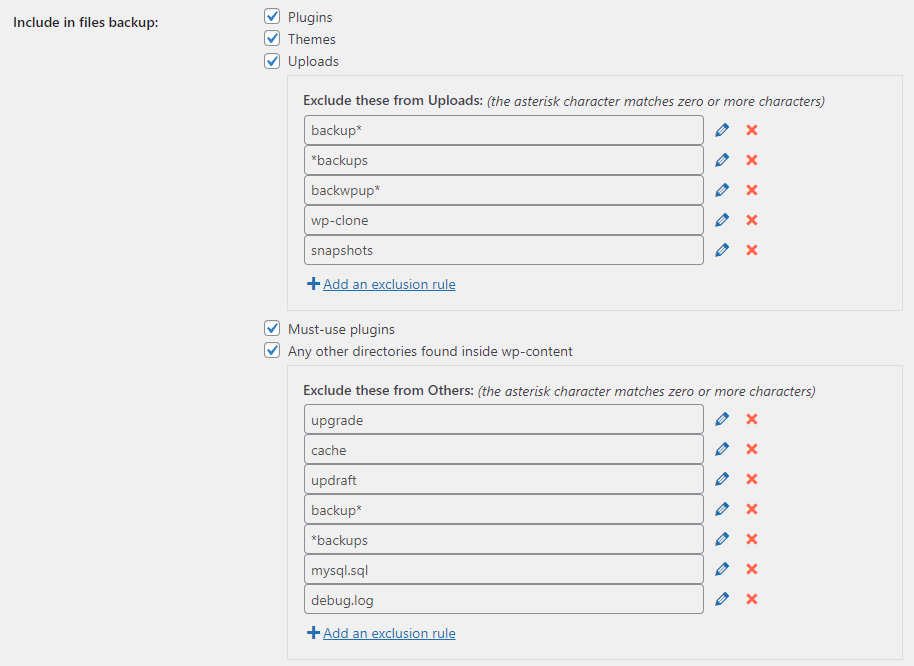
what-to-include-in-files-backup
Hit Save Changes. Now you don’t need to do anything – UpdraftPlus will run on its own in the background.

Step 4: Take a manual backup

Even if you’ve scheduled backups, you might still want to take a manual backup. For example, you might want to back up manually before migrating to a dev site or installing major updates (note: UpdraftPlus Premium automatically backs up before updates).

To manually back up with UpdraftPlus, click the Backup / Restore tab. You’ll see a blue button that says Backup Now; click it.

backup-now-manually
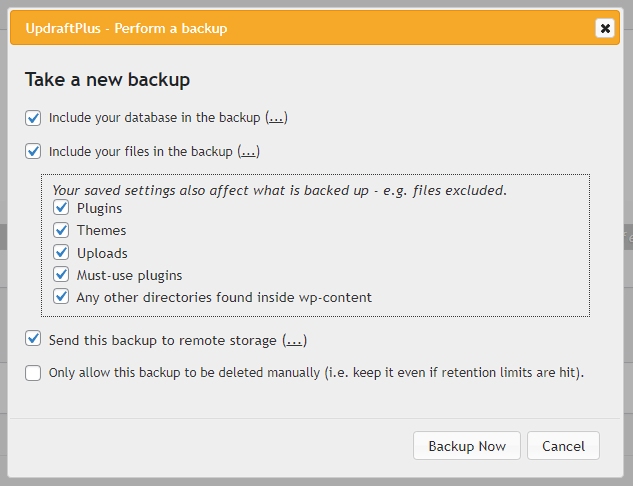
A pop-up will appear. You can choose whether to include your files or database, and which file directories to include. If you want, you can enable or disable sending it to remote storage, or just store the backup on your server. Finally, you can ensure the backup isn’t deleted even once you hit the retention limits you set in the last step.
take-a-new-backup-dialogue-check-all
When you’re finished, click Backup Now and wait for the backup process to complete.

If you want to take incremental backups, you’ll need to upgrade to the premium version.

Step 5: Restore a backup
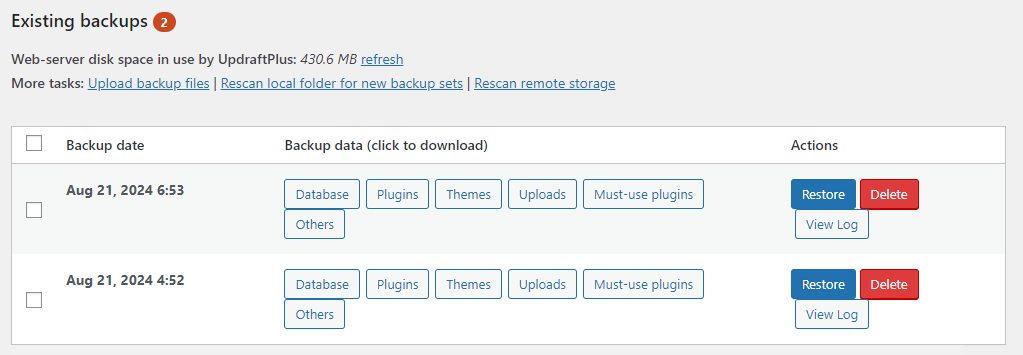
If you ever need to restore a backup, this can be done quickly from the same Backup / Restore tab as before.  Scroll down to the Existing backups section. The backups you’ve taken, whether automatically or manually, will appear here. Just click Restore next to any one of them to revert back.
existing-backup-log
If you instead have a backup stored on your computer, just click Upload backup files and drop the zip file in to restore that way.

Once you click Restore, the restoration wizard will open. You can choose exactly which parts of your website to roll back.
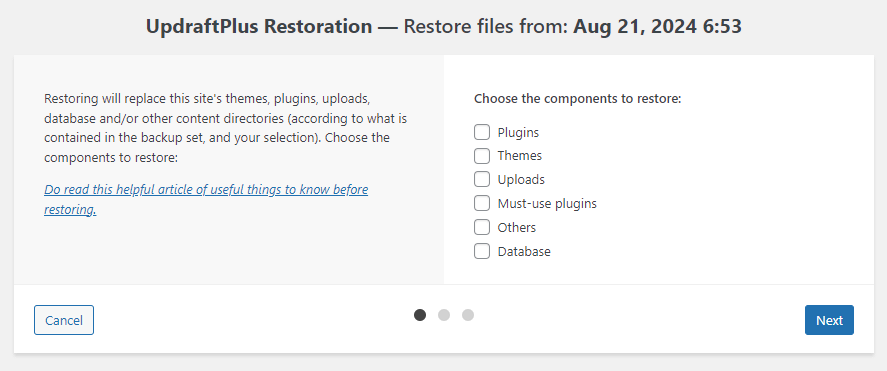
updraft-restoration-settings
With all that, you now know how to take a backup and restore it within the free version of UpdraftPlus.

How to back up with UpdraftPlus Premium

Backing up with UpdraftPlus Premium is very similar to the free version, but there are a bunch of extra features you can take advantage of. If you don’t have it yet, you can purchase UpdraftPlus premium here.

Step 1: Turn on reporting

Just like in the free version, the first step in setting up your backups with UpdraftPlus is to enable reporting.

There’s a lot more information in the report compared to the free version. It will tell you exactly what was included in the backup, the backup size and where it was sent to. Reports even include cryptographic checksums so you can verify the integrity of backups.

Open UpdraftPlus, then click the Settings tab at the top.

settings
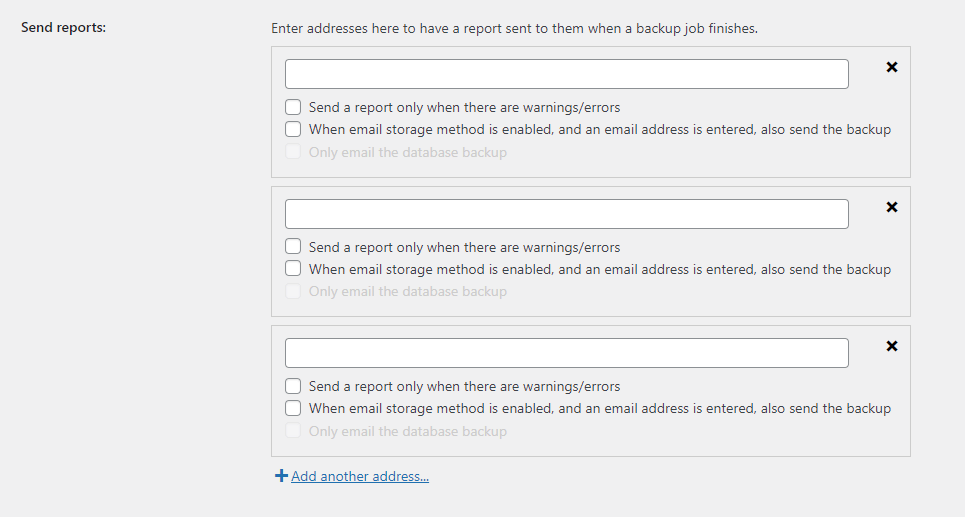
Scroll down to the Send reports section. Here you can send the backup reports to as many email addresses as you like. You can also configure reports so they only send if there are errors. Or, you could attach the backup itself to the report.
send-reports-dialogue
Click Save Changes once you’ve entered the email addresses you’d like to send backup reports and/or backups to.

Step 2: Choose backup locations

Now you need to set your remote storage locations. In the premium version of UpdraftPlus, you can set multiple storage locations, not just one. That way, if you lose access to the backup, if something goes wrong with the cloud provider, or if the backup is deleted through human error, you’ll have another one ready to replace it.

In this same Settings tab, look for the Choose your remote storage option. You’ll see a list of the following options to choose from:

  • UpdraftVault (1GB of free Vault storage included with Premium).
  • Dropbox.
  • Amazon S3.
  • Rackspace Cloud Files.
  • Google Drive.
  • FTP.
  • OpenStack (Swift).
  • DreamObjects.
  • S3-Compatible (DigitalOcean Spaces, Linode Object Storage, etc.).
  • Email.
  • Microsoft OneDrive.
  • Microsoft Azure.
  • SFTP/SCP.
  • Google Cloud.
  • Backblaze.
  • WebDAV.
  • pCloud.

Click on any number of storage options. Several tabs will appear below the remote storage menu, and you can click between them to authenticate each remote storage option.
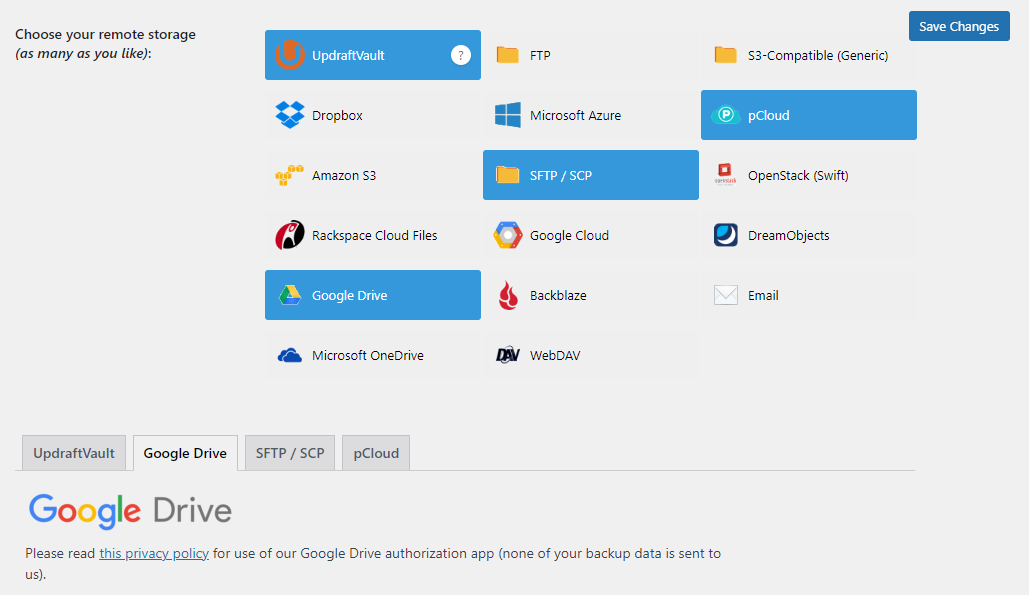
remote-storage-options
When you’ve selected and authenticated all your options, click Save Changes.

Step 3: Schedule your backups

You can schedule backups from the same Settings page. Just look for the sections that read Files backup schedule and Database backup schedule. File and database settings can be modified individually, ensuring a schedule that makes sense for you.
files-backup-schedule
There’s plenty to customise here on this settings page. You can choose a time from when backups will run and then pick a frequency e.g. from midnight and then:

  • Every 2 hours.
  • Every 4 hours.
  • Every 8 hours.
  • Every 12 hours.
  • Daily.
  • Weekly.
  • Fortnightly.
  • Monthly.
Setting exact timing for backups is useful particularly on multisite installations – you can choose separate backup times and significantly spread out the server load.

You can also tell UpdraftPlus to automatically delete backups once they reach a certain age, to save you from having to manually delete them.

Finally, you can also schedule incremental backups. Full backups can take up a lot of space. Incremental backups only back up files that have changed or been uploaded.

Make sure to click Save Changes when you’re done.

Step 4: Include or exclude files
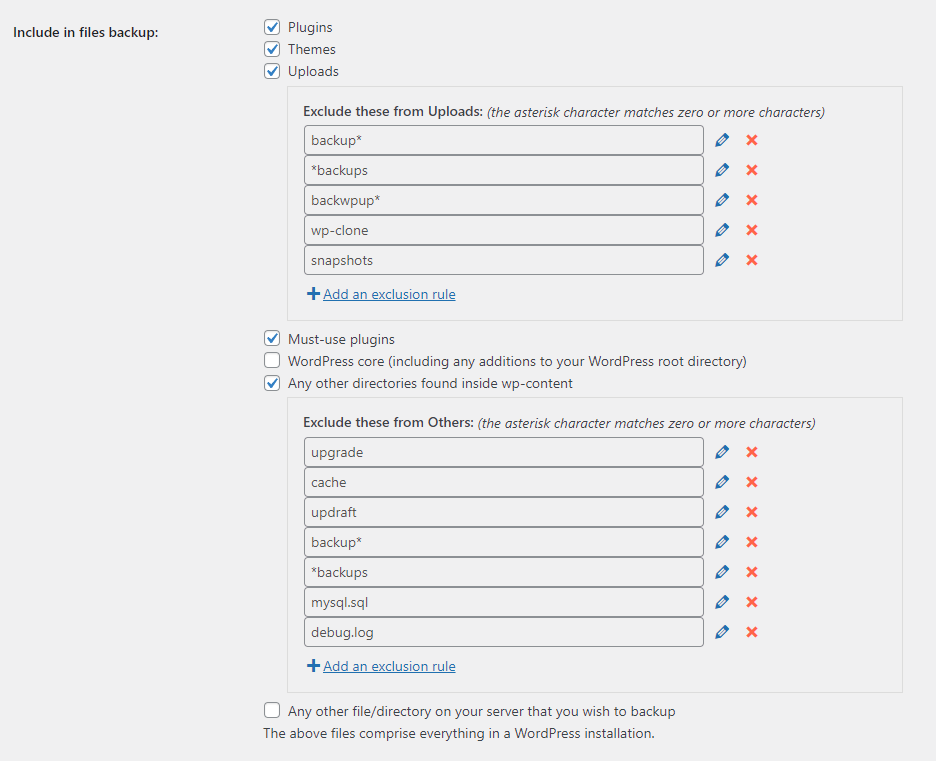
You may need to specifically exclude certain files or directories. You can find this in the Settings tab, scrolling down to the Include in files backup section.
what-to-include-in-files-backup2
While this is available in the free version of UpdraftPlus, a major difference is that you can back up WordPress core files, and also back up any other files also located on your server, not just those within your WordPress install.

Click Save Changes when you’ve finished setting up your custom rules.

Step 5: Take a manual backup

Even if scheduling backups, there are times when a manual backup is necessary. Taking a manual backup is the same as with the free version of UpdraftPlus, but there are a few notable premium features you can take advantage of.

On the Backup / Restore tab, click the blue Backup Now plugin.

database-backup-now
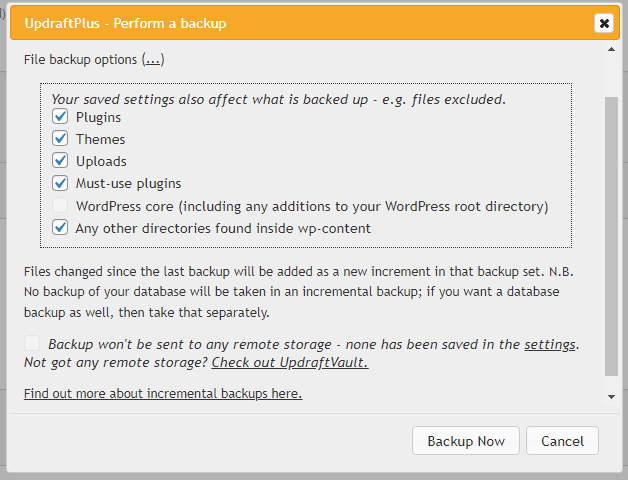
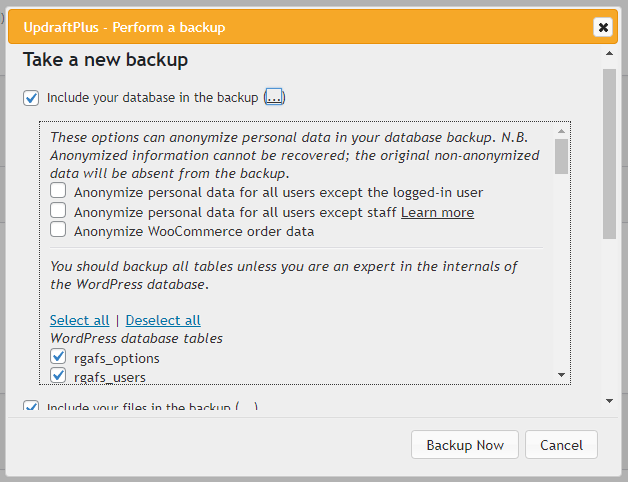
A pop-up will appear, where you can customise exactly what to include in the backup. Click the ellipsis symbol next to each option to select which files and database tables are included.
updraft-plus-perform-a-backup
There’s also an option to anonymise personal, sensitive information in the database.
anonymize-senstive-information-in-backup
Once your backup settings are configured, click Backup Now to start the process.

As a premium user, you can also take a manual backup of incremental changes made (instead of a full site backup) to save on file space. Below the Backup Now button, click Add changed files (incremental backup). A similar pop-up will appear, and you can again customise what is included.
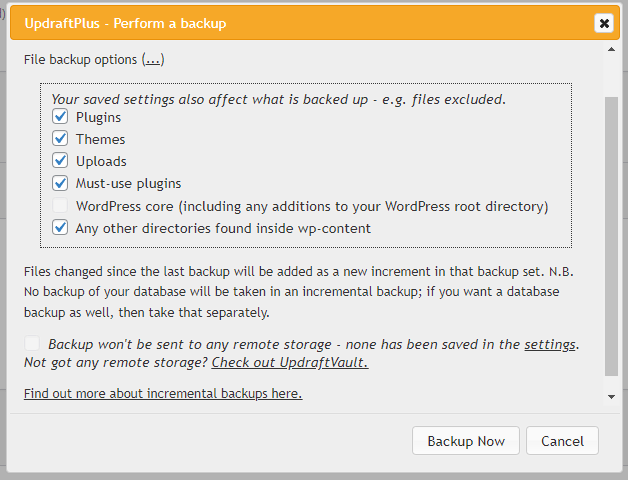
manual-backup-of-incremental-changes

Step 6: Restore a backup

It’s easy to restore a backup with UpdraftPlus. Go to the Backup / Restore tab, then scroll down to the Existing backups section.

Click Restore on the backup you want to revert to. Alternatively, if you’ve downloaded a backup manually, you can click Upload backup files to restore the backup that way.
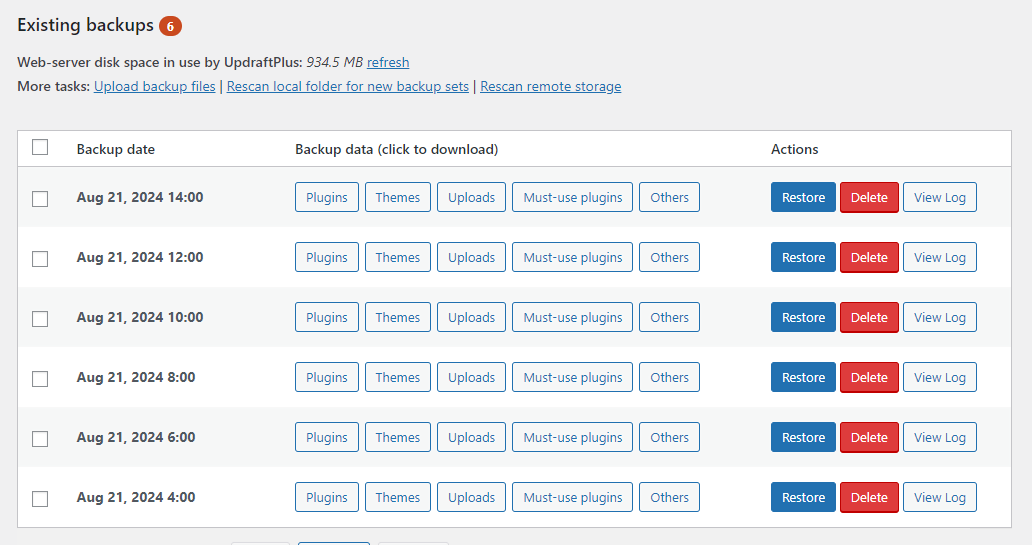
august-backup-log
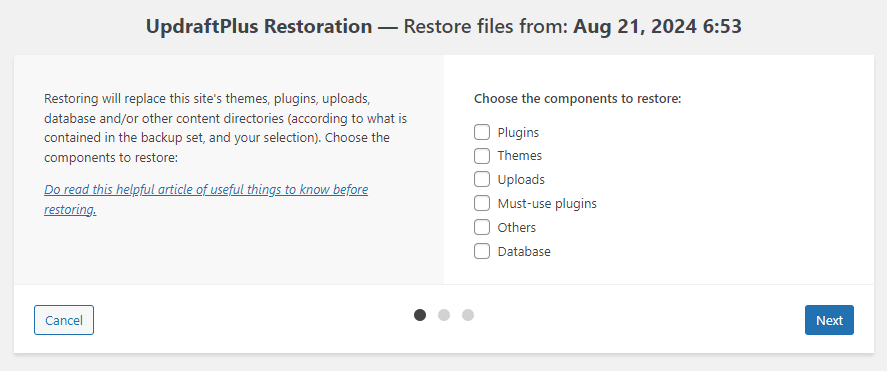
Once you click to restore a file, you’ll be taken to a wizard. You can restore some or all components – for example, you can restore your uploads folder but not your plugins.
restore-files-from-august
And with that, you now know how to use UpdraftPlus Premium to take and restore a backup.

Conclusion

You now know the ins and outs of backing up with UpdraftPlus, both free and premium versions. To learn even more, check out the frequently asked questions or contact support for assistance.

If you’re a free user intrigued by the premium features, consider purchasing UpdraftPlus Premium. Incremental backups, more remote storage locations and granular control over every setting are just some of what the premium version has to offer.

FAQs

How do I schedule backups in UpdraftPlus?
For both free and premium versions, just go to Settings > UpdraftPlus Backups and click the Settings tab. You can then set up scheduled backups for certain intervals, though you have finer control over the exact times with the premium version.
Can I back up my WordPress site to multiple locations using UpdraftPlus?
Yes, UpdraftPlus premium allows you to back up to as many locations as are supported. Just click on each remote storage location you want and authenticate each one.
What is the difference between UpdraftPlus free and premium?
UpdraftPlus premium offers several extra features, including incremental backups, the ability to back up to multiple remote storage locations, advanced retention settings for old backups and customize exactly what files are backed up.
How do I restore a WordPress site using UpdraftPlus?
You can restore an UpdraftPlus backup – or even backups from other plugins – from within the UpdraftPlus interface. Just go to Settings > UpdraftPlus Backups and look for the Existing Backups section. You can click Restore on any backup, or upload ones you took manually.
What are incremental backups?
Incremental backups allow you to back up only the changes made since the last backup. This can very much reduce server load and storage space spent on backups.
How often should I back up my files and/or database?
Ask yourself how often your content is changing and updating. If your site is fairly static, a monthly or fortnightly schedule will work fine. If it’s constantly updating, you may need to back up every few hours. A daily or weekly backup is appropriate for most websites.

twitterlinkedinFacebook