Whether you’re migrating your WordPress site manually or with the help of a migration plugin, you should still perform checks during the entire process.
By performing these essential checks, you can minimize the risks associated with website migration and ensure that your website continues to function optimally, maintaining its visibility, user experience, and security.
In this guide our expert team of developers talk you through a WordPress migration checklist you should complete before, during and after migrating your site.
Follow the links below to jump to specific sections or dive right in:
- What is website migration?
- Why you might need to migrate your WordPress website
- How long does a WordPress site migration take?
- Checklist for a successful WordPress site migration
- What to do before migrating your WordPress site
- What to do during a WordPress migration
- What to check after migrating your WordPress site
- Summary
What is website migration?
Website migration is the process of relocating a website from one hosting platform to another. This means moving all your website’s files and databases to a new server. It’s something you might consider if your business is growing, your current hosting plan is limited in resources, or if your website is experiencing slow loading times and frequent downtime.
Changing hosts can be necessary to accommodate increased traffic and improve performance. However, it’s a complex process that needs to be done correctly to avoid losing content and your rankings in search engine results.
Website migration involves making significant changes to your website’s technology, structure, design, or even its location to enhance its online visibility. It’s not a decision to be taken lightly, as it can be quite challenging.
Why you might need to migrate your WordPress website
Website migration can take various forms, such as:
- Host change: Transferring your entire website from one web hosting service to another while keeping the same domain name.
- Domain change: Changing your domain name.
- Uploading new site – Moving your website from your local host to an online server.
- CMS or framework change – Transitioning from another content management system to WordPress, or the other way around, requires migration of content and functionality.
Each of these types of migrations serves a different purpose and involves specific steps to ensure a smooth transition. While website migration can be necessary to address various issues, it’s important to approach it with caution, as there are potential risks, including the possibility of losing some or all of your website’s functionality.
Expert tip: Use Google Search Console to identify host issues
Did you know Google Search Console has this cool feature? It can tell you if your hosting setup is giving Google’s crawlers a hard time. It’s like having a detective for your website! If you haven’t got an account you can set one up for free here.
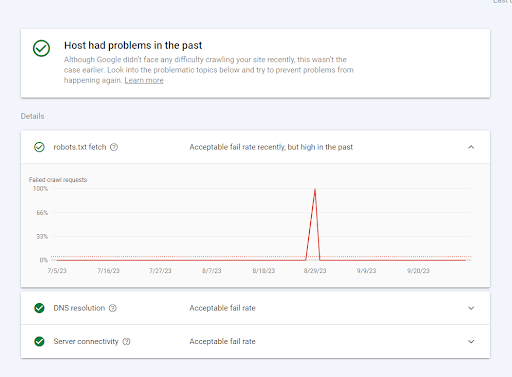
To check it out, just go to Google Search Console, click on Settings, then Crawl Stats, and finally, Hosts. This little report can give you the lowdown on whether your hosting choice is the right fit for your business. So, don’t forget to drop by and give it a peek from time to time. It’s your website’s way of saying, “Help me help you!”
How long does a WordPress site migration take?
The duration of a WordPress site migration can vary depending on several factors. On average, a straightforward migration from one hosting provider to another typically takes between 1 to 4 hours.
However, more complex migrations or those involving larger websites may take longer, potentially several hours or even a day or two. Note that you’ll have to wait for your DNS records to propagate worldwide. This may take up to 72 hours.
Checklist for a successful WordPress site migration
Planning ahead is the key to a successful website migration, and it can save you from potential issues down the road. Our goal is to make the entire process as straightforward as possible.
This WordPress migration checklist is here to guide you through each step, ensuring a hassle-free move. Whether you’re a technical expert or a beginner, this checklist will help you navigate the process with ease.
We will divide the migration process in 3 parts:
- What to do before migration
- What to do during migration
- What to do after migration
WordPress migration checklist
Pre WordPress migration checklist |
|---|
| Back up your existing website |
| Set up your new hosting account or domain |
| Choose the right time for the migration |
| Inform your audience about the move |
| Put your WordPress site in maintenance mode |
| Disable caching, security, and redirect plugins |
What to check during a WordPress migration |
|---|
| Point your domain name to your new host |
| Create a copy of your website |
| Update your hosts file |
| Create a new database |
| Migrate your files and database |
Post WordPress migration checklist |
|---|
| Check your new website’s speed and functionality |
| Scan for broken links |
| Add redirects |
| Update your DNS |
| Check Google Search Console & analytics |
| Test your SSL certificate |
| Perform search and replace on your database |
| Close your old hosting account |
What to do before migrating your WordPress site
1. Back up your existing website
Before you jump into website migration, take a crucial step and back up your existing WordPress site. This backup is your safety net in case anything goes haywire during the migration process. It’s like having a reset button for your site.
You’ve got a couple of options:
- Many web hosts include backup services
- Use a backup plugin like UpdraftPlus.
Alternatively, you can go old-school and manually back up your files using an FTP client like FileZilla. Don’t forget to back up your database too; you can do this through phpMyAdmin in your hosting account. Once that’s done, stash your backups in a safe spot. This way, if anything goes south during migration, you can easily restore your site to its former glory.
2. Set up your new hosting account or domain
If you’re switching to a new web host, follow these steps:
Step 1: Choose the right hosting plan for your needs.
Step 2: Log into your hosting control panel.
Step 3: Install WordPress (many providers offer one-click installations).
If you’re changing your domain name, you can either purchase one through a domain registrar or, in some cases, get a free domain from your new web host.
Before you start your migration, make sure you have the following information readily available:
- Login details for your old and new hosting control panels.
- Login details for your old and new website.
- Nameserver information for the new web host.
- Login information for your domain registrar.
- FTP/SFTP credentials.
Having this information readily available will make your website migration more efficient. You don’t want to waste time searching for login credentials during the process.
3. Choose the right time
When it comes to migrating your website, timing is crucial. A well-planned migration should aim to minimize any negative impact on your site’s performance. Although a slight dip in traffic may be inevitable, you can significantly reduce this by choosing the right time for the migration.
What to consider when choosing the time to migrate your site
- When Site traffic is low: Schedule your migration during lower traffic periods like weekends, late nights, or off-peak hours to minimize user inconvenience.
- Consider time zone: Consider time zone differences when your audience is global; for instance, if you’re in Europe but cater to Asian users, migrate during their off-peak hours.
- Business-specific timing: Choose a migration time that suits your business hours. If you’re a B2B company closed on weekends or if your busiest hours are between 3:00 and 8:00 PM, consider scheduling the migration during weekends or late nights and early mornings.
4. Inform your audience about the move
When you’re getting ready for your website move, don’t forget to give your audience a heads-up to keep things smooth. Just drop them a friendly note about the scheduled maintenance, say sorry for any hiccups, and maybe shoot out an email or post on social media to keep everyone in the loop.
This way, you can nudge your customers to make their purchases early, prevent them from wandering off to competitors, and keep things looking pro, especially if you’re running an online shop. It’s all about making the transition as hassle-free as possible and not messing with your cash flow.
5. Enable maintenance mode
Put your site in maintenance mode. This nifty move stops anyone, especially if you have a multi-author blog or website, from messing with your content while you’re making changes. It’s like locking the door when you’re doing renovations inside. Visitors won’t be able to see or interact with your content, and your writers won’t accidentally publish or edit posts.
6. Disable caching, security, and redirect plugins
Make sure to turn off any caching, security, or redirect plugins that are active on your site. While these plugins are usually great for your site’s regular operation, they can cause hiccups during migration. For example, security plugins might set up firewalls that block essential migration requests.
If you forget to disable these, you might end up with 403 Forbidden or 500 Internal Server errors, and we definitely want to avoid those. Don’t worry, though; you can always reactivate these plugins once your website is happily settled in its new home. So, for now, just switch them off and enjoy a trouble-free migration.
What to do during a WordPress migration
Using a migration plugin can take away a lot of the hassle involved in manually migrating your WordPress site. Follow our expert guide on migrating your site with UpdraftPlus free and premium versions for a hassle free migration.
If you’re set on migrating your site manually, follow the steps below to make sure you’ve got everything covered:
1. Point your domain name to your new host
First off, you need to point your domain name to your new host. Think of Domain Name System (DNS) records as the backstage pass connecting your domain name to the server that houses your website. These records often include cryptic-looking host names like:
- ns1.hostname.com
- ns2.hostname.com
Before you can determine if your migration was a success, you’ve got to make sure your domain name is pointing to your new host. If you’re lucky enough to have a web host offering free migrations, they’ll likely handle the nameserver updates automatically.
However, if you’re taking the manual migration route and using a domain registrar, you’ll need to dive into your account settings and tinker with those DNS settings. Keep in mind that updates to DNS records can take up to 48 hours to propagate, although it’s usually much quicker.
You can even use tools like DNS checkers to see when your domain name is fully connected.
2. Create a new database
You’ll need to create a fresh database and add a new user. After that, it’s time to upload your old database using the Import tab. But there’s one more important step – you’ve got to tweak your wp-config.php file to make sure your site knows about the new database.
Now go to your new hosting account’s cPanel, find the Databases section, and click on MySQL Databases. From there, create that new database and add a user. Now, you can bring in your old database through the Import tab.
Lastly, find your website’s wp-config.php file in your site’s main folder. Open it up and look for these lines:
- define(‘DB_NAME’, ‘db_name’);
- define(‘DB_USER’, ‘db_user’);
- define(‘DB_PASSWORD’, ‘db_pass’);
Now, just replace ‘db_name,’ ‘db_user,’ and ‘db_pass’ with the actual database name, username, and password you created for the new database. That’s the ticket to getting your new website all set up. Easy, right?
3. Migrate your files and database
Alright, it’s file-moving time! You’ll want to transfer all your website files to your new hosting provider. To make this happen, you can use FTP (that’s like a super handy file transfer tool) or, if your host has it, a built-in file manager. One little thing to remember: since your domain still points to your old hosting provider, you might need to use the IP address to connect to your new server.
Now, the easy part. In your FTP client, just drag and drop all the stuff from your WordPress folder on your computer into the root directory on your new server. Then, you wait. It’s like moving your website furniture to a new house. And here’s a time-saving trick: if your hosting provider lets you unzip files, go ahead and zip ’em up before uploading. You’ll just need to unzip them once they’re on the new server. It’s all about getting your site settled in its new online home.
4. Update URL references
Here’s the last thing to consider, and it’s pretty straightforward. You only need to do this if you’re changing your website’s domain during the migration. If you’re not, you can totally skip this step.
When you’re moving your WordPress site and changing the web address, you need to update the references in your database. This makes sure everything points to the right place in your new home on the web. But remember, if your domain isn’t changing, you can happily move on without worrying about this part.
What to check after migrating your WordPress site
Once your WordPress migration is complete, there are a few essential steps to ensure everything runs smoothly:
1. Speed and functionality: Check your new website’s speed and functionality. Make sure it’s as fast and responsive as it should be.
2. Broken links: Scan for broken links and fix them promptly to maintain a seamless user experience. You can try using tools like Screaming Frog to check if there is any broken URL.
3. Redirects: Set up redirects to guide users and search engines from old URLs to their new equivalents.
4. Google Search Console & Analytics: Now that you’ve migrated your website, it’s not time to kick back and relax just yet. You’ll want to keep a watchful eye on your Google Search Console and Analytics accounts. Check in regularly to spot any errors or shifts in your website traffic that might raise a flag. These could be signs of something going amiss, and it’s always better to catch issues early so you can fix them pronto. Stay vigilant, and your website will keep running smoothly.
5. SSL certificate: Test your SSL certificate to ensure a secure connection for your visitors. After a migration, it’s a good idea to check that your SSL certificate is still doing its job. Here’s how: open your website in an incognito window, and if your SSL certificate is in good shape, you’ll spot a little padlock icon next to your site’s URL. That padlock is your sign that everything’s secure.
6. Database search and replace: If you’re switching to a new domain name during your website migration, there’s a little housekeeping to do. You’ve got to swap out the old domain name with the shiny new one all across your database. For example, changing “yourolddomain.com” to “yournewdomain.com.” But here’s the twist: you can’t just do a simple find-and-replace in the database because that might mess up some serialized values. No worries, though! Just reach for handy tools like the Database Search and Replace Script in PHP. It’ll do the trick and keep things smooth as butter.
7. Close old hosting: Don’t forget to close your old hosting account to avoid unnecessary charges.
Expert tip – Perform regular WordPress health checks to identify any issues on your site and keep it in peak condition!
Summary
By following these steps, you’ll ensure a smooth transition and maintain a high-quality online presence after your website migration.
Migrating your site can be a stressful task, even with the help of a plugin. UpdraftPlus Premium comes with an expert team ready to support you with any queries or issues that may crop up along the way.
Get one of the world’s most popular WordPress migration plugins.
UpdraftPlus has more than 3 million active installs. Migrate an unlimited number of WordPress websites with Updraft!
![]()
![]()
![]()