As we have had several requests for a guide on how to use Incremental Backups, we have put together a handy video and detailed instructional blog that will take you through each of the necessary steps.
There are three ways to take an incremental backup:
1. Manual Incremental Backup:
Before we can take an incremental Backup we must have an existing backup that includes the entities that we want to take an incremental backup of.
So if you don’t have a backup already then take a full manual backup using the blue backup now button.

Once you have your full backup you can now add increments to it. This can be done by using the action link under the backup now button, by pressing the “Add changed files (incremental backup)…” Link. It will open the following modal:
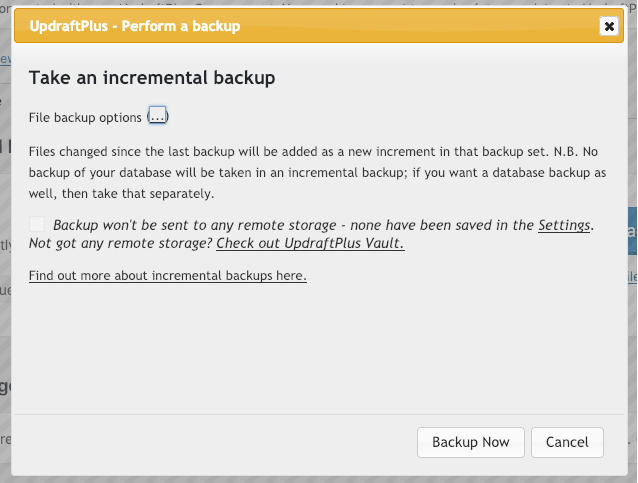
Note that if you don’t have a suitable backup to add increments to then that link will be disabled.
With this modal open you can select the backup now button to take an increment of your saved backup entities (the entities you have set to backup in your UpdraftPlus settings).
If you want to only take a plugin increment for example then press the “…” After the “file backup options” this will open the advanced options.

Select what you want to backup (note that you can only add an entity increment if a full backup of that entity exists).
Once happy press the backup now button and UpdraftPlus will do the rest.
You can confirm that your increment has been taken by looking at the existing backups table:

You can see when the latest increment was taken, if you hover over that a pop up will also tell you what other increments exist in that backup.
2. Scheduled incremental backups:
To take a scheduled incremental backup you just have to set how often you would like the backup to take place, save your settings and UpdraftPlus takes care of the rest.
First go to your UpdraftPlus settings and to the files backup schedule.

If your schedule is set to manual, you will not be able to schedule a incremental backup so first set how often you want your files backup to run.

With the files backup set to daily (or anything you want) it will now allow you to schedule an incremental backup.

How often you can schedule a increment depends on what you set your files backup to
In this example as we choose daily for the files backup we can select an increment to take place up to every 12 hours.

In this example I have my files backup to take place at 12am then every hour.
UpdraftPlus will take an incremental backup at 1am, 2am and so on until 12am the following day where UpdraftPlus will now take a new full backup and then start adding new increments to the latest backup.
Now we have the schedule setup don’t forget to save your settings, then just wait for UpdraftPlus to do the rest.
Again you can check your backups in the existing backups section.
3. Manual incremental backup via WP_CLI:
You can also take a incremental backup via WP_CLI
To do this first make sure you already have a backup. This can be done using the following command: wp updraftplus backup
Note command may differ depending on how you have WP_CLI setup.
Now we have a full backup we can take an incremental backup by adding the incremental argument to the above command: wp updraftplus backup –incremental
Using that command will take an incremental backup and add it to the latest backup.
Restoring a incremental backup:
If you ever want to restore an incremental backup, this can work just like a normal restore except we have the option to select which point we want to restore to.
For example if our full backup was at 12am and we have increments every hour at 1am, 2am, 3am and so on, when we go to restore we can decide that we want to restore up to 2am.
What this means is that UpdraftPlus will first restore the full backup that was taken at 12am and will then restore the 1am backup, before finally restoring the 2am backup.
To start a restore go to your existing backups and find your incremental backup.

Press the restore button and this modal will pop up:


Select the entities you want to restore. Then press the restore button.

You will then have the option to select which point you want to restore up to. Select the point you want then, click the final restore button.
UpdraftPlus will then do the rest.
![]()
![]()
![]()
Will this work on Amazon S3?
Hi Shanjie,
Yes, with any storage provider.
David
Hello! I keep getting errors when I do a manual backup (I just activate an incremental backup on Google Drive but get this error: The backup is being aborted for a repeated failure to progress.
Can we perform manual backups if incremental is active? If yes, I would like to understand why we are getting this error. Thank you! Andy
Please do open a support ticket and we’ll be glad to help – https://updraftplus.com/paid-support-requests/