If there’s one thing every WordPress user should do, it’s back up their website. Server crashes, website malfunctions, and malware are more common than you think, and it can all lead to the total loss of your website and its content.
You probably know this already, which is why you’re here. You want to learn the best way to back up your website and keep your content safe.
Which backup method is best will heavily depend on the individual user, so we’re going to cover five different ways to back up your website. This guide will walk you step by step through the process whether you want to take manual backups, schedule automated ones with a plugin, or use other tools.
That way, you can go with the backup method that suits you best and protect your website from catastrophic data loss.
Why back up your WordPress site?
Imagine losing everything – all your hand-written posts, all the pages you carefully crafted, your theme customisations, plugin settings, and everything.
For individual bloggers and creators, it can be a massive loss of all your hard work. For businesses and e-commerce sites, it can be all that and financially devastating on top of it.
Consider just a few of the reasons why backing up your website is extremely important.
Preventing data loss
Whether you’re writing a blog full of personal posts that are important to you, or running a business where having to set up your entire website from scratch would sink your company, data loss is a major issue.
A few missing posts or defaced pages may not be a big deal, but what about your entire website? Data loss can happen at any moment – whether due to simple mistakes or malicious deletion.
Consider a few common causes:
- Accidental deletion: You go to remove an unwanted post or page or make some edits – only to realise later that you deleted the wrong thing entirely. WordPress’ revisions feature and trash folder usually guards against this, but it can fail and this type of mistake is common.
- Glitches and corruption: You go to perform a routine WordPress update when all of a sudden your site is nothing more than a white screen of death. Or you install a new plugin and run into a strange conflict that results in parts of your site being broken and corrupted. Websites are finicky; anything can happen.
- Server crashes: When server components crash, they may corrupt the data on them – your website and database. This can happen randomly through no fault of your own.
- Malware and hacks: If hackers manage to break in, they may delete or deface content and infect your site with malware. Besides losing content, purging all files of malware isn’t easy. The best thing to do is restore your site to a pre-attack state.
Total data loss may not be common, but if you run a website for very long at all, you’ll likely encounter at least one of these issues.
Minimise downtime and troubleshooting
Backups make fixing issues easy. Malware? Accidentally deleted a post? Messed up your theme? Restore a backup and everything will be just as it was.
Without backups, fixing your website can take a long time and require a lot of annoying troubleshooting. If the data loss is bad, that means your site will be down for a while. And for businesses, extended downtime can severely impact your profits.
Even if you have your most important content saved elsewhere, you’d still need to spend days or weeks setting up your entire website again. Try to remember all your site settings and theme customisations off the top of your head. It won’t be any easier if you do actually lose your website.
And even without something that extreme happening, you may make a mistake you want to roll back.
Easier migrations
If you ever want to migrate your site to a new server, a WordPress backup and migration plugin can make that much easier. Rather than having to manually save your website files and database, you can just click a button and restore a snapshot on the server you want to move to.
This can also be used for troubleshooting or making a staging site to test things out on before pushing those changes to your live website.
While protecting against data loss is the main reason to back up your website, there are plenty of other reasons. If you haven’t taken a backup of your site yet, there’s no reason not to do it now – except for not knowing the best way to do it.
What is the best way to back up a WordPress site?
There are several ways you can back up WordPress, including doing it manually with various tools or installing a plugin to automate the process. Each has its pros and cons, and we’ll go into detail on how to do these below.
For now, when should you use a particular method?
1. Back up with a plugin: Best all-around option for quick and easy backups. It’s the fastest way to take a backup and also has the benefit of letting you automate recurring backups. Also, if you don’t have access to tools like cPanel and FTP, it’s your only option.
2. Manual backup with cPanel: The quickest way to take a manual backup. Provides a web-based interface that allows you to download your files and database.
3. Manual backup with FTP: This requires you to install an FTP client and remotely connect to your site. It can be confusing for beginners. Also, this does not capture your database, so you’ll need to combine this with another method.
4. Manual backup with phpMyAdmin: This allows you to download your database, but not your website files. phpMyAdmin uses a web interface, so backing up your database is quick and convenient, but you’ll need to use cPanel or FTP alongside it.
5. Backup through your web host: This functions similarly to a backup plugin, allowing you to schedule automatic backups, but you access it through your web host’s dashboard rather than through WordPress. It can be unreliable, however, depending on the host, so it’s a good idea to employ other backup methods alongside it. It also takes away control. You might not know how often backups are made or where they’re being stored.
The important thing to know is that your WordPress website is split into two sections: your website files and the database. Website files include WordPress core, your themes and styling, and your installed plugins. The database includes your posts, pages, users, and other content.
A common mistake people make is only downloading their website files, only to find that all their blog posts are gone when they try to restore their site. To take a full backup, you need both the website files and database.
5 ways to back up your WordPress site
There are plenty of ways to back up your WordPress files, but we’ve collected five of the easiest and most straightforward methods. We’ll walk you through each one step by step, and you can decide which one to go with.
Note: While WordPress does have an Export feature (which you can find in Tools > Export), this only exports a few things – posts, pages, comments, etc. If you want to take a full backup, you’ll need one of the methods below.
Now let’s go into detail on how to back up WordPress.
- Method 1: Back up a WordPress site using a plugin (Recommended)
- Method 2: Manually back up a WordPress site via cPanel
- Method 3: Manually back up a WordPress site via FTP
- Method 4: Manually back up a database with phpMyAdmin
- Method 5: Back up your WordPress site through your webhost
Method 1: Back up a WordPress site using a plugin (Recommended)
When you’re looking to back up your WordPress site, finding the right plugin can make the job much easier. The WordPress Plugin Directory is a great place to start. But as you browse, make sure to check a few important details:
- Is the plugin tested with the latest version of WordPress?
- Does it have a good number of active installs?
- Is it well-reviewed?
Be sure to skim through the reviews to see what other users are saying. Once you find a plugin you’d like to use, you can proceed.
In this guide, we’ll walk you through setting up UpdraftPlus, a plugin that meets all the above criteria. It’s one of the most popular and trusted backup plugins out there – for good reason.
So first, we’ll walk you through backing up your website using the free version of our plugin, UpdraftPlus. Using a backup plugin is quicker than backing up your site manually; it just takes one button to save a snapshot, rather than having to get into your site’s files and download them manually.
Plus, not all web hosts give you cPanel or FTP access, and those unfamiliar with navigating a website’s back end may have trouble with it. If you aren’t able to back up manually, a plugin is your best bet.
Step 1: Install and activate UpdraftPlus
The first thing you need to do is install the free version of UpdraftPlus. You can find it on the WordPress plugin repository and install it directly through your dashboard.
Navigate to Plugins > Add New Plugin and search for UpdraftPlus. Click Install Now and then Activate.
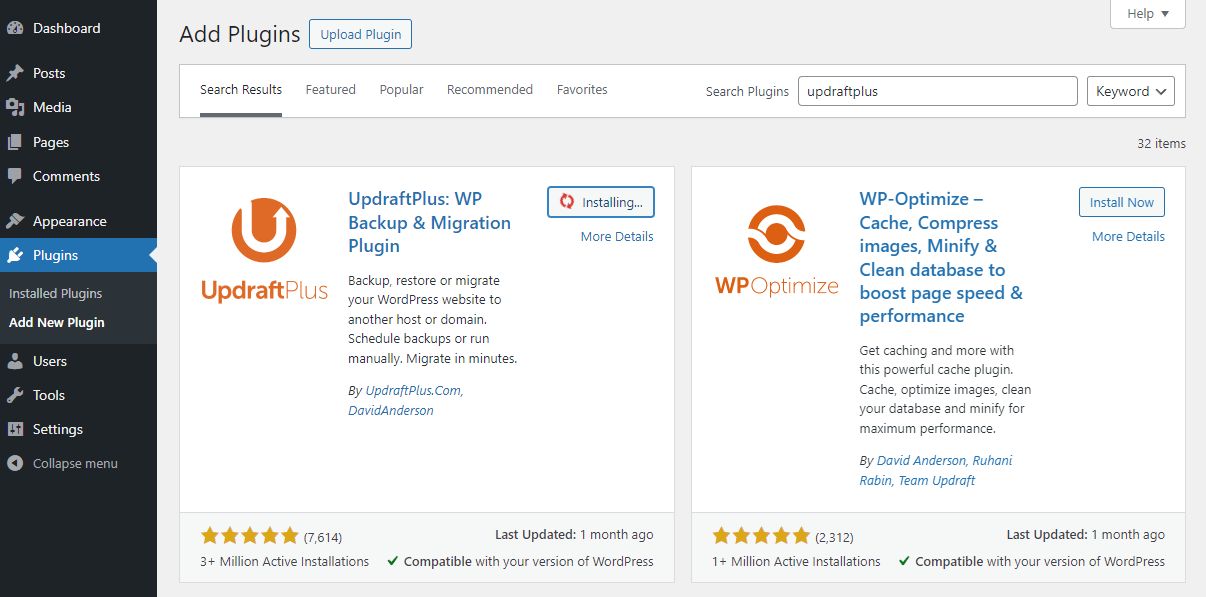
If you have the premium version of UpdraftPlus or installed it manually from the repository, you can also click Upload Plugin and drop the zip file in there.
Step 2: Set up remote storage
First, choose where you’d like to back up to.
Storing backups on your website’s server is a bad idea. If your server files get corrupted or infected with malware, the backups will be rendered useless.
Generally speaking, you should employ the 3-2-1 rule for backups, according to Tom Jauncey, CEO at at Nautilus Marketing. The 3-2-1 rule, “means that you should retain three copies of your data in other places,” he says, then adds, “[f]or instance, there is the original, one backup on another medium, and another backup offsite.”
So, you could, “keep one locally on your computer and another on an external hard drive; keep another copy in the cloud,” he says.
Open UpdraftPlus by going to Settings > UpdraftPlus Backups, then click the Settings tab.
Click the storage you want to export your backups to. Follow the steps to authenticate with the chosen service.
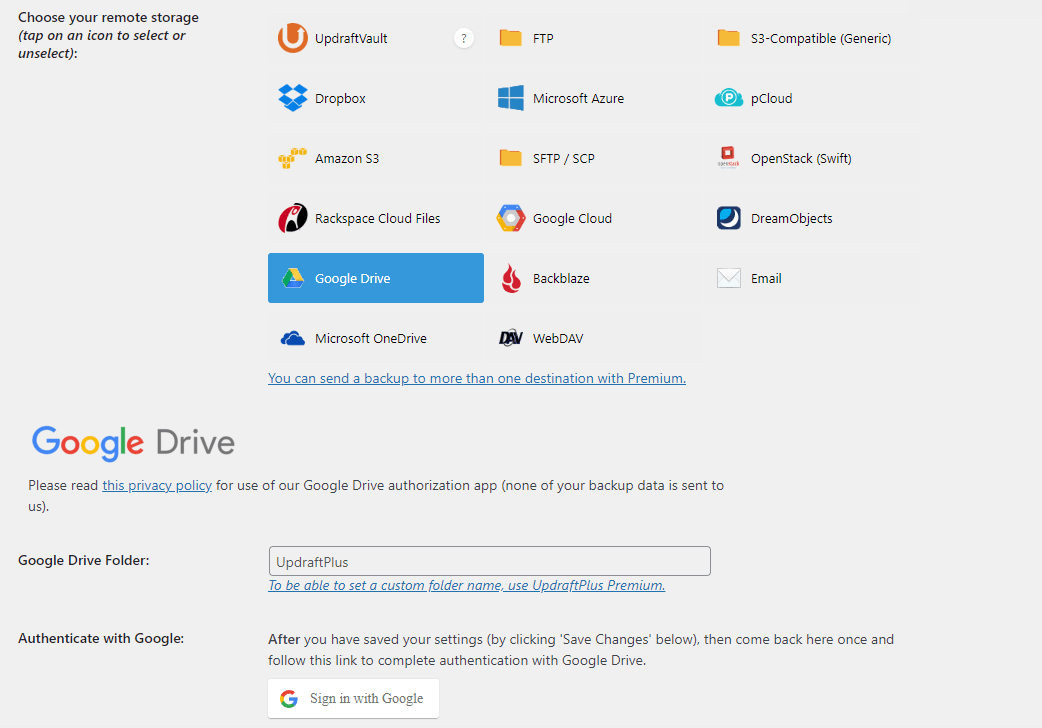
Now when you run manual or automatic backups, they’ll have a place to be stored.
Step 3: Take a manual backup in UpdraftPlus
If you want to create a backup right now, it’s super easy: just click the blue Backup Now button.
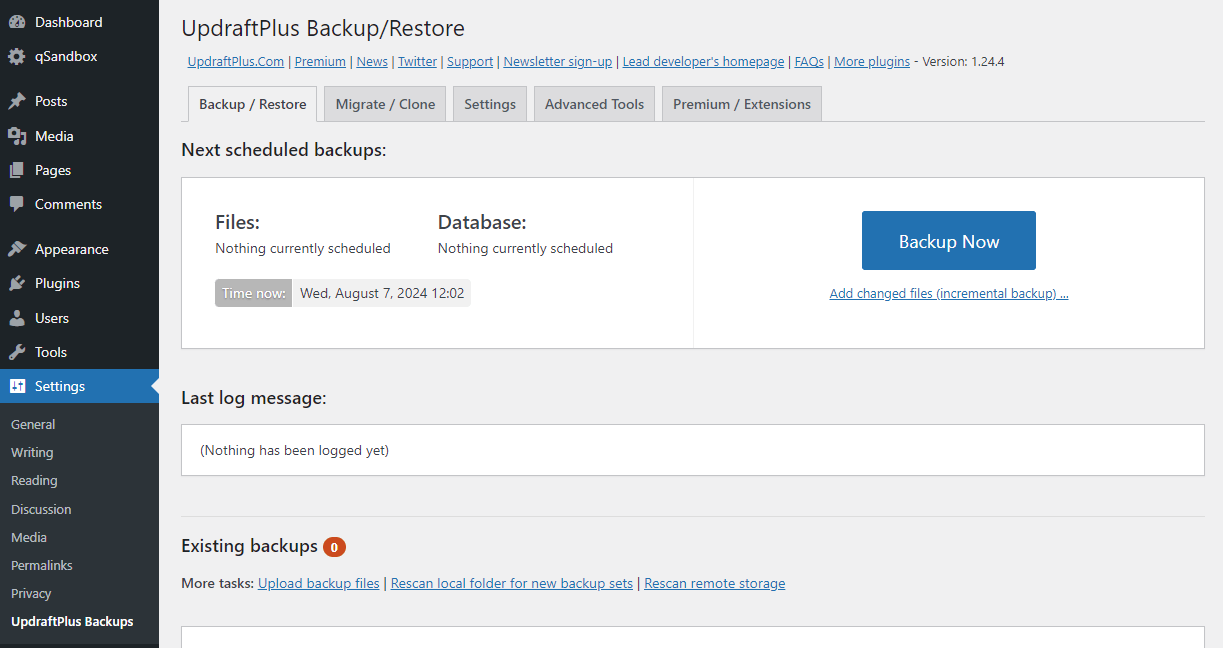
A pop-up will appear allowing you to choose what to back up. Make sure you select both files and database for a full WordPress backup. Then click Backup Now to start the process.
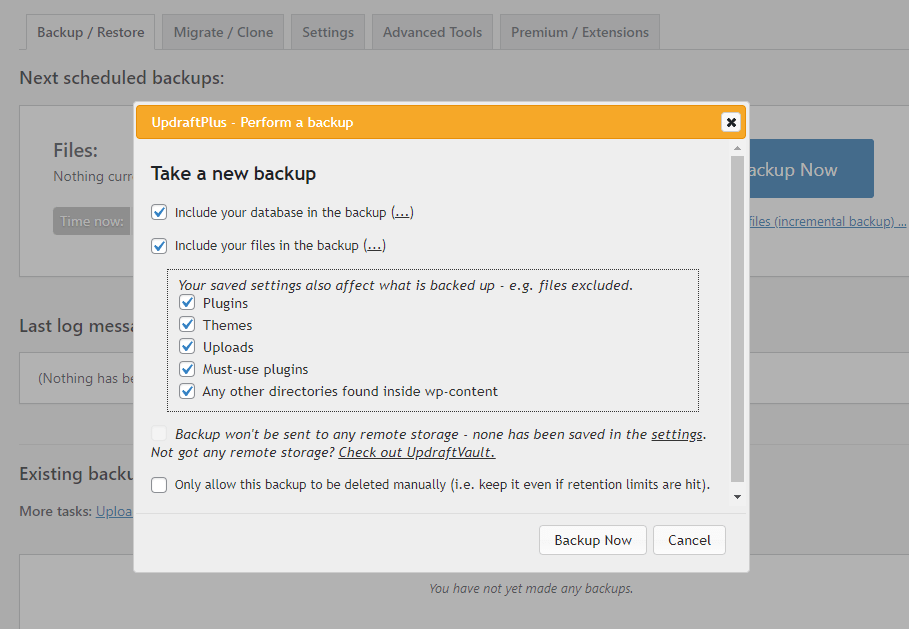
After a few minutes, your site will be backed up. You can find your backups and restore from the same tab as before.

Step 3: Schedule backups
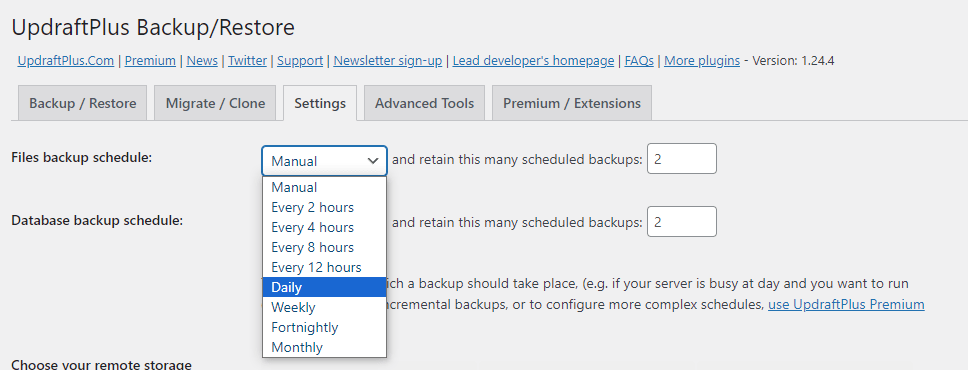
If you prefer, you can schedule automatic backups. Click the Settings tab.
Here you can set the Files backup schedule and Database backup schedule. You can pick from a few options. You can also retain a certain number of backups before automatically deleting older backups
Method 2: Manually back up a WordPress site via cPanel
If you’d rather manually save a backup, the easiest way is through cPanel. Most web hosts use cPanel or a reskin of it, and you can usually access it through a web interface. Check your host’s documentation to see if they use it.
Step 1: Login to cPanel
First, you’ll need to access cPanel. You can usually find it by going to your host’s website and logging in with your hosting account. There may be a link or menu item directing you to cPanel. You can usually find your cPanel login information here as well.
You may also be able to add /cpanel to your website’s address.
Step 2: Run the Backup Wizard
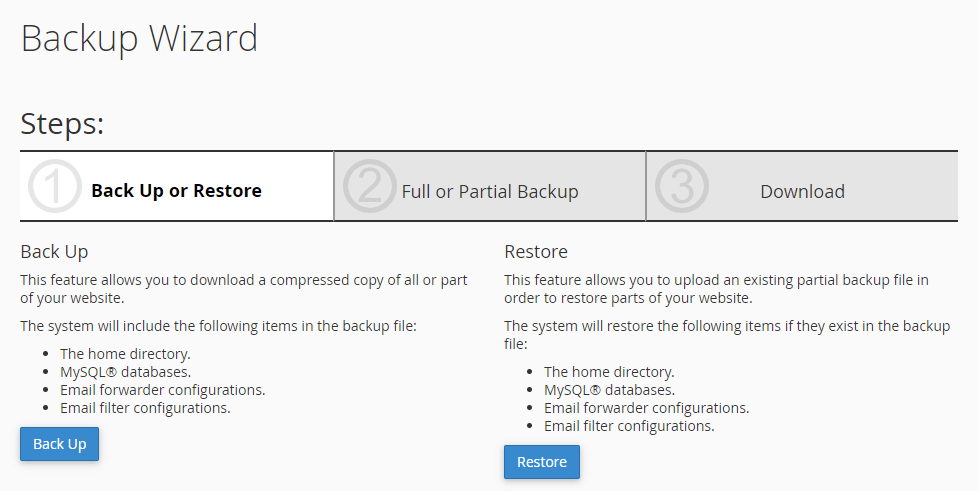
Once you log in to cPanel, you’ll see the home screen. Look for the Files submenu and click Backup Wizard.
This will let you back up your website in a few clicks. It contains your database and home directory, which is usually where your WordPress files are located. Just click Back Up to get started.
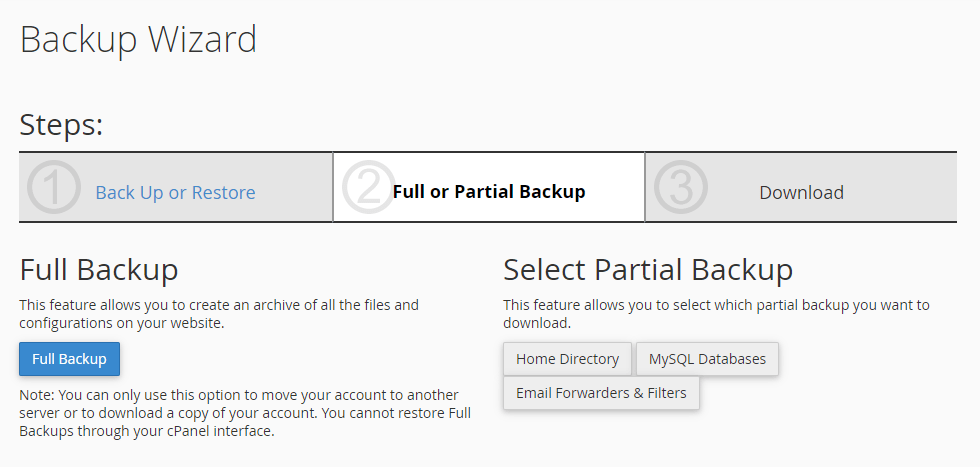
You can either take a Full Backup or individually download the home directory (website files) and database. The full backup does not allow you to restore through cPanel, so you may want to save a partial backup instead.
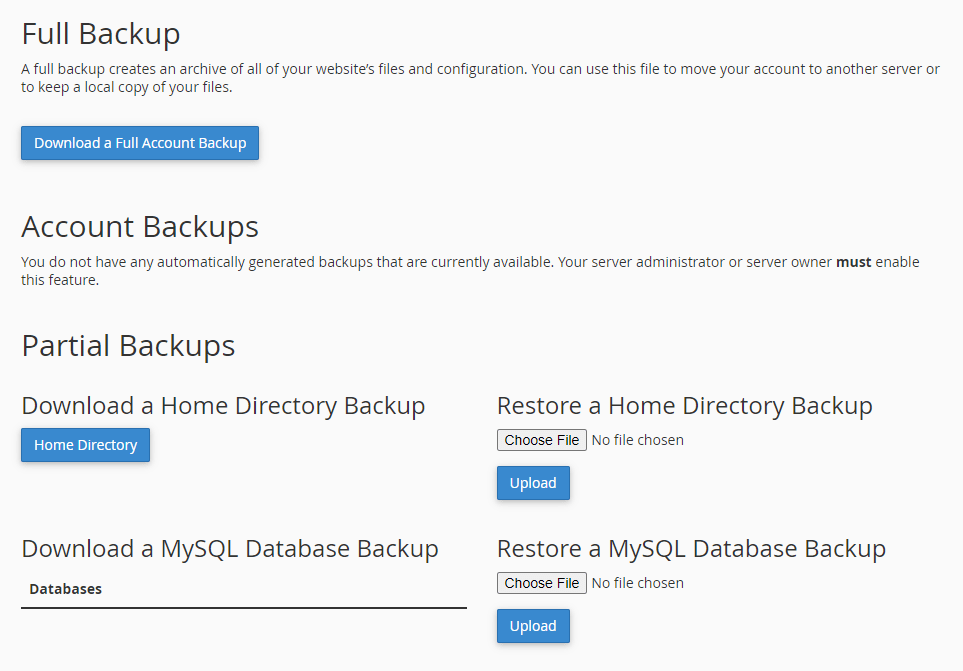
After that, you’ll be prompted to download the files.
Alternatively, you can use the Backup menu instead of the Backup Wizard. This is the exact same, just without step-by-step guidance.
Method 3: Manually back up a WordPress site via FTP
If your host doesn’t use cPanel, then the next best option is to back up your website with FTP, or File Transfer Protocol. This allows you to remotely access your website and download files.
Important note: This method only downloads your website files, not your database. The database is where the bulk of your content (posts, pages, comments, etc.) are located. Don’t forget to take a database backup as well using the next method.
Step 1: Download an FTP client
FTP does not use a web interface; you’ll need to download an FTP client. Some common ones include FileZilla and WinSCP. We’ll use FileZilla for this example.
You’ll also need to get your FTP credentials from your web host. You can often find these somewhere in their dashboard, or you can ask them for the credentials.
Step 2: Connect with FTP
Once you have your FTP credentials (including host URL, username, password, and port), open up FileZilla and enter them in the bar at the top of the screen. Then click Quickconnect.

In the panels below, you’ll see your computer files on the left side and your website’s files on the right. Navigate to your WordPress directory if you need to, which may be located in the public_html or www folder.
Step 3: Download website files
The most important files to capture are the ones in the root folder (the folder WordPress is located in) and the wp-content folder. The other folders are mostly the core files that run WordPress, but there’s no harm in downloading everything.
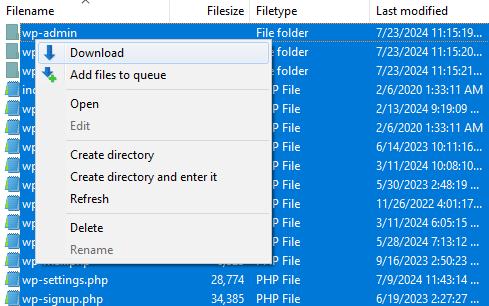
Select all the files and folders in your WordPress site by clicking in the panel and pressing Ctrl+A on your keyboard. Then right click and click Download.
Method 4: Manually back up a database with phpMyAdmin
Your database contains much of your website’s content, like your blog posts, pages, and comments. Many WordPress users make the unfortunate mistake of thinking that these are stored in the files you access through FTP; they’re actually in the database.
You can access phpMyAdmin through cPanel, or you may be able to find it in your web hosting dashboard.

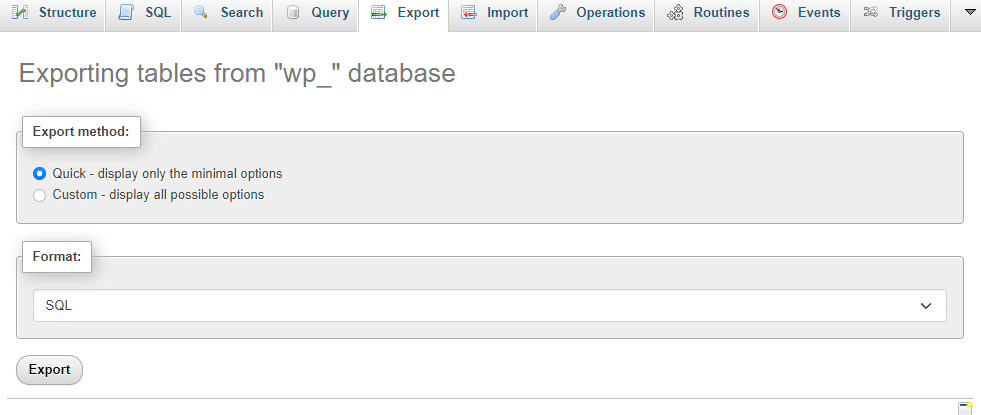
Once you open phpMyAdmin, click on your WordPress database to open it. Then click the Export tab at the top.
If you just want a quick, full database backup, click Export now. You can also set the Export Method to Custom if you want more control over the database entries that are backed up, formatting, and so on.
Method 5: Back up your WordPress site through your webhost
Finally, many web hosts offer their own built-in backup, which you can access through their dashboard. How this looks will vary significantly depending on your hosts – not all even offer this option.
Here’s a general guide:
- Go to your host’s website and log in with your account credentials.
- Look for a backup option in your hosting dashboard.
- Check if there’s a way to take a manual backup, set up automatic backups, or both.
Consider combining this with other backup methods, like using a backup plugin.
Wrapping up
There are many ways to back up your site, including manually (cPanel, FTP, and phpMyAdmin), through your web host, or using a plugin. Each has its advantages. For many people, using a plugin is the easiest and simplest way to schedule regular backups.
UpdraftPlus has a free plugin which has all the core features you’ll need like automated scheduling and multiple remote locations to save your backups. Many users rely on UpdraftPlus to manage their backups.
If you love the plugin but need a little more, consider upgrading to UpdraftPlus Premium. You’ll unlock more storage locations and the ability to send backups to multiple of them, encryption, multisite support, and more fine-tuned scheduling.
Don’t want the hassle of managing backups yourself?
UpdraftPlus makes it easy! Join over 3+ million users who trust UpdraftPlus to back up and migrate their WordPress sites.
FAQS
How often should I back up my WordPress site?
How often you back up your website depends on how often it’s updated. For sites with frequent changes, such as daily blogs or ecommerce stores, daily backups are recommended. Weekly or even monthly backups may be more appropriate if your site is updated less often.
It’s also important to make a backup of your site before you make any major changes, such as updating WordPress or modifying site files.
How do I back up my WordPress site for free?
All the methods listed above can be done totally for free. Free WordPress backup plugins are common, often offering an optional premium upgrade. This includes the free version of UpdraftPlus, which you can install from the WordPress repository. Manual backups can be done at no cost to you as well.
How do I back up my WordPress site to my desktop?
If you do a manual backup, the files will automatically be downloaded to your desktop. If you’re using a backup plugin like UpdraftPlus, you can simply download the backup file.
What if you want to back up directly to your PC? You’ll need to connect UpdraftPlus to a third-party service like Dropbox, which can sync files to your computer. There’s no way to simply send the backup directly to your PC.
How do I back up my WordPress site without plugins?
To back up your site without plugins, you’ll need to manually download your WordPress files via FTP and export your database using a tool like phpMyAdmin. You can also use cPanel or back up through your web host. See the links below:
Does WordPress have a backup option?
WordPress has a very simple Export tool, but this only saves your posts, pages, and some other data. For a full backup of all your site and database files, you’ll need to install a plugin or take a manual backup.
How do I back up and restore my WordPress site for free?
Along with backing up your site, all the methods we outlined above let you restore for free as well. You can either manually restore files through FTP, phpMyAdmin, and/or cPanel, you can restore your site through UpdraftPlus or any backup plugin.
Note that some backup plugins are not compatible with each other and can only restore backups made from their own plugin. UpdraftPlus can restore backups from other plugins or manual backups you took yourself.
How do I automatically back up my WordPress site?
If you want to create a backup schedule, manual backup methods are out of the question. Instead, you’ll need to either set it up through your web host or use a backup plugin.
For example, UpdraftPlus allows you to schedule backups whenever you want. You can also turn on automatic backups before WordPress updates in the premium version of the plugin.
What is a WordPress backup?
A WordPress backup is a copy of all your site’s data, including the database, themes, plugins, and media files. It’s a safeguard against data loss which you can restore in case of server crashes, malware, or accidental deletions.