Click on a question, and the answer will then display.
Installation and de-installation (8)
How do I install UpdraftPlus?
How to install the free version of UpdraftPlus
How to install UpdraftPlus Premium
If you want to get UpdraftPlus Premium, or buy add-ons to enhance your free edition, then go to our shop.
If you have already purchased, and want the installation instructions, then go here.
What are the requirements to run UpdraftPlus?
WordPress 3.2 and later are officially supported.
Other than that, we try to support everything that WordPress itself supports – whether Windows, Linux, BSD or something else, all PHP versions supported by WordPress 3.2, etc.
There are no special requirements beyond this. i.e. No special requirements for running on Windows, etc.
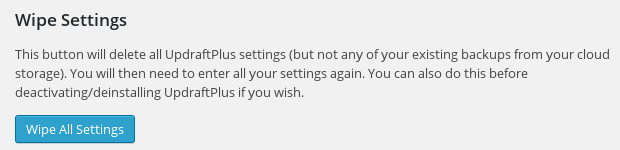
Does UpdraftPlus delete all its settings when it is de-installed? (And, how can I?)
UpdraftPlus does not delete its settings, or your backups, when de-installed. This is because some users de-install and re-install and don’t want to have to re-enter their settings when doing so.
If you want to remove all UpdraftPlus’s settings, then there’s a button down in the ‘expert/debugging’ tab.
If you want to remove all of your backups, then either click the “Delete” buttons in the “Existing Backups” tab, or go to your cloud storage (if any) (e.g. Dropbox, Google Drive, etc.) and delete them all there.
I am not running the most recent version of UpdraftPlus. Should I upgrade?
If you have any support requests then you should certainly update first, to see if your problem has already been fixed. And generally, yes, we recommend running our latest version: it’s the one that’s had the most work done on it, and all the latest fixes and improvements.
When installing, my web hosting says there’s a maximum file size I can upload – what can I do?
If, when installing UpdraftPlus, you get an error message saying that your webserver has configured a limit for uploaded file sizes, and that the plugin is too large, then you can use any of these solutions…
1) Recommended, easiest: Install the free “Upload Larger Plugins” plugin from the WordPress plugin repository. Just go to “Plugins -> Add New” in your WordPress dashboard, search for it, install it, and activate it.
2) Install the plugin manually, by: 1) unzipping it on your PC/Mac (you will then get a folder called ‘updraftplus’), 2) Using FTP to upload it into your webspace, in the wp-content/plugins folder, so that it becomes wp-content/plugins/updraftplus. And then go to your WP dashboard to activate it. More information here.
3) Increase the configured upload size limit, if your web hosting allows you to, by editing a php.ini file. Use FTP to create a file called php.ini (or edit the existing one, if there is one) in the same directory of your WordPress site, with these contents (UpdraftPlus is around 7MB):
; Maximum allowed size for uploaded files.
upload_max_filesize = 40M

; Must be greater than or equal to upload_max_filesize
post_max_size = 40M
If that fails, try placing the php.ini file in the wp-admin folder instead. If that fails, you’ll need to ask your web hosting company for guidance.
How do I backup a WordPress site?
For a step-by-step guide on how to backup your WordPress site using UpdraftPlus, please follow this link for further detailed information.
WordPress crashed when updating UpdraftPlus – what can I do?
WordPress currently (this article was last reviewed in March 2021) does not handle plugin updates in an optimal way – if something goes wrong (for example, your account is too low on disk space, and you reach 100%, or PHP crashes), then it can leave your plugin in an inconsistent state.
Symptoms of your plugin being in an inconsistent state would be any of these:
- That the plugin does not appear on the “Plugins” page in your dashboard (and possibly, when you try to re-install it, you’re told that the directory already exists).
- Or, that after updating an error about a missing file shows on your site, or perhaps just in the dashboard or in the UpdraftPlus log file, mentioning the plugin and a missing file (especially the words “failed to open
stream: No such file or directory”). - Or (for versions of UpdraftPlus from September 2015 onwards), there’s a dashboard notice telling you so.
The only thing to do in this situation is to remove the plugin, and re-install it. Before re-installing it, check how much free disk space you have – if it’s less than 50Mb, then you may need some more (UpdraftPlus is around 19Mb when unzipped – but WordPress creates a second copy when updating, as well as the downloaded zip file).
If the plugin does not appear on the “Plugins” page in your dashboard, and if re-installing tells you that the directory already exists and does not offer you an option to replace the existing one (thankfully newer WordPress versions now do that), then you must use FTP (or the file manager in your web hosting company’s control panel) to remove the plugin. Log in to your web-space via FTP (or file manager), and entirely remove the directory wp-content/plugins/updraftplus.
This article is also very useful for understanding more about how WordPress installs plugins – it’s useful information for all kinds of situations when something goes wrong.
General and pre-sales questions (18)
Is UpdraftPlus reliable?
UpdraftPlus has had over 875,000 downloads, and been tested by users on a very wide variety of WordPress installations. It ranks in the top 0.5% of most-installed plugins at rankwp.com. No software is perfect, but if you’re looking for reliability, then UpdraftPlus is in the top rank. The original “Updraft” plugin began backing up WordPress installations in February 2010. There’s a lot of experience and testing behind today’s UpdraftPlus.
Remember, though, that every WordPress install is different. You should always test your backup system after deploying it. UpdraftPlus, like all WordPress software, comes with no warranty. UpdraftPlus will do everything it can to help, and we have never yet come across someone whose backups were insufficient to recreate their site – but don’t let this make you skip taking sensible precautions!
What is the largest site that UpdraftPlus can back up?
UpdraftPlus’s architecture imposes no limits upon the size of backups. As long as your server has the disk space available to create a backup, and as long as your web hosting company does not apply any other artificial limits (e.g. does not give you enough outgoing bandwidth to allow your backups to reach their destination in the cloud), then UpdraftPlus can back up anything. It is known to be successfully backing up websites of up to 12 gigabytes (12,288 megabytes), and we’re not aware of any website that won’t back up because of being too big.
If I make a purchase, how long am I entitled to updates for?
For one year after purchase. After that, you will be able to renew.
A one-year policy is standard in the WordPress plugins market, and allows us to have a sustainable business so that you can rely on UpdraftPlus for years to come.
Note: If you purchased UpdraftPlus before we brought in the “one-year” policy, on the old “life-time” deal (before 11 a.m. GMT 05/Aug-2013), then that deal will be honoured. A promise is a promise!
How can I purchase improvements for UpdraftPlus?
The base UpdraftPlus plugin is free, and fully functional (it is not “crippleware” that ham-strings you unless you pay). If you want extra features, you can buy “UpdraftPlus Premium”, which includes all of our premium features, plus upgrades and support for one year. We also have several additional services and plugins, such as our UpdraftVault integrated cloud storage offering and the UpdraftCentral site management dashboard. If you need to spin up test sites regularly you can find a cost-efficient way of doing so with UpdraftClone.
Note: If you purchased UpdraftPlus before we brought in the “one-year” policy, on the old “life-time” deal (before 11 a.m. GMT 05/Aug-2013), then that deal will be honoured. A promise is a promise!
How many sites can I install UpdraftPlus on?
The free edition of UpdraftPlus can be installed anywhere and everywhere you like.
When you purchase UpdraftPlus Premium (our version with all extra features, upgrades and 1-year support), then you can choose whether you want a 2-site, 10-site or unlimited site licence. These can be installed on the number of sites indicated.
The above entitlements are used to grant access to support and access to your UpdraftPlus.Com account for downloading software and obtaining upgrades. UpdraftPlus itself is under the GNU GPL, the same licence as WordPress itself, which grants you many and various further rights.
What exactly does UpdraftPlus back up?
Essentially, everything – it backups up your database and all WordPress content – which means your uploads, plugins, themes, and additional files created by plugins. The free version does not backup up WordPress itself, since you can always obtain this again from WordPress.Org. UpdraftPlus Premium has an option to include this too, for convenience – plus any files anywhere else on your server (i.e. non-WordPress) that you want to back up for good measure, too.
I have a pre-sales question which you have not answered here
You are very welcome to send us your question, here.
Is UpdraftPlus WordPress Network (a.k.a. Multisite) compatible?
Yes. If you have a WordPress Multisite install (and you’ll know if you do – it’s fiddly to set up), then you need our multisite add-on, and then you are ready to go. If a backup plugin has not been particular written for WordPress Network usage, then it will be insecure – it will allow every blog admin on the network to backup and restore the entire network – including changing code and settings (e.g. passwords, or changing plugins) along the way.
What are UpdraftPlus’s limits?
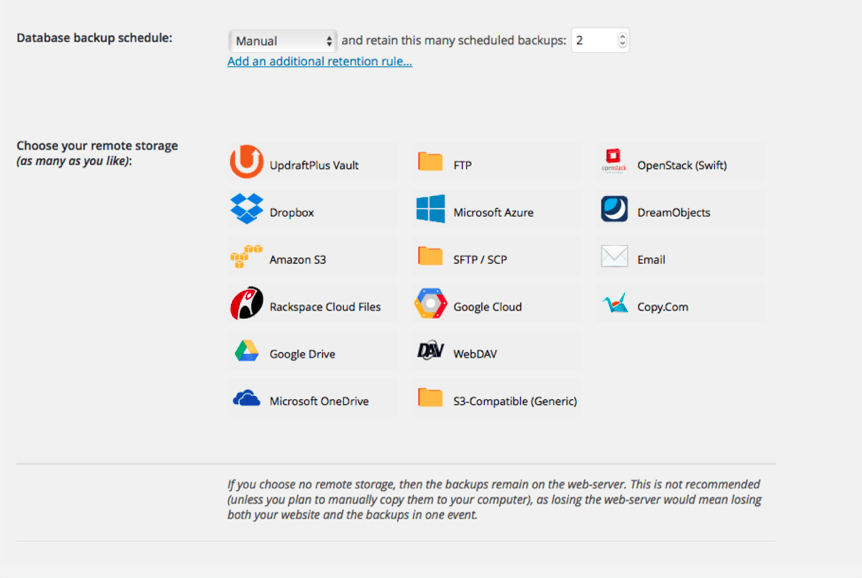
If you deploy Dropbox, Google Drive, UpdraftVault, Amazon S3, Rackspace Cloud Files, OneDrive, Microsoft Azure, Backblaze, Google Cloud, Dreamobjects, Generic S3, SFTP, FTP as your cloud backup method, then in theory UpdraftPlus has no limits. At whatever point your web hosting provider cuts UpdraftPlus off, it will resume again from later. UpdraftPlus also splits the backup at a configurable interval (every 400MB), so that there are no issues with maximum allowed sizes for zip files on your system. (i.e. whatever limit the system has, you can configure UpdraftPlus to use something smaller…. in most cases, UpdraftPlus detects this automatically as it runs, so you do not normally need to touch the setting). With email backups, you will likely find that your email provider limits the size allowed for incoming emails.
What format are backups made in?
UpdraftPlus backs up your files into ordinary zip files (the same format that WordPress and its plugins and theme directories use) rather than any proprietary file formats. The database is backed up into an ordinary SQL (text) file.
Therefore you can use UpdraftPlus to restore backups, but do not have to. You do not even need WordPress installed. You can just unzip the zip files, and use your web hosting company’s control panel to import the SQL into your database.
We are committed, as a fundamental of UpdraftPlus’s design, to retain this situation. UpdraftPlus backups will always be something that you can restore with standard tools. There will be no proprietary lock-in.
What is your refund/cancellation policy?
Software: We can consider refunds, at our discretion (i.e. no automatic right), based upon the particular circumstances of your case. In practice, we usually require that you have found a technical fault, and that we are given proper opportunity to verify sufficient information about any faults which you believe you have found (and that they are in UpdraftPlus, not something else), and to fix them within a reasonable time period. These must in all circumstances be requested within 10 days of purchase, which we believe is sufficient time to ascertain that a purchase works.
Legalese: There are no automatic refunds for digitally-deliverable/non-tangible goods. This is standard practice in these industries, because such goods cannot be returned (unlike physical goods). It is your responsibility to read the product descriptions, verify that it meets your needs (i.e. it provides a workable backup solution for you) and is suitable for your product environment (e.g. that your web hosting company does not ban backups). Please do not treat a purchase as trial-ware – we don’t want to push increased costs onto our genuine customers. EU customers have the legal right to a refund of digital goods which they have not yet downloaded, if requested within 14 days, and such requests will also be honoured.
For separately-purchased support services (i.e. not those bundled with software), for which you purchase support for a specific issue, if your support need turns out to be caused by an UpdraftPlus defect, then we will refund you 100% of your purchase price for the support purchase.
No refunds are available for unused support purchases, or for any part of the price of a bundled software+support package (for refund purposes, those are treated as 100% software packages).
These restrictions do not affect your consumer rights. For example, if UpdraftPlus’s product description states that it has a feature which in fact it does not have, then you can invoke your consumer rights.
Finally, we reserve the right to, without notice or refund, terminate any ongoing services (including support agreements or update feeds) to customers who abuse our facilities or staff.
Can UpdraftPlus be used to migrate a WooCommerce site?
Yes!
WooCommerce is a well-behaved WordPress plugin that stores its database information in the WordPress database, and stores any uploaded files in the WordPress media library. As such, it does not present any special issues or challenges when migrating.
By the way – updraftplus.com itself uses WooCommerce; we’ve even developed a few WooCommerce plugins of our own, which you can see here.
How much resources does UpdraftPlus need, and how can I make backups quicker?
Firstly, note that UpdraftPlus does not run any code on the front end of your site. (This can be verified by reading the source code). It checks, whenever loaded, that it is being called on the back-end – and hands back control immediately if not.
By its nature as a backup plugin, UpdraftPlus has to do this:
- Read every file resource on your website
- Read every row in every table in your database
- Run all the accumulated data through a zip-file compressor
- Write out the results to disk
As such, UpdraftPlus will use plenty of I/O (input/output) resources and CPU. You can’t create a backup without doing those things.
If your website is small – e.g. just made up of some blog posts, and reasonably-sized images, then all this may not amount to much. If, on the other hand, you’ve uploaded lots of large resources (e.g. videos, audio files, or huge images) or if your site is very big and popular (e.g. has vast numbers of comments), then it may amount to more. The impact of the above will be greater if your webserver and database server are on the same physical machine.
UpdraftPlus is designed to only run a single process at a time – i.e. no parallelisation. So, it can only use one CPU core at a time, and there can only ever be one UpdraftPlus process that is reading from disk or writing to disk at once. It will also be subject to any limits you (or your web hosting company) configure via the PHP or operating system configuration. As such, UD’s design means that it uses as low resources at a time as is possible.
Via only running a single process at once, UpdraftPlus is doing all it can from where it sits to limit its own resource usage. There really is no other “internal” solution that can work across the huge variety of hosting and server setups that exist. If you have particular requirements for your server, then you need to configure them at the server level.
If you are the one configuring/running the server, then you should also spend some time on tuning your server, particularly the database – a lot can be done here.
So, what can be done to limit resource usage if I don’t have access to configure the web server?
- Configure the timing of your backup to run overnight – via the “Fix Backup Time” add-on, if you don’t already have it. In the “small hours” of the morning, servers are usually very lightly loaded, with lots of spare resources.
- Make sure that your webserver really is adequate for the task. Experience has shown us that it’s too easy to be “penny-wise, pound-foolish”. Bargain-basement web hosting that saves you a few dollars a month sounds attractive, but almost always comes with a trade-off. That trade-off is that resources are very tight. If your site is big or busy enough that backing it up requires significant resources, then it’s probably also having enough visitors that the bargain-basement web hosting is cutting performance enough to chase away some of those visitors. It’s worth noting here that a low-end VPS, despite the pricing, is likely to have less resources available than typical shared web hosting. (By “typical web hosting”, we’re not talking about the folks who are selling the ridiculously under-priced deals where resources are cut to the absolute bone, e.g. one.com). This is because on a low-end VPS, you get one CPU – which is shared between your operating system, web server + PHP engine, and the database server. If you’ve got a backup process which is read/writing your whole website, and you’re wanting to run the operating system and serve up web pages at the same time, then that means that each of those tasks is going to be getting swapped in and out from the CPU, because they can’t all use it at once. On a shared web host, there are usually many CPUs (up to 32), and you are time-sharing them – so as long as all websites aren’t all having their backups at the same time, then there should be enough resources to go around. Some web hosts have stricter systems which will limit your CPU and disk I/O usage even if there’s plenty of overall CPU power available on the system, though. They vary.
- Alternatively, if you have sufficient access and expertise, then you can run the backup job from the shell, or from WP-CLI and use your system’s “nice” and/or “ionice” commands to limit resources whilst it runs. (Those commands are on Linux, Mac and other UNIX-like systems – on Windows there will be a different solution).
- Check that you don’t have any plugins that create enormous, mostly useless, database tables (e.g. some statistics plugins that record a new row in the database for every single visitor).
- If you store a lot of files, then go into the ‘Expert settings’ section of the UpdraftPlus page, and reduce the default setting for how much data is stored in each zip file. e.g. Reduce it from the default of 400Mb down to 100Mb. This will mean that UpdraftPlus spends less time in manipulating large zip files – which can use a lot of resources and be quite time-consuming, especially on slower servers.
- Run incrementals backups, so that only changes to your files need to be backed up, instead of running a full backup each time.
- Similar (but a bit more cumbersome) to incremental backups (and possible in the free version of UpdraftPlus): if you have a collection of large, unchanging files (e.g. historic audio/video), then you could take a one-time backup of these, store them somewhere safe and then after that exclude them from the UpdraftPlus backup using the exclusion options in UpdraftPlus. That will then save the time/resource usage that zipping them up into the UpdraftPlus backup would have taken.
- Update to PHP 7. If your hosting company has a choice of PHP versions, and if you are currently using an older version (PHP 5.x), then you should look into upgrading to PHP 7, which is significantly faster across a range of operations (and hence uses less resources to perform them). You will need to make sure that your plugins are up to date (or replace ones that are no longer updated with something suitable), and be ready to reverse course (which is harmless) if you find a problem.
- Complain to your hosting company. Though, in our experience, some hosting companies have an excuse for basically everything, It’s not reasonable to sell hosting space for a website but then not provide enough resources to actually operate that website within that space (which includes being able to take your own backups of it). It’s likely that this won’t get any immediate results – but if enough customers do it, and/or vote with their feet, then it’ll make a long term difference. Ultimately, companies have to listen to their customers even if they don’t do it immediately.
Can I get a discount if I upgrade?
Yes! What level of discount you can get depends upon how long ago you purchased. Here’s the full list of codes:
(Note – for customers in the EU who pay VAT, these discounts are applied before taxes; so, there will also be a corresponding reduction in the amount of VAT to pay).
To upgrade, simply purchase your new package for UpdraftPlus Premium, and use one of the coupon codes below to get a discount.
Upgrade from UpdraftPlus Premium Personal (2 licenses):
Use coupon code frompersonal
- If upgrading within 2 weeks, then use this coupon to get 100% of your purchase price back
- If upgrading within 12 weeks, then this coupon gets you $50 off
- If upgrading within 26 weeks, then this coupon gets you $30 off
- If upgrading a subscription, then this coupon gets you 100% of your purchase price back
Upgrade from UpdraftPlus Premium Business (10 licenses):
Use coupon code: frombusiness
- If upgrading within 2 weeks, then use this coupon to get 100% of your purchase price back
- If upgrading within 12 weeks, then this coupon gets you $75 off
- If upgrading within 26 weeks, then this coupon gets you $40 off
- If upgrading a subscription, then this coupon gets you 100% of your purchase price back
Upgrade from UpdraftPlus Premium Agency (35 licenses):
Use coupon code: fromagency
- If upgrading within 2 weeks, then use this coupon to get 100% of your purchase price back
- If upgrading within 12 weeks, then this coupon gets you $100 off
- If upgrading within 26 weeks, then this coupon gets you $60 off
- If upgrading a subscription, then this coupon gets you 100% of your purchase price back
Upgrade from UpdraftMigrator to UpdraftPlus Premium:
If upgrading within 2 weeks, then use these coupons to get 100% of your purchase price back. Which coupon code you use depends on which product you purchased:
- upgrade49 – If you bought UpdraftMigrator on a subscription basis (comes with 1 year of support and updates)
- upgrade30 – If you bought UpdraftMigrator as a one-off, manual purchase (comes with 60 days of support and 1 year of updates)
How long will I have access to updates for?
Firstly: already-installed software can be used forever, whether you have access to updates or not.
With each purchase, access to personal support and updates to install/update to new releases of UpdraftPlus is for 12 months. (As is the case with about 90% of the premium WordPress plugin market).
After 12 months, your subscription will automatically renew, or you can renew manually by making a fresh purchase.
To repeat: if you prefer not to renew, then your installed software is unaffected – it will remain installed and you can carry on using it.
Can I use UpdraftPlus to migrate a site to a different address?
This is a common need for site developers – or anyone wanting to maintain two copies of a site (e.g. when moving web hosting).
The answer is “yes” – you just need the “Migrator” add-on from our shop; or “UpdraftPlus Premium” which includes every add-on.
With that installed, just take a look at our migration guide.
Other products we can provide (2)
What other WordPress products have you got?
Many! Here are some from us or a sister company:
- WordPress-capable hosting from Simba Hosting – including 1-click installer
- Some other premium WordPress and WooCommerce plugins
- Maintenance – let us keep your WordPress up-to-date and safe from hackers
- New websites designed from scratch
- Modifications and fixes for your existing website
- General WordPress coding (e.g. bespoke plugins) and all-round expertise
- WordShell – the premiere tool for command-line WordPress administration. For CLI users, this saves huge amounts of time.
- Some other free plugins in the WordPress.Org directory
How do I set clipboard permissions for different browsers?
Giving your browser permission to access the clipboard makes it easy for you to copy the information that you need to connect to UpdraftCentral. Enabling this feature will save you time; instead of manually copying the generated connection key, you’ll see an icon that will copy it for you in one click. Use this guide to set up your browser correctly. Simply select your browser from the list below, and follow the instructions:
Chrome
- Open Chrome browser settings here
- Select Security & Privacy > Site Settings > Permissions > Clipboard
- Select Allow
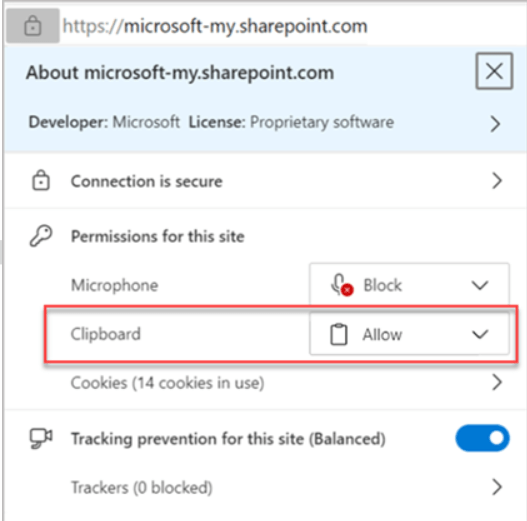
Edge
- Select the lock icon in the address bar
- Change the Permissions for this site > Clipboard setting to Allow
Firefox
- Open Firefox Browser
- In the address bar, type ‘about:config’ and search
- A page will appear with the option ‘Accept the Risk and Continue’
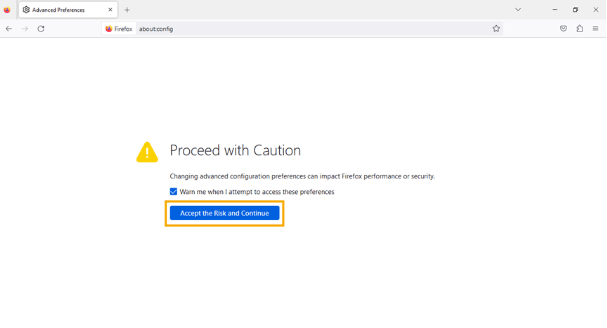
- For the following two Parameters change the preferences as True:
- dom.events.asyncClipboard.readText
- dom.events.testing.asyncClipboard
If you’re struggling to implement these steps, then as a Premium user, you can reach out for ticketed support. Free users can seek support via the WordPress forum.
Licensing and legal questions (4)
How many sites can I install UpdraftPlus on?
The free edition of UpdraftPlus can be installed anywhere and everywhere you like.
When you purchase UpdraftPlus Premium (our version with all extra features, upgrades and 1-year support), then you can choose whether you want a 2-site, 10-site or unlimited site licence. These can be installed on the number of sites indicated.
The above entitlements are used to grant access to support and access to your UpdraftPlus.Com account for downloading software and obtaining upgrades. UpdraftPlus itself is under the GNU GPL, the same licence as WordPress itself, which grants you many and various further rights.
What licence does UpdraftPlus use?
UpdraftPlus is copyrighted, and the main body of its code is licensed to users under the GNU General Public Licence, version 3. Details on the open-source licences of various linked components used are available using the links on our acknowledgements page.
Please note that the GPL licence does not grant any rights to use UpdraftPlus’s trademark or brand beyond ordinary installation and use of the software, without additional explicit permission from us. Furthermore, whilst the GPL grants a perpetual right to use of software obtained under it, it does not grant a perpetual right to any associated services, for example, to receive updates to future updates of the software (in our case, purchases in general come with a right to 12 months of updates, subject to conditions (e.g. not abusing our support staff or other facilities) but you can check the details for individual products).
Can I install UpdraftPlus on my clients’ sites?
Yes, you can install UpdraftPlus on your clients’ sites. There are no technical or licensing restrictions preventing this – we are all in favour of it.
Since you are our customer (and your client is your customer), if there are support issues that come, then it is you who has the right to come to us for personal support. Your client, if they need to, will go to you for support. Of course, it is also very acceptable for your client to get their own UpdraftPlus licence so that they can get direct support, if you prefer that. Whatever works best for you is fine with us!
How can I release / re-cycle a licence?
You can release an assigned licence and make it available for re-use elsewhere any time from 30 days after de-installing the paid version of UpdraftPlus on the site. (You can re-install the free version at any time, including immediately). To do so (i.e. assuming you have de-installed it 30 or more days ago) visit the ‘Licences’ page in your account. There, if the licence can be released, there will be a link to do so, as shown in the screenshot below.
If you need to purchase more licences, then you can do so from our shop.

Remember that an active licence is not needed for UpdraftPlus to run. Licences are required for ongoing support and access to new versions. If you wish to run old versions then you are free to do so (but of course, it is unsupported).
Google Drive (9)
How do I add a Google Drive account to UpdraftPlus?
To configure your account, see here.
What does the error “Error: redirect_uri_mismatch” mean?
It means that you wrongly copied across the URL shown in your admin console to Google Drive/Cloud at the relevant step. Please return to the relevant step of the instructions (these instructions, for Google Drive, or these ones, for Google Cloud Storage), and try again.
I can no longer download or restore from a Google Drive backup
Google recently (first half of 2013) changed their permissions setup. Specifically, the permission which UpdraftPlus was using to download backups (and thence to restore them) no longer enables it to do so.
To fix this, you need to:
1) Update to UpdraftPlus version 1.6.1 or later.
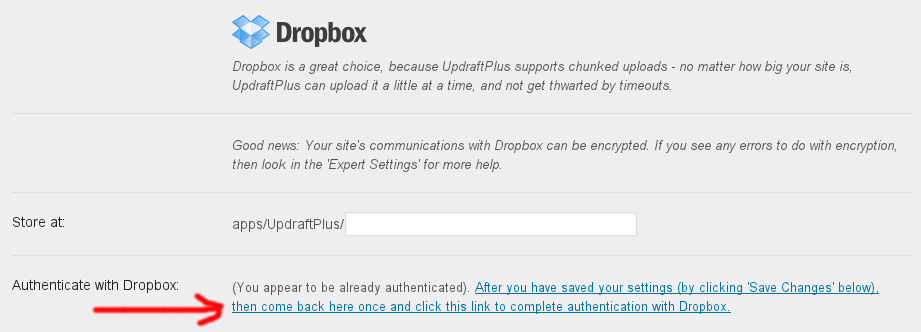
2) Click on the link to “Authenticate with Google”, down in the “Google Drive” settings section.

Authenticate with Google
You will then be able to re-authenticate with Google, gaining the new permissions needed to download your backup files within UpdraftPlus.
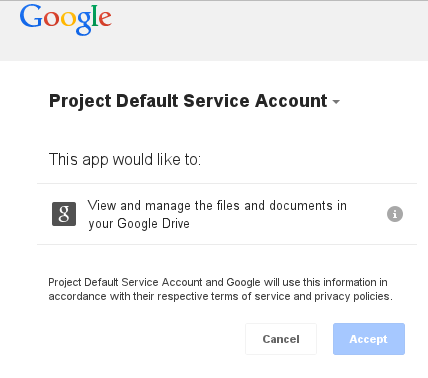
Granting permission to UpdraftPlus to use Google Drive
What does the Google Drive/Cloud error “invalid_client : no application name” mean?
If you see this error when you are authenticating with Google, then it means that when you created your Google API project, you omitted to give it a name.
Google didn’t use to mind about this. But since at least April 2014, they do.
To solve it, log in to your Google API console, and edit your API application there, and give it both a name and an email address in the “Consent Screen” settings (APIs & auth -> Consent Screen). These are not used for anything other than showing you them back when you authorize.
For screenshots, see the step “Set up a product name and email address” of the Google Drive setup instructions (or for Google Cloud Storage, these setup instructions).
What does the error message “Google Drive … Access Not Configured” mean?
Do your backups not reach Google Drive, and are you shown a message like the following? (Either in your dashboard, report, or in your log file):
Google Drive: failed to obtain name of parent folder: Error calling GET https://www.googleapis.com/drive/v2/about: (403) Access Not Configured. Please use Google Developers Console to activate the API for your project.
This message means that when you set up your Google Drive access, you missed out step 2 of the setup instructions, “Activate the Drive API”. i.e. You did not configure the Drive API to be enabled in your Google account.
Enable it, and all should be well. Check the Google Drive setup instructions to see some screenshots and more information.
I have several sites all backing up to the same Google Drive, but sometimes they have authentication failures
The solution is that every separate WordPress installation will need to use its own unique Google API project.
Note: this doesn’t mean a unique Google account – it means a separate project within your Google account’s API console. (See the Google Drive setup guide to refresh your memory on this, if it’s unfamiliar).
This isn’t officially documented by Google anywhere – as far as we know (the documentation is voluminous, and distributed across many places). The only thing you would know from the official guides is that each WordPress install needs a unique client ID. However, several users have found that when they use the same project for several sites, then Google Drive randomly sends back access errors. This probably means that there’s a glitch some inside Google’s own code. But, whatever the reason, it’s not something that can be addressed from this end – you will need to use separate projects in order to work around it.
My Google Drive quota is full, even though I’ve deleted my backups and cannot see anything using it
Here are a couple of things to check…
- Note that your Google quota is not simply a “Google Drive quota”. It is used by other things in your Google account – including GMail, and Google Photos (which your phone might be automatically uploading to). More information from Google is available here.
- If you send an item in Google Drive to the ‘trash’ folder, then it still uses quota. You need to remove it entirely to get the quota back.
What is the privacy policy for use of your Google Drive app?
This privacy policy is published by the creators of UpdraftPlus, Updraft WP Software Ltd (UK) (please see the footer of this page for company registration number). It applies only if you are using our built-in app for authentication. If you configure UpdraftPlus to use your own app, then it does not apply, since in that case no data comes to any of our servers (and so no policy for handling that data is needed). Also you may want to note Google’s own terms and conditions (which forbid use of consumer Google Drive accounts for commercial purposes).
Note that Google Drive does not provide a security model that keeps any data stored via an app (such as UpdraftPlus) separate from other data stored by the same app. i.e. It is not suitable for storing data that belongs to separate websites if administrators of those websites should not be able to access each other’s data. That is not an UpdraftPlus decision, that is the Google Drive security model; Google want you to instead use Google Cloud for commercial use. (Other commercial storage providers are available, of course).
Use of Google Drive with UpdraftPlus involves visiting our authentication server (website) as part of the authentication (OAuth) flow. Note that no backup data or other data from your WordPress site goes to our servers – this all remains on your server on which you are hosting WordPress. So, when you see the Google permission authorisation screen, it is asking you about what the plugin, running on your webserver, will be able to do.
The authentication procedure will cause:
- Your IP address to be logged in our webserver logs. No further processing of these logs is carried out. These logs are kept for 6 months in accordance with UK law, and then automatically deleted. We carry out no further processing on them. They are not shared with any third party.
- (If authentication succeeds) your Google account identifier to be stored in the authentication server’s database, so that the necessary authentication token can be given to your site if it requests it again. We carry out no further processing on them. They are not shared with any third party.
No other data is sent or implicitly gathered by any of our servers in the process of using Google Drive. Any changes to this privacy policy in future will be notified of on this page.
Google Drive creates multiple folders with the same name?
You’ve connected Google Drive to UpdraftPlus as a remote storage option but sometimes it creates a second folder instead of uploading to the existing one?
This issue is a known thing that can happen and theres not much that can be done about it.
Google Drive doesn’t enforce unuque folder names, which means you can have lots of paths with identical names.
UpdraftPlus when it goes to backup will try to look up the folder name in your Google Drive, if this fails it will try again, if it fails again then it requests to create a new one and then it carries on with the backup this is better than no backup e.g the other case being we failed to look up the folder lets not do a backup.
The folder lookup could be caused by a temporary network issue or something similar.
This has happened to my backups so now what can I do?
The only thing to do is manually move the backups all into one of the folders and then delete the other folders.
Restoration (16)
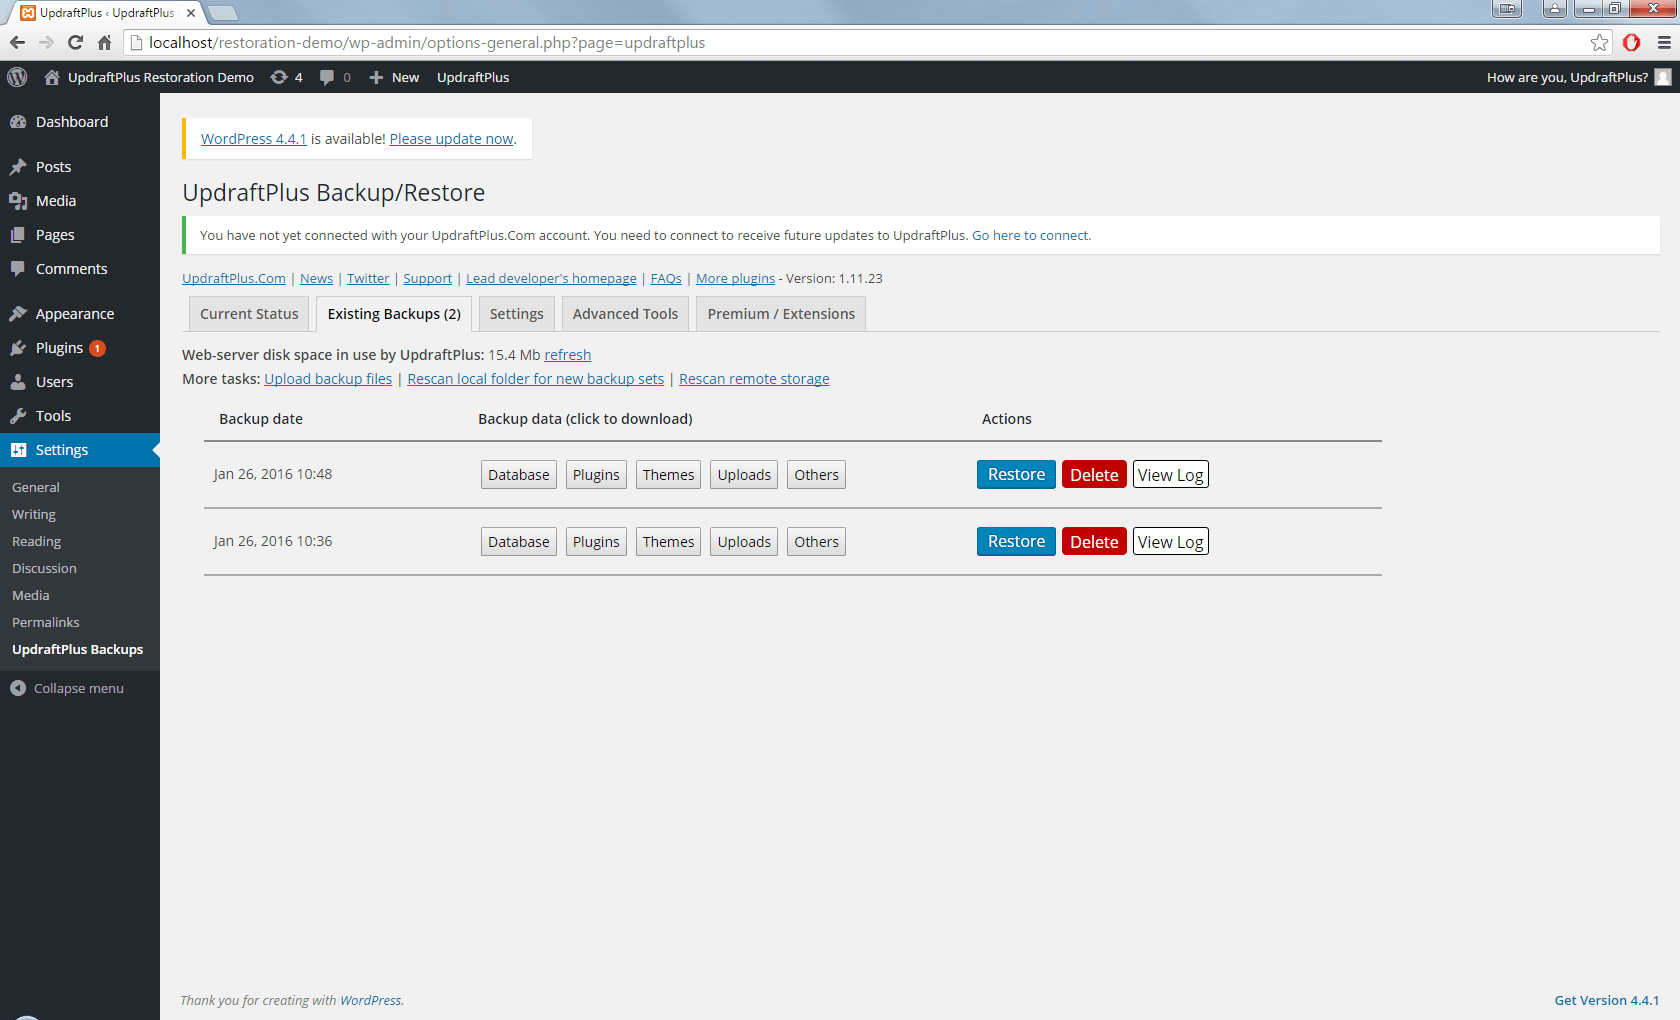
How do I restore my backup (from an already-installed WordPress site)?
A WordPress installation is made up of two things: firstly, the files which are on disk, and secondly the (MySQL) database. To transfer a site from one place to another, there are two things to do: 1) Copy the files and 2) Copy the database. Restoring a backup is exactly the same in principle – restore the files and restore the database. Read on!
(Note – if you are migrating a site to a different location (URL) – i.e. not restoring at the same website address, then there is also a third step: 3) search and replace the database. For this, you will need our Migrator add-on (which is also part of UpdraftPlus Premium).
First: Is your website behind a reverse proxy, such as CloudFlare, or GoDaddy’s “Preview DNS” proxy? You will want to not access your WordPress dashboard this way to do the restoration, because such proxies usually impose a low time-out. If you cannot disable the proxy, then you may need to restore manually instead unless you know your backup is small.
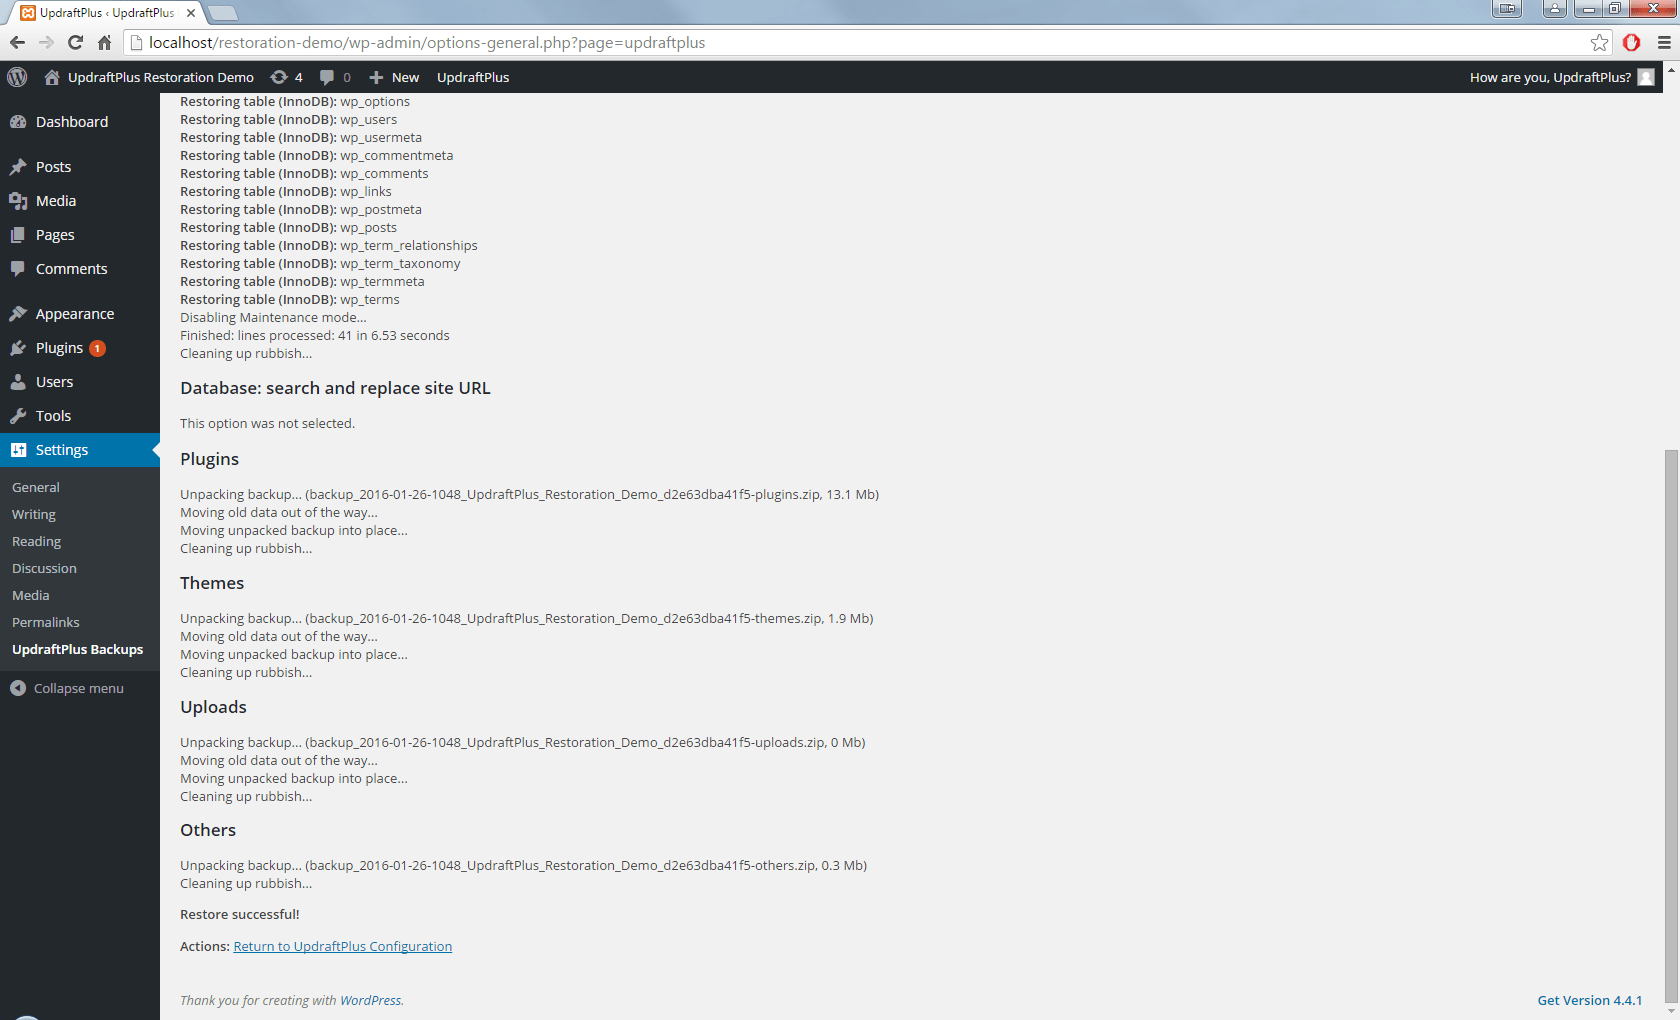
If your site is still basically intact (in particular, the database), then on the UpdraftPlus settings page, there is a ‘Restore’ button. Press it, and it will show you all of the backups it currently knows about. There is a further “Restore” button for each backup, allowing you to choose the particular backup you wish to restore. Once you press that, it will allow you to choose which parts of that backup you wish to restore. Then it will over-write your present data with that contained in the indicated backup set.
Note: if your website backups are large, then a bargain-basement web hosting company may impose a time limit which may be too small. This may result in a partially-restored site. The lowest risk way to restore (but which requires more skills) is manually – see here. Another way to lower the risk is to restore one component (uploads, plugins, themes, etc.) at a time. Generally if you are restoring many things, the safest procedure is to first restore the “uploads”, then secondly the themes, then finally the plugins, others and database together. “Database last” is the one rule that should be kept.
If, however, you have a set of backup files that UpdraftPlus does not yet know about, then there is one extra step. (This situation happens if you make a new WordPress install and install UpdraftPlus). To make UpdraftPlus to know about your backup, you need to 1) Copy the backup zip files from your backup set into UpdraftPlus’s folder by FTP (by default this folder, relative to your WordPress installation, is wp-content/updraft). 2) Click on the ‘rescan folder for new backup sets’ link. Then you can proceed as before.

If you want to restore the database, then you do exactly the same again – but tick the box for “Database” when asked to. Alternatively, if you want to do it manually, then you need to use your web hosting company’s control panel. (Or if you are an expert user, use MySQL from the shell). Look for “database administration” or “phpMyAdmin”. You should be able to find the “Import” function and upload your UpdraftPlus database backup file directly into there. (You will need to remove the encryption first, if you chose an encrypted backup – this is done for you automatically if you download the database from your site’s UpdraftPlus settings page; or you can use the drag-and-drop decrypter on the setting page).
If you require more detailed instructions, we have a step-by-step guide available.
I encrypted my database – how do I decrypt it?
If you have the encryption key (which you entered in your settings) and you are restoring from the settings interface, then it will automatically decrypt. i.e. If you’ve changed your encryption key setting in the mean-time since you backed up, then you should change it back.
If you have a file which you with to decrypt and download (without doing anything else with it), then you can use the drag-and-drop facility built into UpdraftPlus (versions 1.5.10 and upwards). Find it in the “Settings” tab; add your encryption phrase there, and save your settings:

Otherwise, if you really like doing things by hand (or wish to decrypt from the command-line), then use the file example-decrypt.php found in the plugin directory; that will need very (very) minor PHP knowledge to use; find your local PHP guru, or buy support from our shop.
I lost my encryption key – what can I do?
The answer is unfortunately very likely to be “nothing”. It’s real encryption; and people who don’t have the key can’t get the data; it’s meant to be mathematically impossible with current knowledge. National security agencies can hire encryption experts to build large super-computers to try to break the encryption by brute force, at a huge price – but that’s beyond the reach of other mortals.
You must keep your encryption key stored safely so that you won’t have this problem… if it’s already too late for you, then you might try to remember really hard to see if you’ve perhaps got an old backup or copy of the database somewhere. If you have, then search in it for the text “updraft_encryptionphrase”. If your database is online, then it’s the “options” table that you’re wanting to search in.
What format are backups made in?
UpdraftPlus backs up your files into ordinary zip files (the same format that WordPress and its plugins and theme directories use) rather than any proprietary file formats. The database is backed up into an ordinary SQL (text) file.
Therefore you can use UpdraftPlus to restore backups, but do not have to. You do not even need WordPress installed. You can just unzip the zip files, and use your web hosting company’s control panel to import the SQL into your database.
We are committed, as a fundamental of UpdraftPlus’s design, to retain this situation. UpdraftPlus backups will always be something that you can restore with standard tools. There will be no proprietary lock-in.
I get SSL certificate errors when backing up and/or restoring
SSL is a technology used to help you make sure that a) you really are communicating with the people you thought you were (authentication) and b) your communications with them cannot be eaves-dropped by others along the way (encryption).
SSL uses entities called “certificates” to enable these functions. These certificates have time limits upon them (so that if a bad guy manages to steal one, then it has a limited use).
For this to all work, it relies upon the right certificates existing in the right places. In particular, you need to be able to access a store of certificates up-to-date.
UpdraftPlus manages this by including certificates internally. However, if something goes wrong then you may see errors when UpdraftPlus tries to connect to cloud storage (e.g. Amazon S3, Rackspace Cloud, Dropbox, Google Drive).
It is also possible that these errors mean that somebody really is trying to intercept and decode your communications. That’s what SSL errors are for – to alert you that something is wrong.
One step that you can take safely is to open UpdraftPlus’s “expert options” (at the bottom of the UpdraftPlus settings) and activate the option for UpdraftPlus to use your web hosting company’s certificate store (instead of its own). Then try again. If the backup now succeeds, then you should inform us so that we can trace the problem.
If that fails, then you can also try the option to not verify the identity of remote sites. This means that you are turning off authentication. This lowers your security. It should only be done if you are comfortable with the risks (e.g. you are sure that the communications really are with Amazon S3, Dropbox, etc.).
Finally, you can also turn off SSL entirely, using another expert option. Note that this only works for certain transport methods (including Amazon S3 and FTP (for those who have the FTPS extension activate)). Some cloud storage providers (including Dropbox) require SSL, so your only solution with them is to fix your installation.
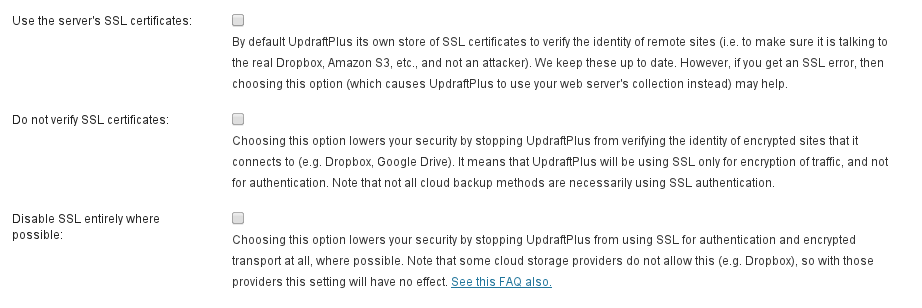
Expert options for SSL
When I restore WordPress core, should I include wp-config.php in the restoration?
This question is only relevant if you have the “More Files” add-on (or UpdraftPlus Premium, which includes all add-ons).
If you are restoring a site, and restoring WordPress core as part of that restoration, then you will be asked if you wish to include wp-config.php in your restoration:

Option to restore wp-config.php
What is wp-config.php? It is the WordPress configuration file. You can read about it in the official WordPress documentation, here.
It tells WordPress how to find its database. As such, it is a critical file. It can also contain various other settings that control WordPress’s behaviour, e.g. your language setting if you are not using the default language.
If you are performing a migration (i.e. move to a different URL), rather than a restoration, then it is always wrong to use this option. (If you can think of any exceptions to that rule, then let us know; we can’t!).
Should you include it in your restoration? It is always safe not to – if you do not select this option, then UpdraftPlus will leave wp-config.php alone, but restore the backup as wp-config-frombackup.php. You can then look at the differences (if any) between the two by hand, and tweak them at your leisure.
However, i you are using the same database as was being used when you backed-up, then generally, yes, it is safe. wp-config.php may contain settings placed there by other plugins that you will want to retain. However, if you are using a different database (e.g. this is a new installation, or you had to create a new one for some other reason), then restoring wp-config.php will break your site – because, after restoration, WordPress will be looking in the wrong place for its database.
The rule of thumb is: if in doubt, then don’t; especially if you are not confident about editing wp-config.php yourself if you make a mistake. All you are likely to lose is a few settings which you can easily restore. However, if something does go wrong then don’t panic – editing wp-config.php is actually very easy, and if you’re not confident yourself then you should easily be able to find someone to do it for you.
I want to restore, but cannot or have failed to do so from the WP Admin console – can I restore manually?
Don’t panic. If you have access to your backed files (i.e. you have the emailed copies, or have obtained the backed up copies directly from Amazon S3, Dropbox, Google Drive, FTP or whatever store you were using), then you simply need to unzip them into the right places. These are all basic operations and not difficult – if you don’t have anyone who can help at hand or if you just want a quick solution, then contact Support (Premium customers only).
Note: Over the years there has been a tiny number of users who go the do-it-yourself route, but who make beginners’ mistakes (which is understandable) and then decide to send us nasty-o-grams about it. The procedure below is tried-and-tested; we have done it over a hundred times. Please don’t be one of those unreasonable users! :-)
Finally… if your WordPress site is too broken to log in to, and you have an UpdraftPlus backup, then you can just delete the broken site (or better, move it elsewhere – just in case it still has something you might want in), make a new install of WordPress and UpdraftPlus, and go from there instead. It’s not necessary to go the manual route until you really need to!
But, if you are doing a manual restore, then… just do this:
1. Unpack a fresh copy of WordPress.
Unless you purchased the “more files” add-on, UpdraftPlus does not back up the WordPress core – you can just get a fresh copy of that from www.wordpress.org. So, if you are starting from nothing, then first download and unzip a WordPress zip from wordpress.org/download. (If you did purchase the add-on, then you can skip from here to step 2., and just make sure you unpack the wpcore zip first at that stage).
You will also need to set up a new wp-config.php file, by editing and renaming the wp-config-sample.php file that is included in WordPress, so that it contains your proper database details. Don’t access WordPress itself in your browser until you’ve finished this entire procedure, though – edit wp-config.php in a text editor. You will also want to copy any other settings you had in your old wp-config.php – e.g. multisite settings. (If your backup includes a “wpcore” zip, then you can find your old wp-config.php in there. Don’t copy the old database settings, unless you really do intend to use the same database instead of importing the backup as below).
If your site is moving location (i.e. changing URL), then you will also want to add WP_HOME and WP_SITEURL parameters to the wp-config.php file. See here and here. (If you do not, then you will not be able to log in).
2. Unpack the plugins / uploads / etc.
After doing that, then unzip the backed-up zip files (i.e. the archives that UpdraftPlus created and stored) for your uploads, themes, plugins and other files back into the wp-content directory. If your access to your website is via FTP, then that means you would do this for each of the .zip files you have from UpdraftPlus:
- Unzip the zip file on your computer.
- Log in via FTP to your website’s hosting space, and move into the wp-content directory.
- Copy the contents of the zip file via FTP into wp-content. If done correctly, then for the “plugins” backup, you will be copying over a folder called “plugins” into wp-content, so its final name is wp-content/plugins. (The “others” archive will not follow this pattern – it can have anything in it)
If you had the “more files” add-on, and have a “wpcore” zip, then unzip that one first. That is the zip that contains the “wp-content” directory that you’ll then be extracting the other zips into.
N.B. For larger sites, your backup may be split over multiple zips files. For performance reasons, by default, UpdraftPlus splits the data every 400MB. So, you may have more than one “uploads” zip (with names ending in uploads.zip, uploads2.zip, uploads3.zip, etc.). You need to unzip and upload *all* of these, so that the final wp-content/uploads folder (in this example) is the resulting of merging all those zips (i.e. unzipping them all on top of each other).
3. Import your database
Finally re-install the database. Your web hosting provider will almost certainly provide you with access to a database manager – often phpMyAdmin.
If your database was not stored with encryption, then you can simply click on the ‘Import’ function in your database manager, and upload the database file (the file which ends in db.gz). Then you are finished!
Note: some versions of phpMyAdmin only want to accept a database backup for which the filename ends in the pattern “.sql.gz”. You can achieve this by simply renaming the UpdraftPlus backup – change the filename ending from “db.gz” to “db.sql.gz” before uploading it.
If your database needs decrypting (if the file name ends in gz.crypt) then you need to decrypt it before doing the above step. See this question here.
What should I understand before undertaking a restoration?
Restoring parts of WordPress from inside WordPress always carries risks. Our aim is to reduce them as much as possible. If you are in doubt about anything, then remember that we sell a hands-on “we’ll do it for you” product in our shop, in the “Support” section. Remember: though we want UpdraftPlus to work as reliably as possible (that’s how we get customers), ultimately it is a do-it-yourself tool, that you are finally responsible for the use of. If you want to hold another person responsible, then first hire that person to do the job for you!
Anything to worry about?
Firstly, if your website and its backups are not large (measured in the tens of megabytes instead of the hundreds), and if you can directly access it (i.e. it is not walled behind a proxy service such as CloudFlare or GoDaddy’s “DNS Preview”), then it is likely that you can stop reading now (although if you are restoring a site to a different address (URL), then see the note below). Even the most resource-starved of web hosting companies will be giving you enough resources so that you have nothing to worry about. If your website is under 200 megabytes, then you should still be fine as long as you have not over-economised with under-resourced web hosting (or been conned by high-priced hosts who sell you the same product with nicer branding!). You can also stop reading. Otherwise, read on.
Experts may prefer to do it manually
The safest and quickest way to restore WordPress is often manually, from the shell (or via FTP if no shell is available). Why is it safer and quicker? Mainly because it is not subject to the time-outs that come when running inside a web browser, and also can run quicker. However, the manual way also requires the most technical skills. If you do have the skills, then there are no technical advantages to doing it inside UpdraftPlus instead of manually – only convenience. The instructions for manual restoration are here.
Mostly, there’s nothing to worry about
Don’t let the above paragraph worry you unduly. All restorations of plugins, themes, uploads and (where relevant – on WordPress Multisite) additional blogs and must-use plugins are done atomically. This means that it’s all or nothing – either the restoration will be entire/complete, or nothing will be restored. UpdraftPlus does this by unpacking the download, and then moving the entire folder into place at once. So, there’s almost no risk of anything going wrong with restoration of those entities. If you have the “more files” add-on, in order to back-up and restore WordPress core, then this restoration cannot be done completely atomically. The atomicity is per-directory within your WordPress root. i.e. Inside the directory that has WordPress in it, UpdraftPlus moves in one directory/file at a time. This is still very low risk; moving things is only done once the entire archive is unpacked (into temporary storage), and the consequent moving around is almost instantaneous.
Maximise your chances
To maximise the amount of time that WordPress is allowed to spend on any one operation, you should access your website directly if you can. If your website is on CloudFlare or another proxy service (e.g. GoDaddy’s “DNS Preview” service), then temporarily disable it. Many proxy services impose a time-out that is lower than your web hosting company’s own time-out.
The database
The main risk is when restoring a database upon under-powered cheap web hosting. The risk is larger the larger your site is. This cannot be done atomically. If it aborts mid-way (e.g. due to a time-out), then you will be left with a database which partially contains the old data and partially contains of the new. However, if you are restoring a database, then presumably either your old and new databases are very similar, or the site you are restoring to is not live (we can’t imagine how someone would be replacing a very different database on a live site). In order to maximise the amount of time you have available to complete a restoration, you can and should:
- If any of the entities you are restoring are particularly large, then do them separately. i.e. First restore the plugins, then do a separate restoration of the themes, then of uploads, etc. If you do this, then don’t be surprised to see various errors on your site in the intermediate stages, when only some things and not others have been restored. Wait until everything is restored before looking at them – and (this is important) – restore the database last. (And when you restore your plugins, we expect that your backup also had UpdraftPlus in it – but if it did not, then don’t be surprised if UpdraftPlus disappears immediately upon restoring plugins; just install it again after doing so).
Restoring from scratch?
If you are restoring from scratch, and do not have the “More Files” add-on, then remember to set up any extra parameters in your wp-config.php file.
I am restoring a pre-WordPress-3.5 multisite into a 3.5-or-later multisite – what happened to my blogs.dir?
Before WordPress 3.5, a new WordPress Network (i.e. Multisite) install used to keep media uploads (images, etc.) in the uploads directory (for the “main” site on the network, site ID 1), and in a separate directory (called blogs.dir by default) for other sites. By default, blogs.dir was found at wp-content/blogs.dir, and UpdraftPlus’s multisite add-on would back it up separately.
From WordPress 3.5 onwards, a newly set up (i.e. not upgraded) multisite would instead put all blogs’ uploads in the uploads directory (wp-content/uploads, by default). This is more consistent, and leads to fewer backup zips.
However, this presents a small issue if you have a backup from a pre-3.5-era multisite, and wish to restore it into a 3.5-or-later multisite. You have a backup of blogs.dir – but your new site has no such location.
This issue does not arise if you have only upgraded your pre-3.5-era multisite to 3.5 or later – in that case, WordPress will run it in a compatibility mode, and keep the blogs.dir setup). Furthermore, this issue is not relevant if you are restoring a database from a pre-3.5.-era multisite, because doing this will trigger WordPress’s compatibility handling.
What to do? You can do this:
- Unzip your blogs.dir backup zip (i.e. the one that UpdraftPlus created). It will contain subdirectories for each site on the network, like blogs.dir/2, blogs.dir/3, etc.
- Also unzip your uploads backup zip. This will contain a subdirectory, “uploads”.
- Create a subdirectory “sites” inside it the “uploads” subdirectory (i.e. “uploads/sites”).
- Move the contents of the blogs.dir directory into uploads/sites (so now you will have “uploads/sites/1”, “uploads/sites/2”, etc.).
- Zip up the uploads directory again, so that you have a zip file with one subdirectory in the top level (“uploads”).
- You can then use the new uploads zip to import your site uploads.
Alternatively, just perform the restoration, and then copy over the contents manually from your blogs.dir backup zip into wp-content/uploads/sites on your new site.
You can do the same procedure in reverse if wanting to transfer content from a post-3.5-era setup into a pre-3.5 multisite.
Please can you (Mr. UpdraftPlus) send me (A. Customer) a copy of my backup set? Thanks!
We can’t do this, because we have never had any copies of your backups (unless you paid for and set up access to UpdraftVault storage – in which case you should go to your UpdraftVault page in your account, or fill in our customer support form, with your order number).
Where are your backups? Your backups are stored in whatever location you chose in the UpdraftPlus settings (e.g. Dropbox, Google Drive, etc.):
If you chose no backup destination, then (as it says in the settings area, in the screenshot above) your backups are kept on your web server. This means that they are in the directory wp-content/updraft . We don’t recommend doing this, as then if hackers destroy your website or your web hosting company goes bust, then you lose both the site and the backups in one go. This is why UpdraftPlus shows you a warning if you select that option. In that case, you can get them via FTP, or from your web hosting company’s control panel, or by requesting from your web hosting company (we don’t have access to your web hosting company, so it’s them you’d need to talk to).
Why am I being asked for FTP details upon restoration/migration or plugin installation/updates?
On some WordPress setups, you might see something like this when you try to restore your backup, or when you try to install or update UpdraftPlus:
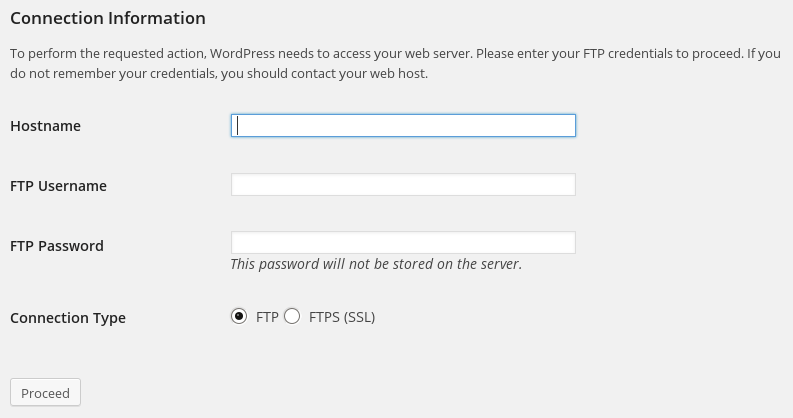
This happens if (and only if) WordPress does not have sufficient file permissions to write to the directories which it needs to write to, or if it finds that when trying to write, the resulting files have different ownership or permissions to WordPress itself. (To be more accurate, the PHP engine that WordPress is running on top of does not have these permissions, or runs under a different ownership). When this happens, WordPress has another trick up its sleeve: it asks you for FTP details. With those FTP details, it writes the files another way: by sending them over FTP to the webspace.
Hence, the key points are:
- This is a feature of WordPress
- It happens if the file permissions do not allow WordPress to write files directly, or they result in unexpected file or group ownership.
- It does not indicate a problem as such
- The FTP details to enter are those for the web hosting space (i.e. the web hosting space that the WordPress install you are working on is installed in)
- If you do not know your FTP details, then you will need to ask your web hosting company (we certainly do not know them!)
- Alternatively, if you are able, you can change the ownership and/or file permissions of your WordPress install, to allow PHP to be able to write to it.
Which directories?
If you see this message installing/updating, then the important directories are: wp-content and wp-content/plugins. If you see it when restoring a backup, then the directory involved depends on the component being updated; you should check the permissions on the directory containing WordPress (if restoring WordPress core), and wp-content, and wp-content/plugins, wp-content/themes and wp-content/uploads, for other entities.
How do I restore my site with UpdraftPlus?
This question is about how to restore your site to the same location and URL. For information on migrating a site, please see our Migration Guide. For information on moving hosts, please see our ‘How to move hosts‘ guide.
In the example below, we are restoring a site that has an accessible WP Admin to a previous backup. If your WP Admin is not accessible, you will need to follow this guide instead.
1. Install/Activate UpdraftPlus
If you are starting with a fresh installation of WordPress, or if UpdraftPlus is not currently installed, you will need to install and activate UpdraftPlus. For full instructions on how to do this, please see our installation guide.
2. Find your backup files
If restoring a site with a pre-existing UpdraftPlus installation, go to Settings->UpdraftPlus Backups and click the ‘Restore’ button. This will open the ‘Existing Backups’ tab. There you will see a record of your backup, and can move onto Step 3.
If you do not see a record of your backup, or if this is fresh installation, you will need to import your backup files into UpdraftPlus. There is more than one way to do this – you can use any way you like:
- Make sure that the site is set up to access your remote storage location (e.g. Dropbox), save your settings, and then press the “Rescan remote storage” link in the ‘Existing Backups’ tab.
- OR, download the backup set from your remote storage location (or wherever you have the backups stored), and upload into the ‘Existing Backups’ tab, via the ‘Upload backup files’ link.
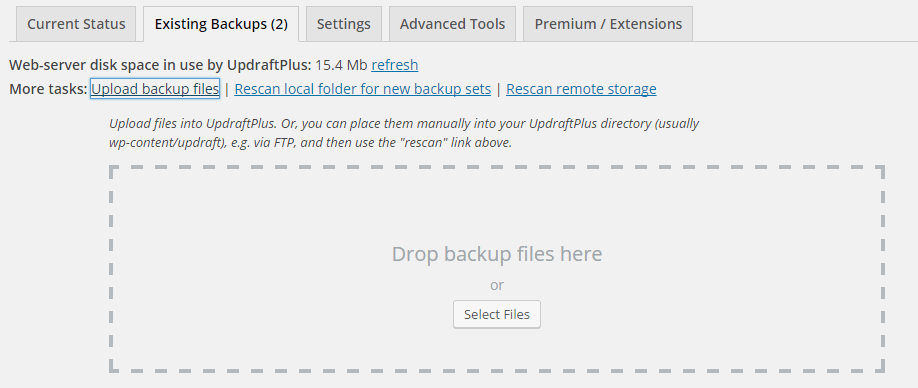
- OR, download the backup set from your remote storage location (or wherever you have the backups stored), and use FTP to upload into the UpdraftPlus folder on your destination site (wp-content/updraft by default), and press the “Rescan local folder for new backup sets” link in the ‘Existing Backups’ tab.
Once you have uploaded the backup set, you should see a record of the backup in the ‘Existing Backups’ tab.
3. Start the restoration wizard
In the Existing Backups tab, click the ‘Restore’ button for the backup set that you want to restore (under the ‘Actions’ column). A pop-up will appear with a list of options to restore:
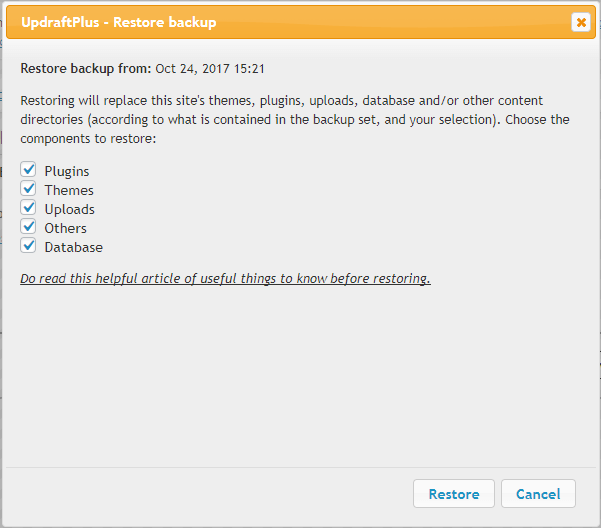
Select whichever parts of the backup that you need to restore. If restoring WP-Core files, you will need to choose whether to restore the wp-config file (This is not needed in most normal restorations).
Once you have selected your required sections to restore, click the ‘Restore’ button.
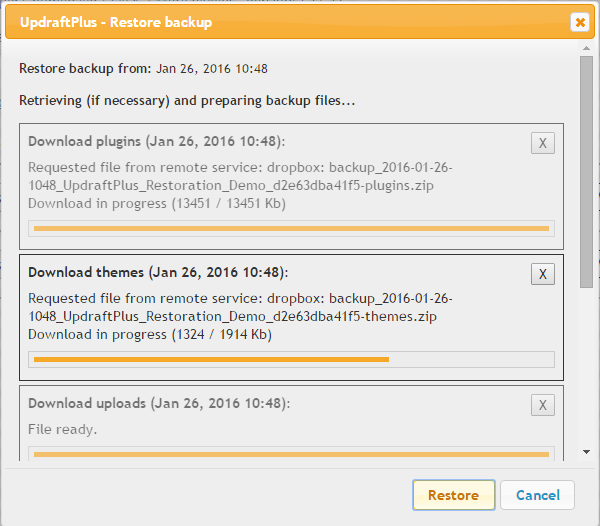
4. Begin the Restoration
After clicking ‘Restore’, UpdraftPlus will download (if needed) and process your backup files ready for the restoration.
Once this is done, you will receive a confirmation message and warning of any problems that UpdraftPlus has found. If restoring the Database, you DO NOT need to select the ‘Search/Replace database’ option.
If you are happy that there are no problems, click ‘Restore’ again.

5. Watch the restoration succeed!
UpdraftPlus will then run the restoration. You can watch the progress:
At the bottom of the screen, hopefully you’ll get the “Restore successful!” message, and the option to return to the main UpdraftPlus page:
If you do return to the WordPress dashboard, you may have to log in again.
Didn’t work?
If something went wrong, then don’t panic – it may be easy to fix. If UpdraftPlus has detected that the restoration was timed-out or crashed partway, you should see a notice at the top of the UpdraftPlus settings page with the option to resume the restoration.
Even if this doesn’t work, then there’s still nothing to worry about – the UpdraftPlus backup files are just standard zip and SQL files which can be used to restore your site manually. However, before you give up, do try looking in your web server’s error logs, and turn on WP_DEBUG in wp-config.php.
What are the implications of changing a table’s character set?
Background: Since UpdraftPlus 1.13.8 (autumn 2017), UpdraftPlus has been able to do extra checks upon your database prior to restoration for compatibility. In particular, it will look at the MySQL server that WordPress is running on, and make sure that it supports the character sets which are used by your database backup. Of course, if you are restoring on the same site/server, then this won’t be an issue. But it can very occasionally be an issue when people create a site on one setup which is unusual, and then try to restore somewhere else. (The normal situation with modern MySQL and WP versions is that you’re using a character set which supports a full range of international characters).
In this case, UpdraftPlus will show you a warning, and ask if you want to change to a different character set, as below:
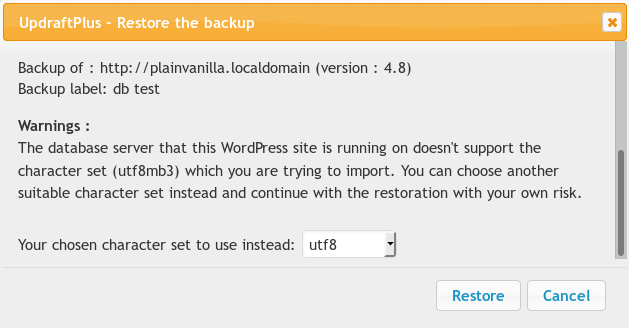
In the past, UpdraftPlus used to crash in this case. But now it will detect it, and give you this option, whether to carry on with an attempted substitution, or to abort.
So – is it safe?
The answer, unfortunately, is “sometimes”. If your database content includes characters which do not exist in your chosen character set, then the import will either fail, or MySQL will silently drop parts of the data. If your database content does not include characters which do not exist in your chosen character set, then the import will be successful. For this reason, you should choose a character set that is as similar as possible to the one that your are trying to replace, and to be ready for things to not work. It is difficult to give more advice than this, because the issue can become very technical.
The most fail-safe thing to do is to speak to the administrator of your destination server (i.e. the MySQL server), and ask him if he can enable the missing character sets on the server (which might mean upgrading MySQL). Then you will be able to be sure that there won’t be a problem.
Tell me more about the “Search and replace site location in the database” option
Quick link: Go to the UpdraftPlus shop to find the Migrator add-on, or UpdraftPlus Premium.
If you have the “Migrator” add-on (or UpdraftPlus Premium, which includes all add-ons), then when you restore a site, you will be given the option to “Search and replace site location in the database”:
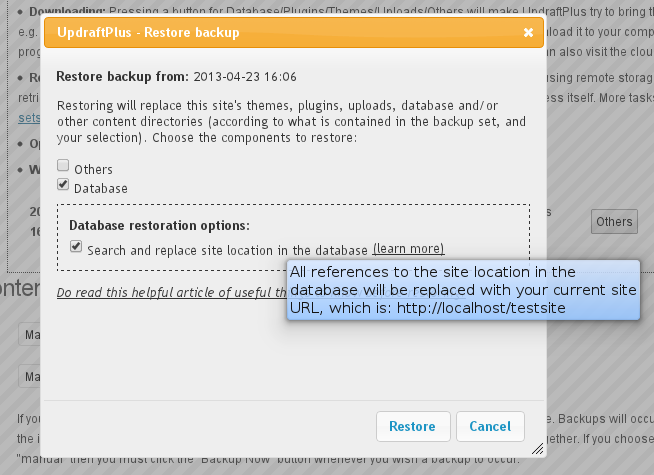
Migrating a database
What does this option do? If selected, then after restoring your database, it will then perform a search-and-replace operation upon it. It will first look up the address that the site was living at (i.e. the site whose database you are restoring). Then, it will replace all instances of that location in the database with your site’s new address.
This is a vital step if you are migrating a site from one location (URL) to another. For example, if you are moving a site from your development location – e.g. https://localhost/testsite to your live location – e.g. https://example.com – then after copying all the files and database, you then need to search/replace the database to reflect the new location. If you do not, then your site, though sitting at the “new” location, will contain lots of references to the “old” one. This can cause confusion and bugs. Most professional WordPress developers use the tried-and-tested “searchandreplacedb2.php” script to accomplish this task. UpdraftPlus includes the same code as its own search-and-replace engine to give you the same reliability.
So, in summary, here is how to migrate/clone a site from one location where WordPress is installed to another:
- Make sure that the new site (destination) has UpdraftPlus and the “Migrator” add-on installed (either stand-alone, or via UpdraftPlus Premium). (You can get these products from our shop, here).
- Create a backup on the original (old) site.
- Go to the “Existing Backups” tab and then under this click “Upload backup files”, from here you can then import the backup into the new site, by dragging and dropping:

- After the upload has finished, use the “Restore” button on the new site to begin a “restoration” using the backup set that you just uploaded. Make sure that you tick the “search and replace” button when doing so.
That’s all!
You can see a fuller walk-through, with many more screenshots, here.
I am trying to upload my database backup from a Mac so that I can restore/migrate from it, but it is greyed-out
Some versions of Mac OS appear to show the database file (ending in db.gz) as greyed-out when you try to upload it from the file selector. (This is apparently because the Mac doesn’t know what a db.gz file is).
If this happens to you, then open the Mac’s directory browser application, and drag-and-drop the file instead. If that doesn’t work, then drag-and-drop it more slowly!
What does the error message “PCLZIP_ERR_BAD_FORMAT(-10)” mean?
Examples: “PCLZIP_ERR_BAD_FORMAT(-10): Invalid archive structure”; “PCLZIP_ERR_BAD_FORMAT (-10) : Unable to find End of Central Dir Record signature”
This is a message that it is possible to see during a restoration or migration operation. If it occurs, then it will be when UpdraftPlus is unpacking one of the zip files from your backup. (To be more precise, it is when UpdraftPlus asks WordPress to unzip the zip file, using WordPress’s built-in unzipping functions).
Its meaning is that the zip file was corrupt, and could not be unzipped.
When we have seen this message, the situation has generally been like so: the backup zip itself was fine (don’t panic!), but the corruption occurred either when the user downloaded it from their “source” WordPress site (e.g. the download got terminated, and the user wasn’t told or didn’t spot it), or when the user uploaded it into their “destination” WordPress site. i.e. The download/upload was not successful; the uploaded file is not the same as your original backup zip. Either that, or the user attempted to begin the restoration before the upload operation had completed.
The solution, therefore, is to download and upload the zip again. To test that the download was sound, try opening the zip on your PC/Mac – does it open? If not, then you had a problem when downloading.
If the drag-and-drop uploading widget in the UpdraftPlus dashboard was used previously, then an alternative method is to use FTP to directly place your zips into the wp-content/updraft folder on your website; and then when the upload is complete, pressing the “Rescan local folder for new backup sets” link, as shown below. Then try your restore/migration again.
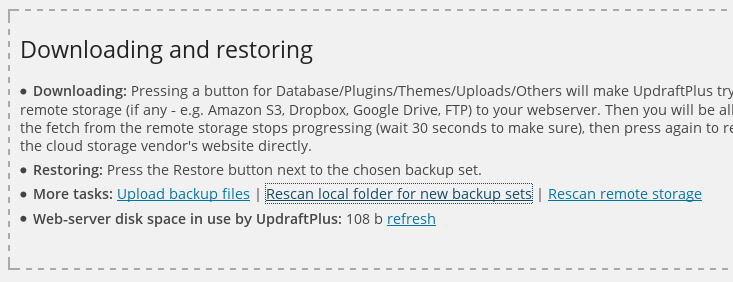
Link to press for rescanning files
Alternatively, connect your destination site to the same remote storage (e.g. same Dropbox folder, or same Amazon S3 bucket) as the source site. Don’t forget to save the settings – and then click the “Rescan remote storage” link in the screenshot above on the destination site. UpdraftPlus will then be able to fetch the backup directly – you won’t need to make sure that your download/upload cycle goes smoothly.
Configuration (9)
In the administration section, it shows my (Amazon, FTP, etc.) passwords starred – but I want to see the actual text
Note (July 2015): previous releases of UpdraftPlus showed plain text by default. Though starring adds nothing to security and isn’t best for usability (as explained below), so many people expect stars, that we decided it’d be better to acquiesce, and say goodbye to the repeated questions about it! Until then, this FAQ asked the question the other way round – we’ve left some of the explanation to do with password starring in browsers below, for general usefulness.
When you enter a password and it is starred, in fact this only prevents “shoulder-surfers” (people looking over your shoulder) from seeing the password. It provides no extra protection from other users who can sit at the keyboard, or access the same WordPress admin panel.
Three quick, different ways that people who have access to the settings page can access stored passwords are: 1) Press “View Source” in their web browser, and read it out of there. 2) Download a backup of the site’s database and read it out of there. 3) Install an extension in their web browser to un-star all passwords (e.g. this one).
Starring out the password only protects against people who are a) malicious enough to misuse your password, but b) too technically incompetent to do any of the above. It’s best to keep people like that well away from your admin panel!
A better solution (than starring out), if you have multiple admins on the WordPress site, is to set up a new set of access credentials for the backup storage for each website you are backing up (i.e. a unique FTP login/set of S3 credentials, etc.). For Amazon S3, read this article. You can also lock access to your admin page in UpdraftPlus Premium, as explained here.
If you want to display passwords directly, then do this:
- Using FTP (or equivalent) access to your web hosting space, create (if it does not already exist) a folder called mu-plugins in the content directory of your WordPress install (which is usually called wp-content – i.e. the new directory will be wp-content/mu-plugins).
- In that folder, create a new file called ud-star-passwords.php (or anything else ending in .php) with the following content:
<?php
add_filter('updraftplus_admin_secret_field_type', 'updraftplus_admin_secret_field_type');
function updraftplus_admin_secret_field_type($type) { return 'text'; }
That’s it!
I want to change or re-authenticate my Dropbox account – how do I do this?
In the “Dropbox” section of the UpdraftPlus settings page (in your WordPress dashboard), there is a “re-authenticate” link. Use this whenever you wish to re-authenticate your Dropbox account (e.g. if you made a change to your Dropbox account that makes this necessary), or to change to an entirely different Dropbox account:
I want to lock the UpdraftPlus settings so that other site admins cannot access them
In UpdraftPlus Premium, this is done in the “Advanced Tools” tab:

And scroll down the page a bit…

Don’t forget to remember your password! If you forget it, then there’s an FAQ for how to get back in., assuming that you have write access to the WordPress installation (files or database). This lock feature isn’t meant to provide unbreakable security, but to be a convenience feature to prevent mishaps and casual nosiness. If someone has an unrestricted administrator-level WordPress login, then ultimately there are ways to do anything to the site: that’s the point of an administrator login.

How to add BackBlaze to your UpdraftPlus account settings
For written instructions, please see this guide.
How to add DreamHost to your UpdraftPlus account settings
Find out how to add DreamHost to UpdraftPlus as your remote storage location at this link. Includes an easy to follow video and written instructions
What is the “Add an additional retention rule…” option?
This option allows for more sophisticated backup retention. This works by setting up a number of rules for deleting backups, that apply to backups older than the specified time. Only one backup older than the specified age will be kept for each interval. This allows you to save storage space by deleting superfluous older backups.
Here is an example of a set of retention rules, for a database backup. Note that you don’t need to have such a complex set – this is just an example!

Firstly, up to a maximum of 40 scheduled backups are kept. Whatever else is kept or deleted, there will be no more than 40 scheduled backups kept.
Out of any backups older than 12 hours, one backup will be kept in every 8 hour period. What this means is that the first (i.e. youngest) backup that is older than 12 hours will be found; and then no more kept unless it is 12 + 8 hours old (20 hours), then another after 20 + 8 (28) hours, etc.
Out of any backups older than 5 days, a different rule applies. i.e. it is no longer the case that one backup will be kept every 8 hours; instead, one backup will be kept for every 3 day period. The rule applies in the same way: the first (i.e. youngest) backup that is older than 5 days will be kept; and then no more kept until 5 + 3 days later (8 days), etc.
Finally, out of any backups older than 15 days, one backup will be kept per week.
You may add as many additional retention rules as you like. These rules are run every time a backup is completed. Only one rule can apply at a time.
When there are no extra retention rules, any automatic backup (i.e. a backup made before a plugin/theme/WordPress update – not to be confused with a scheduled backup) that is younger than the oldest scheduled backup will be kept. This changes if you have any extra retention rules. Any automatic backup that is older that the time period specified in a retention rule will be deleted – i.e., only automatic backups that are younger than the first rule will be kept.
What is the different between path-style and bucket-style access to an S3-compatible bucket?
These are two different ways for software (e.g. UpdraftPlus) to indicate to an S3-compatible storage provider which resource is being requested. Amazon S3 supports both (path-style is considered legacy, but is still widely used, so bucket-style is preferred and is the default). So, a fully Amazon-compatible S3 storage provider will allow either. However, in practice, some only support one; hence the option is provided in case you need to enforce use of one rather than the other.
How can I exclude particular files/directories from the backup?
UpdraftPlus provides a number of ways to exclude files or directories from the backup.
These are:
1. List them directly in the “exclude” settings
Any files or directories that you directly list will be excluded. You can use a wildcard at the beginning or end, in order to exclude any files or directories at the top level matching that pattern. (The default setting uses this to exclude backups created by a number of other plugins). The above screenshot excludes any files or directories in “uploads” whose names begin with “backup”, and also excludes the entire directory 2015/05 (i.e. wp-content/uploads/2015/05).
You can add as many as you like; to do so, separate them with commas. (But not with spaces – a comma only). Also, make sure that you’re adding them to the correct setting.
2. Create a file called .donotbackup in a directory
If you create a file called “.donotbackup” (without the quotes) in any directory, then that directory (and its sub-directories) will be excluded from the backup.
3. Exclude files with particular extensions
You can exclude files with chosen extensions by either:
a) Adding them to the exclusion setting (see 1, above), by identifying them with “ext:”; e.g. ext:mp3,ext:mp4.

b) Or, you can add a line in your wp-config.php to define the constant UPDRAFTPLUS_EXCLUDE_EXTENSIONS; for example (again, extensions are separated by commas, only):
define('UPDRAFTPLUS_EXCLUDE_EXTENSIONS', 'mp3,mp4');
4. Exclude files with particular prefixes
This is the counter-part of excluding files based upon the suffix in their filename; you can also do it via prefix (i.e. the characters that begin the filename). To do this, add them to the exclusion setting (see 1, above), by identifying them with “prefix:”; e.g. prefix:abc will exclude any files whose names begin with abc.

5. Exclude directories using a WordPress filter
You can write a small code snippet (e.g. as an mu-plugin, or in your child theme’s functions.php file) to exclude any directory you desire from the backup, using a WordPress filter. You can make the code as simple or complicated as you like. The filter to use is updraftplus_skip_directory, which returns a boolean (true to skip, or false (the default) to not skip), and whose other parameter is the full directory path. Here is an example of a code snippet to skip all .git directories:
add_filter('updraftplus_exclude_directory', 'my_updraftplus_exclude_directory', 10, 2);

function my_updraftplus_exclude_directory($filter, $dir) {

return (basename($dir) == '.git') ? true : $filter;

}
6. Exclude files using a WordPress filter
In the same way as described above for directories, there is a filter updraftplus_exclude_file which you can use to prevent the backup of particular files. The below example will prevent the backup of any files called bertie.jpg :
add_filter('updraftplus_exclude_file', 'my_updraftplus_exclude_file', 10, 2);

function my_updraftplus_exclude_file($filter, $file) {

return (basename($file) == 'bertie.jpg') ? true : $filter;

}
How do I set clipboard permissions for different browsers?
Giving your browser permission to access the clipboard makes it easy for you to copy the information that you need to connect to UpdraftCentral. Enabling this feature will save you time; instead of manually copying the generated connection key, you’ll see an icon that will copy it for you in one click. Use this guide to set up your browser correctly. Simply select your browser from the list below, and follow the instructions:
Chrome
- Open Chrome browser settings here
- Select Security & Privacy > Site Settings > Permissions > Clipboard
- Select Allow
Edge
- Select the lock icon in the address bar
- Change the Permissions for this site > Clipboard setting to Allow
Firefox
- Open Firefox Browser
- In the address bar, type ‘about:config’ and search
- A page will appear with the option ‘Accept the Risk and Continue’
- For the following two Parameters change the preferences as True:
- dom.events.asyncClipboard.readText
- dom.events.testing.asyncClipboard
If you’re struggling to implement these steps, then as a Premium user, you can reach out for ticketed support. Free users can seek support via the WordPress forum.
Backing up (26)
Some of my files have uploaded into my cloud storage, but not others
UpdraftPlus features a resumption feature – if you wait 5 minutes and visit a page on your site, then it should re-try not-yet-uploaded files. So, don’t assume that backing up has failed if a few minutes pass without any apparent progress. Be prepared to wait an hour and then check again.
You can also look for the log file (you can find it in wp-content/updraft, if you are using FTP). Before asking for support, you can improve your chances of a speedy answer if you can make sure that you: 1) Have started a backup, and then waited at least an hour (because UpdraftPlus will keep trying) 2) Have tried to find the log file of the failed backup.
Where in Dropbox are my files stored?
UpdraftPlus uses what Dropbox calls an “app folder”. This means that UpdraftPlus only has access to its own files – not any other part of your Dropbox.
App folders are all stored in the top-level folder called “apps”, with their own name. In the case of UpdraftPlus, your files are in “apps/UpdraftPlus.Com”. Dropbox does not allow us to access anything outside of there.
If you purchase UpdraftPlus Premium, then you can store your backups inside sub-folders of that directory, e.g. one site in “apps/UpdraftPlus.Com/mysite”, another in “apps/UpdraftPlus.Com/anotherone”, etc.
If you cannot yet see your backup in your Dropbox folder, then you should go to the Dropbox website, and look directly in your Dropbox in there. If you have been viewing your Dropbox on your PC/Mac, then it may not yet be synchronised (it takes time for new data in your Dropbox to get synchronised to the folder on your PC/Mac – the Dropbox website has the “official” contents). Please do check this before you conclude that your backup hasn’t worked!
Can I run backups from the shell / cron?
N.B. (April 2018 – the instructions on this page should still work, but we now support WP-CLI, which is the recommended way to interact with UpdraftPlus from the command-line. See our WP-CLI documentation here).
If you have shell access, then running a backup from the command-line has one big advantage over running it via your website: you shouldn’t get time-outs, so the backup will not need to automatically resume, but can run through in one go.
Furthermore, from the shell you can view the progress more easily in real-time. You can also run these as cron jobs.
To kick off a backup from the shell or cron, run a PHP file in the directory of your WordPress installation that looks like this:
<?php

define('UPDRAFTPLUS_CONSOLELOG', true);
define('DOING_CRON', true);
require_once('wp-load.php');
do_action('updraft_backupnow_backup_all', array('nocloud' => 0));
If you don’t want to watch the lines being logged running past, then you can miss out the “define” line.
If you don’t want to send the backup to remote storage, change the ‘nocloud’ parameter to ‘1’.
- To backup just files, replace the ‘do_action’ line with:
do_action('updraft_backup');
- To backup just the database, replace the ‘do_action’ line with:
do_action('updraft_backup_database');
If you want to only backup certain entities (e.g. plugins, themes, database) then replace the do_action line with:
global $updraftplus;
$backup_files = true;
$backup_database = true;
$entities_to_include = array('plugins', 'themes');
$updraftplus->boot_backup($backup_files, $backup_database, $entities_to_include);
If you wish or want to resume an already-started job, then instead of the do_action line above, use this one – but change the 12-digit hex code to the code for your job (which you can easily spot in the log file of a started job, or from the filenames in your wp-content/updraft directory):
do_action('updraft_backup_resume', 'fbb7e2919e0c', 1);
If you wish to run incremental backups, in addition to the normal backup cronjob, you will need to add a second task calling the following action:
do_action('updraft_backup_increments');
For example:
<?php

define('UPDRAFTPLUS_CONSOLELOG', true);
define('DOING_CRON', true);
require_once('wp-load.php');
do_action('updraft_backup_increments');
Schedule this cron task at the times you wish for the incremental backups to run, and the full backup task with a wider interval.
Note that on a WordPress multi-site install, you will also need to add (before the line that loads wp-load.php), lines like these – but change them so that the host and URI together indicate one of your sites. (If they do not match any, then the line that loads wp-load.php will not return; WordPress will die first).
$_SERVER['HTTP_HOST'] = 'site.localdomain';
$_SERVER['REQUEST_URI'] = '/';
On older versions of WordPress, you may instead need to install the patch from this ticket, in order to overcome a WordPress bug; here is the patch for 3.7 (believed to work for some later versions too): https://core.trac.wordpress.org/ticket/14913 (or if you are on 3.6 or 3.7, get an already-patched version of the relevant WordPress file from: https://updraftplus.com/forums/support-forum-group1/paid-support-forum-forum2/problem-whit-uploads-dir-thread33.1/#postid-232).
My backup is not working; I have read the log file, and UpdraftPlus attempts to add files to the backup but the backup size never increases
This is symptomatic of your web hosting account being full. i.e. Your have reached the disk space usage limit on your web hosting package.
See also this FAQ for more information about disk space usage within UpdraftPlus.
Will you support Windows Live OneDrive (f.k.a. SkyDrive)?
We already do – support was released in UpdraftPlus Premium version 2.10.1.
My scheduled backups do nothing, or “Backup Now” stops mid-way
This indicates a problem with the scheduler within your WordPress installation. (“Backup Now” starts the backup without the scheduler, but uses the scheduler to schedule resumption of the job in case it needs more than the amount of time that the webserver allows in one go). As such, it will affect any scheduled backup plugin that you try – as well as various other tasks that WordPress and other plugins schedule internally.
Note that this article is about problems where (in the case of a scheduled backup) literally nothing happens (other than the message indicating that a backup was scheduled). In the case of a “Backup Now” backup, it is the case where the backup starts, but after stopping never starts going again. (You can tell this by reading your log file and seeing if the last lines begin with (0) or if there are any with other numbers. (Leave it for 10 minutes with nothing happening before checking this, as resumptions do not occur until a few minutes later)).
Note also that if pressing “Backup Now” works completely, but your scheduled backups do nothing, then you probably still have this problem – in the latest versions of UpdraftPlus, UpdraftPlus has various tricks to help things along as long as the UpdraftPlus settings page is open in your web browser (which is the case when you press “Backup Now”).
Now, what can cause this problem?
1. Maintenance mode?
Firstly: is your website in maintenance mode? This disables scheduled tasks of all kinds – so turn it off first.
2. No visitors?
WordPress’s scheduler relies on the site having visitors. No visitors means that WordPress doesn’t run, and therefore can’t hand over to the scheduled task. If your site is in development, and you schedule a backup run for a time when all the developers are asleep, then that may be the cause for the scheduled task not running. (Read more here).
3. Is your scheduler explicitly disabled?
Perhaps your site has WordPress’s scheduler disabled in the configuration. UpdraftPlus versions 1.6.61 and later will alert you of this; to check manually, look for a line like this in your wp-config.php file (which is found in the root directory of your WordPress install), and remove it (or change true to false, making sure there are no quote marks around false):
define('DISABLE_WP_CRON', true);
In this case, the disabling may be something your web hosting company did intentionally, so be aware that they may re-disable it. Or, it may be something that you did intentionally, and you may have set another means of calling WordPress’s scheduler system, perhaps via your web hosting company’s control panel. In that case, the message about DISABLE_WP_CRON is to be expected – but note that it is then your responsibility to make sure that the scheduler is called frequently enough to process all the jobs scheduled on your site. No scheduled backups will run until the time that you have set the scheduler system to be called (and “Backup Now” backups won’t be able to resume if they require resumption).
Also – note that it’s possible for DISABLE_WP_CRON to be set in a file other than wp-config.php; wp-config.php is simply the most likely (99%) place. If you have a warning about DISABLE_WP_CRON, but it is not found in wp-config.php, then it will be somewhere else – you will need to hunt for it.
4. Loopback connections are not working?
Some web hosting providers (one big one: Heart Internet) purposefully (though for no good reason) disable the “loop-back” connects that allows WordPress to run its scheduler. This is also the case if your website is password-protected. If loopback connections are not working (whether deliberately disabled or not), you can try this use WordPress’s alternative scheduling system – instructions here. The instructions amount to one thing: add a line anywhere in the middle of your wp-config.php file as follows (don’t add it too late in the file, or it will take no effect):
define('ALTERNATE_WP_CRON', true);
5. Try using a cron job
If your web hosting company gives you “shell” access and you can set up cron jobs, and if you are confident/skilled enough to use that, then that’s a great solution. Jobs run that way won’t face any time-out issues imposed by the webserver. Read more about running via the shell here.
6. Is your entire website password-protected?
Another cause is if your entire website is password-protected at the HTTP level (e.g. via a .htaccess file). This also prevents WordPress’s scheduler from working. You should configure your webserver to allow “loop-back” connections (i.e. connections to self), otherwise you WordPress scheduler and everything that depends upon it will be broken. If you are using Apache and .htaccess, then adding these two lines to the access control section of your .htaccess should work – after replacing a.b.c.d with your website’s IP address):
Allow from a.b.c.d
Satisfy Any
Please note: The above suggestion is just a suggestion. .htaccess configuration is a very big subject. UpdraftPlus neither “supports” nor “doesn’t support” different .htaccess configurations, because .htaccess files operate at quite a different level to WordPress plugins. If you enter the correct instructions in your .htaccess file to permit access, then UpdraftPlus will work. But if you are not sure of the correct instructions for your particular server, then you need to consult with either your web-hosting company or your local .htaccess guru.
7. Still no good?
If the scheduler’s brokenness remains and is not caused by one of the above reasons, then the problem is almost certainly with your web hosting provider. If the alternative scheduler also fails, then you need to either contact your web hosting company for support (ask them if loopback connections work, and if not, if they can enable them); or failing that find a different web hosting company. If they confirm that loopback connections are disabled and say that it is necessary for security, then this is nonsense. (A website connecting to itself can do nothing more or less than anything else connecting to the website can). In such a case, you will need to find a new hosting company in order to use any scheduled task (including UpdraftPlus) within WordPress.
Anything essential to know?
After you have set up UpdraftPlus, you must check that your backups are taking place successfully. WordPress is a complex piece of software that runs in many situations. Don’t wait until you need your backups before you find out that they never worked in the first place. Remember, there’s no special warranty (exactly as with all WordPress software – UpdraftPlus is no exception).
What format are backups made in?
UpdraftPlus backs up your files into ordinary zip files (the same format that WordPress and its plugins and theme directories use) rather than any proprietary file formats. The database is backed up into an ordinary SQL (text) file.
Therefore you can use UpdraftPlus to restore backups, but do not have to. You do not even need WordPress installed. You can just unzip the zip files, and use your web hosting company’s control panel to import the SQL into your database.
We are committed, as a fundamental of UpdraftPlus’s design, to retain this situation. UpdraftPlus backups will always be something that you can restore with standard tools. There will be no proprietary lock-in.
I get SSL certificate errors when backing up and/or restoring
SSL is a technology used to help you make sure that a) you really are communicating with the people you thought you were (authentication) and b) your communications with them cannot be eaves-dropped by others along the way (encryption).
SSL uses entities called “certificates” to enable these functions. These certificates have time limits upon them (so that if a bad guy manages to steal one, then it has a limited use).
For this to all work, it relies upon the right certificates existing in the right places. In particular, you need to be able to access a store of certificates up-to-date.
UpdraftPlus manages this by including certificates internally. However, if something goes wrong then you may see errors when UpdraftPlus tries to connect to cloud storage (e.g. Amazon S3, Rackspace Cloud, Dropbox, Google Drive).
It is also possible that these errors mean that somebody really is trying to intercept and decode your communications. That’s what SSL errors are for – to alert you that something is wrong.
One step that you can take safely is to open UpdraftPlus’s “expert options” (at the bottom of the UpdraftPlus settings) and activate the option for UpdraftPlus to use your web hosting company’s certificate store (instead of its own). Then try again. If the backup now succeeds, then you should inform us so that we can trace the problem.
If that fails, then you can also try the option to not verify the identity of remote sites. This means that you are turning off authentication. This lowers your security. It should only be done if you are comfortable with the risks (e.g. you are sure that the communications really are with Amazon S3, Dropbox, etc.).
Finally, you can also turn off SSL entirely, using another expert option. Note that this only works for certain transport methods (including Amazon S3 and FTP (for those who have the FTPS extension activate)). Some cloud storage providers (including Dropbox) require SSL, so your only solution with them is to fix your installation.
Expert options for SSL
I am having trouble backing up, and my web hosting company uses the LiteSpeed webserver
LiteSpeed appears to have problems with all WordPress scheduled tasks that last more than a very short time – including all backup plugins. Adding this in an early position in the .htaccess file in your WordPress root folder may fix the problem:
RewriteRule .* - [E=noabort:1]
Adding the above line will make the LiteSpeed warning on UpdraftPlus’s settings page go away – this does not mean that the problem is definitely fixed; you will only know that via testing. If the above does not help, then you can try this: use WordPress’s alternative scheduling system – instructions here. The instructions amount to one thing: add a line to your wp-config.php file as follows:
define('ALTERNATE_WP_CRON', true);
If that does not help you, then you’ll need the help of your web hosting company to see why WordPress’s scheduler isn’t working on their setup, or is terminating it prematurely. Or failing that, you’ll need a different web hosting company. This problem is a generic one affecting all backup plugins on WordPress that run via the scheduler (which is all of them, as far as we know).
Why does my scheduled backup not run at precisely the time scheduled?
Short answer: it will, if your site has enough visitors. If not, then it may take place later.
For a longer answer, read the information contained in the answer to this related FAQ, which explains some of the workings of WordPress’s scheduling system. (The information is relevant even if you are not seeing the exact message that that FAQ is about).
Does UpdraftPlus support WP-CLI?
Yes, via our WP-CLI premium feature, which is part of UpdraftPlus Premium. Check out our documentation here.
How much free disk space do I need to create a backup?
This question is only interesting or relevant if a) you do not have an “unlimited” hosting plan and b) you are already using more than (approximately) 25% of your web hosting plan’s web space.
The very short answer is: theoretically, up to two-thirds (i.e. twice as much free space available as is already used); though most users will require less than this. This answer is not something unique to UpdraftPlus, but is the case for backup plugins generally, if they are based on WordPress on a modern web hosting platform. If your site is large (e.g. over 250Mb), then you can significantly reduce the amount of free space needed by going into the ‘expert’ section at the bottom of the ‘Settings’ tab, and reducing the ‘split’ setting down from its default (of 500Mb) to something less (e.g. 100Mb).
Longer answer
Here is a longer explanation to help you evaluate your particular case and give more technical details:
If you are dispatching your backups to the cloud (e.g. Amazon S3, Google Drive, Dropbox, Rackspace, FTP, WebDAV), then some space is still needed within your web hosting account to create the backup, before it is then sent off to the cloud.
Backups are created as zip archives, which are compressed. So it’s not possible to predict exactly how much will be needed (because some resources can be compressed more than others). It will never be more than your existing usage. The larger your site is, the more likely it is that most of your space is used by already-compressed resources (e.g. graphics, videos, audio), and the closer the amounts for “needed space for backup” to “spaced used by your website” will be. For small sites, with few uploaded resources, the ratios will be much less – since much of your usage will be for WordPress itself, which isn’t normally backed up (since you can get another one from wordpress.org), and which even if you are backing it up is mostly easy to compress.
However, there is another factor involved. UpdraftPlus, being written in the PHP programming language (as is WordPress itself), uses PHP’s facilities for creating zip files. When creating a zip file, PHP can internally create a temporary zip file, which can be as large as the resulting zip itself. As a result, it’s mathematically possible, if you back up everything, to need at least two-thirds / 67% free space in your web hosting account in order to produce a backup. (One third is used by your site; another third is used temporarily by PHP in producing the zip file that UpdraftPlus requests of it; and another third is used by the zip file itself).
If your web hosting setup lacks resources, then it is furthermore possible for some of these temporary files to be left behind. If your web hosting server, in order to manage resources, kills off the PHP process before it finishes, then the temporary file will remain until is cleared up manually by UpdraftPlus, once the archive is completely created, or if that happens then usually 12 hours later. This can really boost the amount of disk space you need for things to complete successfully, especially if it happens multiple times. If you have a resource-limited web hosting provider, plus a small disk space allowance, then that’s an unpleasant combination. Unfortunately the PHP engine does not advise its users (in this case, UpdraftPlus) as to where it put its temporary files, so UpdraftPlus just has to do its best to clear up what it can find, after the event. However, UpdraftPlus by default splits zip data every 500Mb, and cleans up temporary files each time a new split occurs. So, you can reduce the amount of space taken up by temporary files (and the likelihood of PHP leaving them behind when it dies) by reducing this setting (in the ‘expert’ section at the bottom of the ‘Settings’ tab).
If you are not dispatching your backups to the cloud (why not? Are you expecting any hackers to be so kind as to not touch your backups, or your hosting company never to go bust or have an accident?), or if you are leaving backups behind on the server (i.e. if you changed the Expert Option for this), then you will of course need further resources, for each backup set that remains on the server.
How do I stop an in-progress backup?
If you want to stop an already-running backup, then the final way is to restart the web service on your server. However, you may not have that access, or need something less forceful.
Because PHP can run in many different ways, there is no one way to stop a PHP script, like any part of WordPress, from running. However, UpdraftPlus runs via WordPress’s scheduler. If your backup is taking a long time, then it is likely to be needing several ‘runs’ to complete. UpdraftPlus takes care of all that internally. It re-schedules new attempts to continue the backup job automatically.
If you want to de-schedule the next run of a backup job, then go to the “Current Status” tab whilst the job is running then just above the progress bar click the “delete schedule” link.
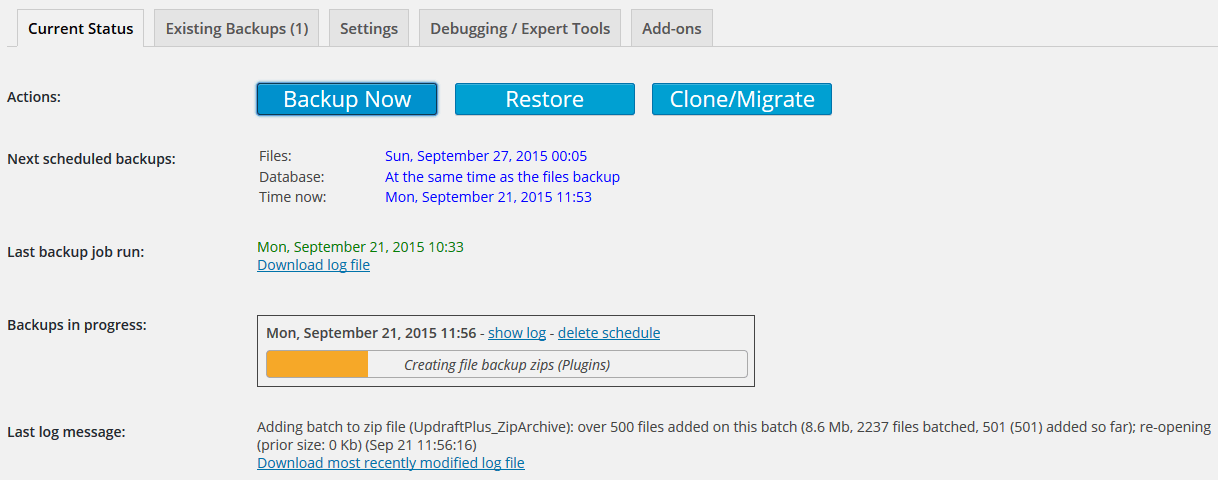
That’s all. Note that this won’t stop the current run of a backup job if it is already running; it will prevent further attempts to continue the same backup job after the current run runs out of time. (When that happens again will vary according to your web hosting setup).
How much resources does UpdraftPlus need, and how can I make backups quicker?
Firstly, note that UpdraftPlus does not run any code on the front end of your site. (This can be verified by reading the source code). It checks, whenever loaded, that it is being called on the back-end – and hands back control immediately if not.
By its nature as a backup plugin, UpdraftPlus has to do this:
- Read every file resource on your website
- Read every row in every table in your database
- Run all the accumulated data through a zip-file compressor
- Write out the results to disk
As such, UpdraftPlus will use plenty of I/O (input/output) resources and CPU. You can’t create a backup without doing those things.
If your website is small – e.g. just made up of some blog posts, and reasonably-sized images, then all this may not amount to much. If, on the other hand, you’ve uploaded lots of large resources (e.g. videos, audio files, or huge images) or if your site is very big and popular (e.g. has vast numbers of comments), then it may amount to more. The impact of the above will be greater if your webserver and database server are on the same physical machine.
UpdraftPlus is designed to only run a single process at a time – i.e. no parallelisation. So, it can only use one CPU core at a time, and there can only ever be one UpdraftPlus process that is reading from disk or writing to disk at once. It will also be subject to any limits you (or your web hosting company) configure via the PHP or operating system configuration. As such, UD’s design means that it uses as low resources at a time as is possible.
Via only running a single process at once, UpdraftPlus is doing all it can from where it sits to limit its own resource usage. There really is no other “internal” solution that can work across the huge variety of hosting and server setups that exist. If you have particular requirements for your server, then you need to configure them at the server level.
If you are the one configuring/running the server, then you should also spend some time on tuning your server, particularly the database – a lot can be done here.
So, what can be done to limit resource usage if I don’t have access to configure the web server?
- Configure the timing of your backup to run overnight – via the “Fix Backup Time” add-on, if you don’t already have it. In the “small hours” of the morning, servers are usually very lightly loaded, with lots of spare resources.
- Make sure that your webserver really is adequate for the task. Experience has shown us that it’s too easy to be “penny-wise, pound-foolish”. Bargain-basement web hosting that saves you a few dollars a month sounds attractive, but almost always comes with a trade-off. That trade-off is that resources are very tight. If your site is big or busy enough that backing it up requires significant resources, then it’s probably also having enough visitors that the bargain-basement web hosting is cutting performance enough to chase away some of those visitors. It’s worth noting here that a low-end VPS, despite the pricing, is likely to have less resources available than typical shared web hosting. (By “typical web hosting”, we’re not talking about the folks who are selling the ridiculously under-priced deals where resources are cut to the absolute bone, e.g. one.com). This is because on a low-end VPS, you get one CPU – which is shared between your operating system, web server + PHP engine, and the database server. If you’ve got a backup process which is read/writing your whole website, and you’re wanting to run the operating system and serve up web pages at the same time, then that means that each of those tasks is going to be getting swapped in and out from the CPU, because they can’t all use it at once. On a shared web host, there are usually many CPUs (up to 32), and you are time-sharing them – so as long as all websites aren’t all having their backups at the same time, then there should be enough resources to go around. Some web hosts have stricter systems which will limit your CPU and disk I/O usage even if there’s plenty of overall CPU power available on the system, though. They vary.
- Alternatively, if you have sufficient access and expertise, then you can run the backup job from the shell, or from WP-CLI and use your system’s “nice” and/or “ionice” commands to limit resources whilst it runs. (Those commands are on Linux, Mac and other UNIX-like systems – on Windows there will be a different solution).
- Check that you don’t have any plugins that create enormous, mostly useless, database tables (e.g. some statistics plugins that record a new row in the database for every single visitor).
- If you store a lot of files, then go into the ‘Expert settings’ section of the UpdraftPlus page, and reduce the default setting for how much data is stored in each zip file. e.g. Reduce it from the default of 400Mb down to 100Mb. This will mean that UpdraftPlus spends less time in manipulating large zip files – which can use a lot of resources and be quite time-consuming, especially on slower servers.
- Run incrementals backups, so that only changes to your files need to be backed up, instead of running a full backup each time.
- Similar (but a bit more cumbersome) to incremental backups (and possible in the free version of UpdraftPlus): if you have a collection of large, unchanging files (e.g. historic audio/video), then you could take a one-time backup of these, store them somewhere safe and then after that exclude them from the UpdraftPlus backup using the exclusion options in UpdraftPlus. That will then save the time/resource usage that zipping them up into the UpdraftPlus backup would have taken.
- Update to PHP 7. If your hosting company has a choice of PHP versions, and if you are currently using an older version (PHP 5.x), then you should look into upgrading to PHP 7, which is significantly faster across a range of operations (and hence uses less resources to perform them). You will need to make sure that your plugins are up to date (or replace ones that are no longer updated with something suitable), and be ready to reverse course (which is harmless) if you find a problem.
- Complain to your hosting company. Though, in our experience, some hosting companies have an excuse for basically everything, It’s not reasonable to sell hosting space for a website but then not provide enough resources to actually operate that website within that space (which includes being able to take your own backups of it). It’s likely that this won’t get any immediate results – but if enough customers do it, and/or vote with their feet, then it’ll make a long term difference. Ultimately, companies have to listen to their customers even if they don’t do it immediately.
My FTP stopped working when I upgraded to UpdraftPlus Premium
If you could successfully backup by FTP with UpdraftPlus Free, but it stopped working when you upgraded to UpdraftPlus Premium, then this article is for you.
The cause of this issue is that UpdraftPlus Free only supports unencrypted FTP. UpdraftPlus Premium supports encrypted FTP, and will try to use it by default.
Unfortunately, some FTP servers indicate that they support encrypted FTP, but don’t. Usually the problem is firewalling – the firewall ports to allow encrypted FTP are not open. So when UpdraftPlus tries to connect, it times out.
One solution is to ask the operator of the FTP server to either:
a) Make encrypted FTP possible (open up the firewall ports)
or
b) Configure the FTP server to not advertise itself as offering encrypted FTP (since it doesn’t work – though, you may wish to confirm this first e.g. by using a desktop FTP client)
Alternatively, you can force UpdraftPlus to drop back to non-encrypted FTP as follows:
1) Click on the “Show expert settings” link towards the bottom of the UpdraftPlus settings page:
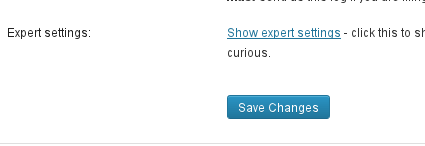
Expert Options
2) Check the “Disable SSL entirely” option.
After doing so, press the “Save Changes” button.

Disable SSL
That’s all!
Why am I getting warnings about my site not having enough visitors?
Short-cut: If you are developing a new website and see this warning, then simply keep the UpdraftPlus settings page open whilst you back up. You don’t need to read any of the rest!
UpdraftPlus is a WordPress plugin; as such, it relies on WordPress running and handing it the opportunity to do something; in particular, it relies upon WordPress’s scheduled task engine running properly.
Thus if WordPress’s scheduled task engine (“WP Cron”) does not run, then neither can UpdraftPlus. So, if your website has zero visitors between midnight and 5am, and if your backup is scheduled to run just after midnight, then it won’t actually get to run until a visitor turns up at 5 am.
There is usually no danger of this becoming a problem, because even very unpopular websites tend to get visited by several search engines as long as those search engines are aware of them.
However, if enough of the following factors are present, then your backup may not be able to complete:
- Your website is not known by search engines
- Your website has almost no other visitors (e.g. is under development, and only the developer visits it, during office hours)
- Your webserver only allows code to run for a short time
- Your website is larger, and is being uploaded to a cloud backup service
- You schedule backups to run very frequently (e.g. every 4 hours) so that multiple backup jobs may be competing for resources
Another way that this can happen is if your WordPress scheduler has been disabled (you’d usually know if this is so and understand the rest of this paragraph), and you’re instead running the scheduler via an automated task you’ve set up to call wp-cron.php directly. If you only call wp-cron.php once an hour, then this is like just having one visitor per hour as far as WordPress’s scheduler is concerned.
Note: If you were sent to this page by a warning from your copy of UpdraftPlus, then this does not mean for sure that your backups are definitely failing because of this problem – it just means that UpdraftPlus has detected a lack of visitors. It may be that there are still enough. The warning is advisory of a potential problem.
This issue is not a novelty of UpdraftPlus; it is the case for every WordPress backup plugin with scheduled backups.
What are the solutions? Any of these should help:
- If you’re a developer, or your site was only just launched, then don’t set your backup time to 1 a.m. until after you launch the site and have some visitors and your site is known by search engines.
- Your web hosting company’s control panel may have the facility to set up automated tasks – you could set up a task to visit the site every 1 minute. This has a negligible impact upon on performance. If you want to look at this option, you should ask your web hosting company for help – we can’t provide specific guidance.
- Sign up with a facility like https://uptimerobot.com/, https://www.pingdom.com/free/ or https://www.easycron.com/tutorials/how-to-set-up-cron-job-for-updraftplus to get some more automated visits to your website.
- If you’re just developing the site and need a backup *now*, then just keep the UpdraftPlus settings page open – it will make silent calls to the WP scheduling code in the background every few minutes (UpdraftPlus 1.7.15 and later).
- Load up the site’s front page and hit “reload” every 5 minutes until the backup has completed.
- If you disabled WordPress’s default “cron” engine, and attempted to call it another way, then seeing this message means that you are not calling it regularly enough. Call it each minute. This has a negligible impact upon performance; if your web hosting company says otherwise, then this is bad advice (your author is someone who has both run a web hosting company and analysed and contributed to cron code in WordPress core).
Note: When using automated visits, certain caching plugins (such as WP Super Cache) can prevent the scheduler from being triggered. If you are having issues, ensure that the automated visit is directed to an uncached page or file.
Do I need to back up WordPress core?
UpdraftPlus Premium has the option to back up WordPress core, and any other files that have been stored by hand in the WordPress root directory. Should you use this option?
Normally, backup of WordPress core is unnecessary, since you can always download a new copy from wordpress.org (and most web hosting companies provide a 1-click WordPress installer to make it even easier). Also, if you suspect that your site has been hacked, it is better to download a fresh copy. This spares the worry or work of comparing your backup with a clean copy of WordPress core.
However, the backup is also harmless, so if you are not sure if you should be backing it up, then you lose nothing by doing so. Here are the situations in which you will want to back up WordPress core and any extra files stored in its directory:
- No need to go to wordpress.org to get a new copy of WordPress.
- If you have made modifications to WordPress core (which is not recommended – you should use plugins instead; but perhaps you had some unusual need), then this will back them up. (You will know if you have done this).
- If you have added new files into WordPress, but outside of the normal upload mechanisms, then this will back them up. (You will know if you have done this – it refers to files that are not in a standard WordPress directory (e.g. the ‘wp-content/uploads’ folder), and not uploaded through the WordPress dashboard (e.g. you added an extra directory /mystuff in the root of the site via FTP).
- If you also store other resources or even separate sub-sites in the same folder as WordPress, then this will include them in your back up. (e.g. If you added another PHP-based application that was not WordPress, and you want to be able to back this up too).
- Backup up your wp-config.php file so that you do not need to re-enter your database settings and other customisations upon restoring
What is the most secure way to set up Rackspace Cloud Files?
Rackspace Cloud Files allows you to set up users that have access to only one container in your Cloud Files account – and to nothing else. This is the most secure configuration. It means that admin users on your WordPress site, even if they can copy the Rackspace access details from the UpdraftPlus configuration, can do nothing more with them than access the UpdraftPlus backups.
The easiest way to set up Rackspace Cloud Files in this way is using the “Rackspace Cloud Files enhanced” add-on from our shop.
Can I make a backup directly to my PC/Mac?
To make a backup and download it to your PC (or an external USB drive attached to your PC), you can do this in two steps:
1) Press the “Backup Now” button on the UpdraftPlus dashboard
2) When the backup has completed, click on the “Existing Backups” tab, and download the backup from there.
Sometimes customers ask if it is possible to skip step 2) – i.e. can UpdraftPlus automatically send the backup to your PC/Mac?
This is possible, but only if you set up software on your PC to automatically synchronise a remote cloud storage service with your PC/Mac. e.g. Send your backup to Dropbox, and use the Dropbox application on your PC to automatically sync your Dropbox with your PC/Mac. Or send your backup to Google Drive, and use the Google Drive application on your PC/Mac to automatically download what’s in your Google Drive.
It’s not possible for a website (such as your WordPress website, of which UpdraftPlus is a part) to automatically send backups to your computer directly – there is no general-purpose technology which exists to achieve this. Therefore, it’s necessary to use some sort of particular helper application, like in the previous paragraph.
How can I exclude a specific table from the backup?
(This capability exists in UpdraftPlus 1.9.65 (free) or 2.9.65 (paid) or later).
Are you sure you want to do this? It’s always better to have too much backed up, than too little. If you are sure, then here’s how it’s done.
This option isn’t directly configurable in the UpdraftPlus settings page, but you can create a WordPress filter to do so, like so:
Step 1: Create a directory wp-content/mu-plugins in your WordPress install, if it does not already exist.
Step 2: Inside that directory, create a file ending in .php (e.g. wp-content/mu-plugins/prevent-table.php), with contents like this:
<?php

add_filter('updraftplus_backup_table', 'my_updraftplus_backup_table', 11, 5);

function my_updraftplus_backup_table($go_ahead, $table, $table_prefix, $whichdb, $dbinfo) {
    $tables_to_not_back_up = array('wp_my_table', 'wp_some_other_table');
    if (in_array($table, $tables_to_not_back_up)) return false;
    return $go_ahead;
}
If your WordPress site disappears, then you had a syntax error in that file. Remove it to get WordPress back!
That’s a very simple example – it will exclude the two indicated tables (the line $tables_to_not_back_up = … – you can add as many as you like, of course). You can make it as complex as you like, using all the supplied information. The $whichdb variable is equal to ‘wp’ for the WordPress database, or an integer from zero upwards for others you have set up (in UpdraftPlus Premium). The $dbinfo variable is an array containing the database information (host, username, password). You can use this information to make sure you’re working on the right database, if you have tables with the same name in multiple databases.
My web hosting company says that I can’t store backups on my site, but can store them remotely. Can UpdraftPlus handle this?
Yes. UpdraftPlus has various options for remote storage – e.g. Dropbox, Amazon S3, Google Drive, FTP, etc. Naturally, it has to actually create the zip file(s) to be stored remotely before it can then send them to the remote storage and then delete them from your site after sending them. There will be a short time gap in which the backup exists on your site before it is dispatched and deleted. This should be fine with all web hosts that say that they allow you to create backups and store them remotely – because there’s no other way of doing it. It should be especially fine if you use UpdraftPlus’s feature (in Premium or via the Fix Time add-on) to run the backup in the small hours when the web server will only be lightly loaded. If they don’t like it being done that way, then they are basically forbidding you to make a zip-file-based backup. Time to find a web hosting company that’s not selling crippled hosting.
How do I use Incremental Backups?
When backing up your WordPress site content such as images, media, video, plugins, themes, etc. using UpdraftPlus or another backup plugin, you usually have to create a whole new backup file of the entire site – every time. But with Incremental Backups, this is no longer necessary.
To give the user as much control as possible, you now have the ability to arrange your incremental file backups to the hourly schedule of your choice. Once UpdraftPlus has taken the initial full backup, it will subsequently only backup any new changes that have occurred between the period of hours you have selected. The changes could range from something as small as a new image you added, to something as big as an entire website and theme overhaul.
Click here for a full and detailed guide on how to use Incremental Backups.
What is the different between path-style and bucket-style access to an S3-compatible bucket?
These are two different ways for software (e.g. UpdraftPlus) to indicate to an S3-compatible storage provider which resource is being requested. Amazon S3 supports both (path-style is considered legacy, but is still widely used, so bucket-style is preferred and is the default). So, a fully Amazon-compatible S3 storage provider will allow either. However, in practice, some only support one; hence the option is provided in case you need to enforce use of one rather than the other.
Troubleshooting (27)
What does the error “Error: redirect_uri_mismatch” mean?
It means that you wrongly copied across the URL shown in your admin console to Google Drive/Cloud at the relevant step. Please return to the relevant step of the instructions (these instructions, for Google Drive, or these ones, for Google Cloud Storage), and try again.
I get SSL certificate errors when backing up and/or restoring
SSL is a technology used to help you make sure that a) you really are communicating with the people you thought you were (authentication) and b) your communications with them cannot be eaves-dropped by others along the way (encryption).
SSL uses entities called “certificates” to enable these functions. These certificates have time limits upon them (so that if a bad guy manages to steal one, then it has a limited use).
For this to all work, it relies upon the right certificates existing in the right places. In particular, you need to be able to access a store of certificates up-to-date.
UpdraftPlus manages this by including certificates internally. However, if something goes wrong then you may see errors when UpdraftPlus tries to connect to cloud storage (e.g. Amazon S3, Rackspace Cloud, Dropbox, Google Drive).
It is also possible that these errors mean that somebody really is trying to intercept and decode your communications. That’s what SSL errors are for – to alert you that something is wrong.
One step that you can take safely is to open UpdraftPlus’s “expert options” (at the bottom of the UpdraftPlus settings) and activate the option for UpdraftPlus to use your web hosting company’s certificate store (instead of its own). Then try again. If the backup now succeeds, then you should inform us so that we can trace the problem.
If that fails, then you can also try the option to not verify the identity of remote sites. This means that you are turning off authentication. This lowers your security. It should only be done if you are comfortable with the risks (e.g. you are sure that the communications really are with Amazon S3, Dropbox, etc.).
Finally, you can also turn off SSL entirely, using another expert option. Note that this only works for certain transport methods (including Amazon S3 and FTP (for those who have the FTPS extension activate)). Some cloud storage providers (including Dropbox) require SSL, so your only solution with them is to fix your installation.
Expert options for SSL
My backup is not working; I have read the log file, and UpdraftPlus attempts to add files to the backup but the backup size never increases
This is symptomatic of your web hosting account being full. i.e. Your have reached the disk space usage limit on your web hosting package.
See also this FAQ for more information about disk space usage within UpdraftPlus.
I am having trouble backing up, and my web hosting company uses the LiteSpeed webserver
LiteSpeed appears to have problems with all WordPress scheduled tasks that last more than a very short time – including all backup plugins. Adding this in an early position in the .htaccess file in your WordPress root folder may fix the problem:
RewriteRule .* - [E=noabort:1]
Adding the above line will make the LiteSpeed warning on UpdraftPlus’s settings page go away – this does not mean that the problem is definitely fixed; you will only know that via testing. If the above does not help, then you can try this: use WordPress’s alternative scheduling system – instructions here. The instructions amount to one thing: add a line to your wp-config.php file as follows:
define('ALTERNATE_WP_CRON', true);
If that does not help you, then you’ll need the help of your web hosting company to see why WordPress’s scheduler isn’t working on their setup, or is terminating it prematurely. Or failing that, you’ll need a different web hosting company. This problem is a generic one affecting all backup plugins on WordPress that run via the scheduler (which is all of them, as far as we know).
How to fix the WordPress missed schedule error
If you come across the frustration of a WordPress missed schedule error, you’re not alone.
WordPress has a convenient feature that allows you to run scheduled tasks in the background. This feature does many useful things for you, like checking for updates, publishing posts at a specific time or scheduling backups via UpdraftPlus.
But sometimes, you may get an error indicating that your WordPress scheduler is not running tasks as intended. It will disrupt the timely execution of your scheduled tasks.
In this post, you’ll learn how to fix missed schedule post errors in WordPress. This will ensure your scheduled posts go live precisely when you want them to.
You can use the table of contents below to navigate to the method that interests you the most.
Table of contents
- Disable maintenance mode
- Configure your WordPress timezone settings
- Monitor recent site traffic
- Clear your website cache
- Increase your WordPress memory limit
- Check for disabled scheduler
- Set up a cron job
- Find a reliable hosting provider
1. Disable maintenance mode
When a WordPress site is in maintenance mode, it disables scheduled tasks of all kinds. So, if you encounter the WordPress missed schedule error, it’s important to confirm that maintenance mode is deactivated on your site. This action will enable scheduled tasks to resume functioning correctly.
Here’s a quick method to turn off maintenance mode in WordPress:
- Log in to your WordPress admin dashboard.
- Navigate to Settings.
- Look for the WP Maintenance Mode option.
- In the General Settings section, toggle the Status to Deactivated.
- Click the Save Settings button.
After following these steps, you will successfully deactivate maintenance mode on your WordPress site. Remember to check your site in a new tab to confirm it’s no longer in maintenance mode and the WordPress scheduler is working.
2. Configure your WordPress timezone settings
Another simple but essential step is to match your WordPress timezone with the one you use for scheduling tasks.
WordPress relies on accurate timezone settings to schedule tasks or publish posts at the correct times. If your timezone settings are incorrect, it can lead to the WordPress missed schedule error.
To configure your WordPress timezone settings:
- Open your WordPress dashboard.
- Navigate to Settings > General.
- Scroll down to the Timezone section.
- Using the dropdown, select the timezone you want to use for your WordPress website.
Click on the Save Changes button to save your settings.
3. Monitor recent site traffic
WordPress doesn’t perform background processes (such as scheduled tasks) when there are no visitors on your site.
For example, suppose your WordPress site is in development, and you schedule a backup run during off-peak hours when developers are not actively working.
In this case, the scheduled task may not run as expected. That’s because there are no active processes or visitors triggering WordPress to carry out the scheduled task.
That’s why you must consider site traffic and activity patterns when scheduling tasks in WordPress, especially when there is minimal or no site activity.
Consider boosting site activity during scheduled task times. Simply visiting a few pages on your WordPress site can activate the background processes. This approach ensures that scheduled tasks are executed without error.
4. Clear your website cache
Although caching speeds up website loading times, it can sometimes store outdated content that may interfere with scheduled tasks.
To clear the cache in WordPress using a caching plugin like WP-Optimize:
- Open your WordPress dashboard.
- Navigate to the WP-Optimize tab and select Cache.
- Scroll down and click on Purge cache.
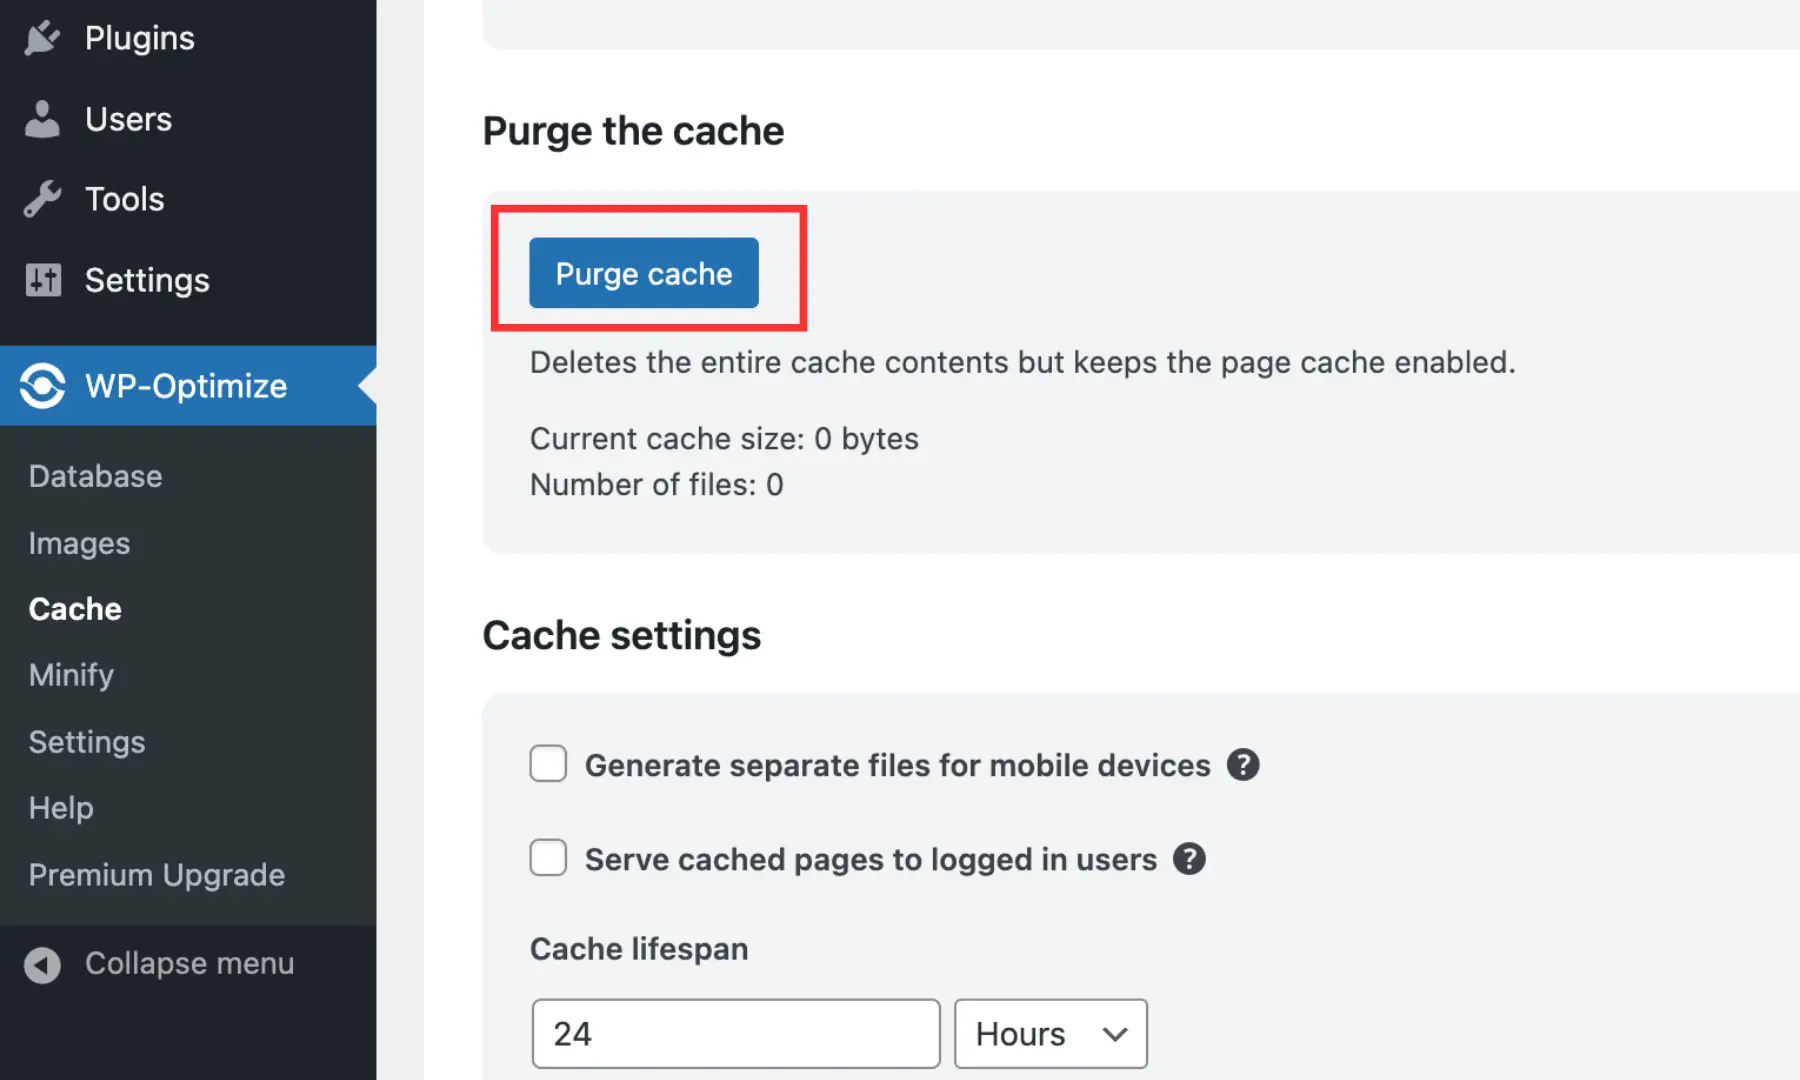
The specific steps may vary slightly depending on the plugin you’re using. You can navigate to the plugin settings in your WordPress admin dashboard. There, look for an option to clear or purge the cache. Follow the plugin’s instructions to clear the cache.
5. Increase your WordPress memory limit
It’s also possible that your WordPress site needs more memory than what is currently allocated to schedule tasks properly. An easy way to increase the memory limit is by editing the wp-config.php file.
First, you’ll need to access your wp-config.php file using an FTP client (like FileZilla) or your hosting provider’s file manager. You can find this file in the root directory of your WordPress installation.
Open the wp-config.php file in a text editor and look for a line that defines the memory limit for WordPress. It is located just before the line of code that says, ‘That’s all, stop editing! Happy publishing.’ and looks like this:
define(‘WP_MEMORY_LIMIT’, ’64M’);
The value ‘64M‘ represents the memory limit in megabytes. You can increase this value to a higher number based on your website’s requirements. For example, you can set it to ‘128M’ or ‘256M’ depending on your needs.
Don’t forget to save the changes once you’ve modified the wp-config.php file. You can then re-upload your updated wp-config.php file back to your server.
After increasing the memory limit, visit your website and check if your WordPress missed schedule error has been resolved. You can also schedule a post to check if it publishes correctly.
Expert tip: Before making any changes to your wp-config.php file, it’s always a good idea to create a backup of the original file. This way, you can revert to it if anything goes wrong.
6. Check for disabled scheduler
You might also want to check if your site has WordPress’s scheduler disabled in the configuration.
For this, look for a line like this in your wp-config.php file:
define(‘DISABLE_WP_CRON’, true);
You need to remove it or change ‘true‘ to ‘false‘. Make sure there are no quotation marks around ‘false‘.
It’s essential to note that if your web hosting company intentionally disabled the scheduler, they may re-disable it.
Alternatively, you might have turned it off yourself with an alternative scheduling method in your web hosting control panel. In this scenario, remember you’re responsible for ensuring it’s called frequently enough to handle scheduled tasks.
7. Set up a cron job
If your web hosting company offers “shell” access and allows you to set up cron jobs, then that’s a good solution. Tasks executed through cron jobs bypass any time-out issues imposed by the web server.
However, this approach is for technically proficient users comfortable with command-line interfaces. Errors in setting up cron jobs can potentially impact your website. So, if you’re unsure about cron jobs, we suggest exploring alternative solutions.
Alternatively, you can consult your hosting provider or a WordPress developer for assistance.
8. Find a reliable hosting provider
If you still find your WordPress scheduler not working even after following the above methods, it’s highly likely that the issue lies with your web hosting provider.
In this case, your best course of action is to reach out to your hosting company for support. If they are unable to resolve the issue, you may need to consider switching to a different web hosting provider.
Some of the popular hosting options include Hostinger, Bluehost, and SiteGround.
Conclusion
Even though WordPress offers a task scheduling feature, there are instances where you might come across a WordPress missed schedule error.
Luckily, there are several ways to resolve this missed schedule error in WordPress. By following the solutions outlined in this post, you can avoid WordPress schedule issues and ensure the smooth operation of your WordPress site.
Remember, it’s always crucial to create a backup before implementing any changes to your site’s configuration.
For a comprehensive backup solution, consider using UpdraftPlus. It’s an efficient WordPress backup and migration plugin trusted by millions worldwide. Learn more about UpdraftPlus, or contact us if you have any questions.
FAQs
How do I fix a scheduled event late in WordPress?
To fix a scheduled event running late in WordPress:
- Monitor recent site traffic
- Clear your website cache
- Increase your WordPress memory limit
- Check for disabled scheduler
- Set up a cron job
- Find a reliable hosting provider
Why is my schedule post not working in WordPress?
Some of the reasons include differences in time zones, server-related issues or misconfigurations in WordPress settings, such as disabled scheduler functions. It’s essential to troubleshoot by checking server resources and reviewing WordPress cron settings to ensure scheduled posts function correctly.
What is the missed schedule plugin for WordPress?
This plugin offers a reliable way to schedule posts on websites with low traffic. In such cases, the standard scheduling method may not always be accurate due to the combination of low visitor numbers and frequent updates.
How to fix UpdraftPlus failed backups
For more detailed written/video information on the most common issues encountered when you are unable to complete a backup with UpdraftPlus, please follow this link.
Why are my backups slow?
When creating a backup, UpdraftPlus uses Binary Zip or PHPZip to compress the backup files. If neither Binary Zip or PHPZip are available on your server, UpdraftPlus will use PclZip. PclZip is older and slower than Binary Zip or PHPZip and this may be causing your backups to slow down. Please ensure the PHPZip module is turned on. You can action this directly via cPanel or by contacting your web host for support.
How much free disk space do I need to create a backup?
This question is only interesting or relevant if a) you do not have an “unlimited” hosting plan and b) you are already using more than (approximately) 25% of your web hosting plan’s web space.
The very short answer is: theoretically, up to two-thirds (i.e. twice as much free space available as is already used); though most users will require less than this. This answer is not something unique to UpdraftPlus, but is the case for backup plugins generally, if they are based on WordPress on a modern web hosting platform. If your site is large (e.g. over 250Mb), then you can significantly reduce the amount of free space needed by going into the ‘expert’ section at the bottom of the ‘Settings’ tab, and reducing the ‘split’ setting down from its default (of 500Mb) to something less (e.g. 100Mb).
Longer answer
Here is a longer explanation to help you evaluate your particular case and give more technical details:
If you are dispatching your backups to the cloud (e.g. Amazon S3, Google Drive, Dropbox, Rackspace, FTP, WebDAV), then some space is still needed within your web hosting account to create the backup, before it is then sent off to the cloud.
Backups are created as zip archives, which are compressed. So it’s not possible to predict exactly how much will be needed (because some resources can be compressed more than others). It will never be more than your existing usage. The larger your site is, the more likely it is that most of your space is used by already-compressed resources (e.g. graphics, videos, audio), and the closer the amounts for “needed space for backup” to “spaced used by your website” will be. For small sites, with few uploaded resources, the ratios will be much less – since much of your usage will be for WordPress itself, which isn’t normally backed up (since you can get another one from wordpress.org), and which even if you are backing it up is mostly easy to compress.
However, there is another factor involved. UpdraftPlus, being written in the PHP programming language (as is WordPress itself), uses PHP’s facilities for creating zip files. When creating a zip file, PHP can internally create a temporary zip file, which can be as large as the resulting zip itself. As a result, it’s mathematically possible, if you back up everything, to need at least two-thirds / 67% free space in your web hosting account in order to produce a backup. (One third is used by your site; another third is used temporarily by PHP in producing the zip file that UpdraftPlus requests of it; and another third is used by the zip file itself).
If your web hosting setup lacks resources, then it is furthermore possible for some of these temporary files to be left behind. If your web hosting server, in order to manage resources, kills off the PHP process before it finishes, then the temporary file will remain until is cleared up manually by UpdraftPlus, once the archive is completely created, or if that happens then usually 12 hours later. This can really boost the amount of disk space you need for things to complete successfully, especially if it happens multiple times. If you have a resource-limited web hosting provider, plus a small disk space allowance, then that’s an unpleasant combination. Unfortunately the PHP engine does not advise its users (in this case, UpdraftPlus) as to where it put its temporary files, so UpdraftPlus just has to do its best to clear up what it can find, after the event. However, UpdraftPlus by default splits zip data every 500Mb, and cleans up temporary files each time a new split occurs. So, you can reduce the amount of space taken up by temporary files (and the likelihood of PHP leaving them behind when it dies) by reducing this setting (in the ‘expert’ section at the bottom of the ‘Settings’ tab).
If you are not dispatching your backups to the cloud (why not? Are you expecting any hackers to be so kind as to not touch your backups, or your hosting company never to go bust or have an accident?), or if you are leaving backups behind on the server (i.e. if you changed the Expert Option for this), then you will of course need further resources, for each backup set that remains on the server.
I can no longer download or restore from a Google Drive backup
Google recently (first half of 2013) changed their permissions setup. Specifically, the permission which UpdraftPlus was using to download backups (and thence to restore them) no longer enables it to do so.
To fix this, you need to:
1) Update to UpdraftPlus version 1.6.1 or later.
2) Click on the link to “Authenticate with Google”, down in the “Google Drive” settings section.
Authenticate with Google
You will then be able to re-authenticate with Google, gaining the new permissions needed to download your backup files within UpdraftPlus.
Granting permission to UpdraftPlus to use Google Drive
The modal windows that UpdraftPlus opens can’t be clicked on – they are greyed out
Note: Some steps have been taken in UpdraftPlus to overcome the actions of other plugins that cause the problem below. If you’re not on UpdraftPlus 1.7.21 or later, then please update. Otherwise, continue!
Do you, when you click on the “Backup Now” button, or the “Restore” button, see a window that appears to open “underneath” the greying-out effect, and looks something like this (give or take changes in colours and other minor layout elements):

This is caused by another plugin you have installed, or perhaps your theme. That plugin or theme is loading its code onto UpdraftPlus’s settings page (instead of only loading its code on its own page). That problem is then compounded by that code conflicting with UpdraftPlus’s own code.
Here is an (incomplete) list of plugins known to do this, at least at some point in their history – please let us know if you find another, so that people finding this page in future can find their problem quicker: Nextgen Plus + Nextgen Pro + Photocrati theme (December 2014 – fixed in January 2015), “WP Shortcodes”, “WP Events” (2.2.4.1), “The Events Calendar” by Modern Tribe (3.2), Font Resizer (1.2.3), Agent Extension Standalone Plugin/Agent Image News (one of the two – which one is unconfirmed) (present in version ?1.3).
To find the culprit (if it’s not one of those), de-activate your plugins one-by-one, and switch to a default theme (e.g. Twenty Twelve, Twenty Thirteen), to find the culprit. (When the culprit has been disabled, reloading the UpdraftPlus settings page and clicking on “Backup Now” will no longer manifest the problem). If you have lots of plugins, then you can work quicker by “bisecting” – i.e. de-activate half of them, and then depending on the outcome either re-activate that half and work on the other half, or re-activate half of that half.
When you find the culprit, please report it as a bug using the support mechanism for that plugin. (Or permanently de-activate it or replace it, depending on whichever you find most convenient). Ask them to make sure that the plugin/theme’s code is only loaded on its own pages, and not everywhere.
My FTP stopped working when I upgraded to UpdraftPlus Premium
If you could successfully backup by FTP with UpdraftPlus Free, but it stopped working when you upgraded to UpdraftPlus Premium, then this article is for you.
The cause of this issue is that UpdraftPlus Free only supports unencrypted FTP. UpdraftPlus Premium supports encrypted FTP, and will try to use it by default.
Unfortunately, some FTP servers indicate that they support encrypted FTP, but don’t. Usually the problem is firewalling – the firewall ports to allow encrypted FTP are not open. So when UpdraftPlus tries to connect, it times out.
One solution is to ask the operator of the FTP server to either:
a) Make encrypted FTP possible (open up the firewall ports)
or
b) Configure the FTP server to not advertise itself as offering encrypted FTP (since it doesn’t work – though, you may wish to confirm this first e.g. by using a desktop FTP client)
Alternatively, you can force UpdraftPlus to drop back to non-encrypted FTP as follows:
1) Click on the “Show expert settings” link towards the bottom of the UpdraftPlus settings page:
Expert Options
2) Check the “Disable SSL entirely” option.
After doing so, press the “Save Changes” button.
Disable SSL
That’s all!
Why am I getting warnings about my site not having enough visitors?
Short-cut: If you are developing a new website and see this warning, then simply keep the UpdraftPlus settings page open whilst you back up. You don’t need to read any of the rest!
UpdraftPlus is a WordPress plugin; as such, it relies on WordPress running and handing it the opportunity to do something; in particular, it relies upon WordPress’s scheduled task engine running properly.
Thus if WordPress’s scheduled task engine (“WP Cron”) does not run, then neither can UpdraftPlus. So, if your website has zero visitors between midnight and 5am, and if your backup is scheduled to run just after midnight, then it won’t actually get to run until a visitor turns up at 5 am.
There is usually no danger of this becoming a problem, because even very unpopular websites tend to get visited by several search engines as long as those search engines are aware of them.
However, if enough of the following factors are present, then your backup may not be able to complete:
- Your website is not known by search engines
- Your website has almost no other visitors (e.g. is under development, and only the developer visits it, during office hours)
- Your webserver only allows code to run for a short time
- Your website is larger, and is being uploaded to a cloud backup service
- You schedule backups to run very frequently (e.g. every 4 hours) so that multiple backup jobs may be competing for resources
Another way that this can happen is if your WordPress scheduler has been disabled (you’d usually know if this is so and understand the rest of this paragraph), and you’re instead running the scheduler via an automated task you’ve set up to call wp-cron.php directly. If you only call wp-cron.php once an hour, then this is like just having one visitor per hour as far as WordPress’s scheduler is concerned.
Note: If you were sent to this page by a warning from your copy of UpdraftPlus, then this does not mean for sure that your backups are definitely failing because of this problem – it just means that UpdraftPlus has detected a lack of visitors. It may be that there are still enough. The warning is advisory of a potential problem.
This issue is not a novelty of UpdraftPlus; it is the case for every WordPress backup plugin with scheduled backups.
What are the solutions? Any of these should help:
- If you’re a developer, or your site was only just launched, then don’t set your backup time to 1 a.m. until after you launch the site and have some visitors and your site is known by search engines.
- Your web hosting company’s control panel may have the facility to set up automated tasks – you could set up a task to visit the site every 1 minute. This has a negligible impact upon on performance. If you want to look at this option, you should ask your web hosting company for help – we can’t provide specific guidance.
- Sign up with a facility like https://uptimerobot.com/, https://www.pingdom.com/free/ or https://www.easycron.com/tutorials/how-to-set-up-cron-job-for-updraftplus to get some more automated visits to your website.
- If you’re just developing the site and need a backup *now*, then just keep the UpdraftPlus settings page open – it will make silent calls to the WP scheduling code in the background every few minutes (UpdraftPlus 1.7.15 and later).
- Load up the site’s front page and hit “reload” every 5 minutes until the backup has completed.
- If you disabled WordPress’s default “cron” engine, and attempted to call it another way, then seeing this message means that you are not calling it regularly enough. Call it each minute. This has a negligible impact upon performance; if your web hosting company says otherwise, then this is bad advice (your author is someone who has both run a web hosting company and analysed and contributed to cron code in WordPress core).
Note: When using automated visits, certain caching plugins (such as WP Super Cache) can prevent the scheduler from being triggered. If you are having issues, ensure that the automated visit is directed to an uncached page or file.
Why is WordFence warning me that files inside UpdraftPlus have changed?
There are some WordPress security plugins which will alert you if the contents of one of your plugin files changes (e.g. WordFence). This is a useful service – if unexpected changes occur, then it might mean that your site was hacked.
The way that WordFence detects this unfortunately results in lots of false positives.
The better way to perform this check would be by comparing your installed plugin with the plugin that was originally downloaded. However, WordFence compares your installed plugin with the plugin that can be downloaded today.
This is problematic, because often plugin authors make minor changes to their plugins without changing the version number. For example, when a new version of WordPress is released, they might change the indication of what version number the plugin supports. Or make a trivial change to a spelling mistake, or fix a bug that affected small numbers of people. They do this because changing the version number will cause an update to show for all users of the plugin – and if this happens too often, then users get unhappy about the number of updates they have to apply. Hence, there’s a trade-off; the plugin developer has to weigh up the relative value of the improvement or bugfix he is making and the number of users it will benefit against the costs of increasing the version number.
This is quite common (we speak from experience of maintaining very many WordPress sites + plugins); but unfortunately WordFence assumes that a plugin will never change if its version number hasn’t changed. That assumption just doesn’t fit with a lot of very popular WordPress plugins.
Of course, it’s possible that you really have been hacked; however, WordFence’s warning is only a possible indicator of this, not a definite one.
Please can you (Mr. UpdraftPlus) send me (A. Customer) a copy of my backup set? Thanks!
We can’t do this, because we have never had any copies of your backups (unless you paid for and set up access to UpdraftVault storage – in which case you should go to your UpdraftVault page in your account, or fill in our customer support form, with your order number).
Where are your backups? Your backups are stored in whatever location you chose in the UpdraftPlus settings (e.g. Dropbox, Google Drive, etc.):
If you chose no backup destination, then (as it says in the settings area, in the screenshot above) your backups are kept on your web server. This means that they are in the directory wp-content/updraft . We don’t recommend doing this, as then if hackers destroy your website or your web hosting company goes bust, then you lose both the site and the backups in one go. This is why UpdraftPlus shows you a warning if you select that option. In that case, you can get them via FTP, or from your web hosting company’s control panel, or by requesting from your web hosting company (we don’t have access to your web hosting company, so it’s them you’d need to talk to).
My remote storage method is FTP, but I cannot see my backups on my FTP server
Here’s a check-list to help you…
1. Has your backup finished?
If you visit your UpdraftPlus settings page (refresh it if it’s already open, just to be sure), then does it show the backup as having finished?
2. Did you save your settings before starting the backup?
Sometimes users either forget to save their settings before they start the backup… or they change the settings after the backup job began and hope that the backup job will pick up the new settings. That doesn’t work: backup jobs use the settings that were active at the time that the backup began; so, you need to set the FTP settings and save them before you start the backup.
3. Does your FTP software cache directory listings?
Some FTP clients will show you the same directory listing as it last saw – they will only update the listing for files uploaded through the FTP client itself. Close your FTP client and open it again, and press the button for refreshing the directory listing view.
4. Have you ever tested your FTP settings?
If you press the “Test FTP Settings” on the UpdraftPlus settings page, then does it work? If not, then you will need to respond to any error message it gives you when you try it.
If the attempt to connect fails, but the same settings work in an FTP program on your PC, then most probably your web hosting company has a firewall that blocks outgoing FTP connections from your website – you should ask them to open up the port to allow connections for your backup.
5. Does your backup report give any clues?
If you configured UpdraftPlus to email you a backup report, then does it have any useful information in it? Is it showing any warnings or errors? (If not, then you can also read the backup log file if you’re confident enough to read log files… do a search in it for “FTP” to find the right part of the log).If you did not configure UpdraftPlus to email you a report, then try that.
If all that fails, and you’re a paying customer, then please feel free to file a support request… please remember to attach your backup log file (the “Download latest log file” link at the top of the UpdraftPlus settings page should access it; if not, then find it in the section that opens when you press the big “Restore” button).
Why does UpdraftPlus warn me that my disk has no space left, when in fact it does?
UpdraftPlus just passes on the results of asking PHP “how much free space is left?” – via the “disk_free_space” PHP function.
Based on support requests we’ve had, it does seem that on some PHP installs, PHP reports that your disk is full when it is not. We do not have any specific information on why this might happen. If it is causing you a problem, then you should ask your web hosting company to take a look. If they give you any useful information then please do send it back to us!
How do I deal with “Fatal error: Allowed memory size of…” errors?
Here is an example of such an error (this may either be showing on your website, or just logged in your PHP logs, whilst your website has a blank screen):
Fatal error: Allowed memory size of 41943040 bytes exhausted (tried to allocate 98304 bytes) in D:\Hosting\4662999\html\wp\wp-admin\includes\post.php on line 281
This is not particularly an UpdraftPlus error. It means that the PHP install on the webserver that your WordPress site is on reached its configured memory limit. What that means is that your site has plugins that need more memory than your setup is configured to allow.
If it happened when you installed UpdraftPlus, then it means that you were previously running very close to the limit, and one more plugin was enough to tip you over the limit.
To resolve this, you just need to tell WordPress to increase the limit. To do that, edit the wp-config.php for your site and add a line like this one; add it after the opening <?php at the top. Anywhere after that is fine (but not at the very end, where it will take no effect):
define('WP_MEMORY_LIMIT', '256M');
If the error comes when restoring/migrating, then you should also add this (which allows even more memory to the admin dashboard):
define('WP_MAX_MEMORY_LIMIT', '384M');
If you are not sure of how to do this, then ask your web hosting company for help, and they should be able to assist. If your memory limit was already 256M, then raise it to something higher, e.g. 512M, etc.
If seen when restoring/migrating
If you see the error whilst restoring your site, then it probably means you have a very large file to unpack (the maximum memory needed is approximately the amount of memory used by WordPress generally, plus the size of the largest file). You will need to raise your memory limit to at least that.
If the largest file is in your “uploads” (which is where very large files are likely to be), then you can just restore the uploads manually – i.e., don’t include the uploads in your restoration (do the restoration without it). Then, afterwards, unzip that zip on your PC and use FTP to move the resulting “uploads” folder into wp-content (so that it becomes wp-content/uploads – remove any existing such directory first… but if you have multiple uploads zips, then you’ll instead need to upload the contents of each in turn).
I have locked the UpdraftPlus settings page, and forgotten the password – how do I unlock it?
Are you faced with this lock screen, and forgot the unlock password?
The best thing to do is contact whoever set the lock password, and ask them!
If that is you, and you have lost the password completely, then please read on…
If you have access to the site’s wp-config.php file, then simply add this and then reload the settings page:
define('UPDRAFTPLUS_NOADMINLOCK', true);
Otherwise, if you cannot do that, then you will need to find the password in the WordPress database; for this, you will need to either have:
- The ability to install plugins – install and activate the SQL Executioner plugin
- Another way of editing your database (e.g. phpMyAdmin in your web hosting control panel)
If you find the below steps too technical, then you can always purchase a one-time support incident from our shop.
If you installed the “SQL Executioner” plugin, then you can access it in the Tools -> SQL Executioner menu.
 You now need to search in your database for the unlock password. The following query will work in SQL Executioner on a WordPress single site installation:
SELECT * FROM $options WHERE option_name = 'updraft_adminlocking';
On a WordPress multisite (i.e. network) installation with UpdraftPlus Premium or the UpdraftPlus multisite add-on, you will need to use this query instead:
SELECT * FROM $sitemeta WHERE option_name = 'updraftplus_options';
If you are not using SQL Executioner, but instead phpMyAdmin or some other SQL tool, then you will need to replace $ with the table prefix from your WordPress site – so, instead of $options, you’ll have something like wp_options (and something like wp_sitemeta instead of $sitemeta). (The tool should show you the names of all the tables, from which you can spot the correct table name; if not, then use the SQL command “SHOW TABLES;”).
When you have successfully run the correct command, then the output should include the text password in it. On a single site, it should be obvious; on a multi-site, search in the output for the text updraft_adminlocking … and very shortly afterwards (a few characters later), you should be able to see the password. (Don’t directly edit it in your SQL editor unless you understand the format of PHP serialized arrays – otherwise you may lose some or all of your UpdraftPlus options).
If you wish to reset your password again afterwards, then you can do so in the “Advanced Tools” (formerly “Debugging / Expert Tools”) tab of your UpdraftPlus settings page in the WordPress dashboard.
My Google Drive quota is full, even though I’ve deleted my backups and cannot see anything using it
Here are a couple of things to check…
- Note that your Google quota is not simply a “Google Drive quota”. It is used by other things in your Google account – including GMail, and Google Photos (which your phone might be automatically uploading to). More information from Google is available here.
- If you send an item in Google Drive to the ‘trash’ folder, then it still uses quota. You need to remove it entirely to get the quota back.
WordPress crashed when updating UpdraftPlus – what can I do?
WordPress currently (this article was last reviewed in March 2021) does not handle plugin updates in an optimal way – if something goes wrong (for example, your account is too low on disk space, and you reach 100%, or PHP crashes), then it can leave your plugin in an inconsistent state.
Symptoms of your plugin being in an inconsistent state would be any of these:
- That the plugin does not appear on the “Plugins” page in your dashboard (and possibly, when you try to re-install it, you’re told that the directory already exists).
- Or, that after updating an error about a missing file shows on your site, or perhaps just in the dashboard or in the UpdraftPlus log file, mentioning the plugin and a missing file (especially the words “failed to open
stream: No such file or directory”). - Or (for versions of UpdraftPlus from September 2015 onwards), there’s a dashboard notice telling you so.
The only thing to do in this situation is to remove the plugin, and re-install it. Before re-installing it, check how much free disk space you have – if it’s less than 50Mb, then you may need some more (UpdraftPlus is around 19Mb when unzipped – but WordPress creates a second copy when updating, as well as the downloaded zip file).
If the plugin does not appear on the “Plugins” page in your dashboard, and if re-installing tells you that the directory already exists and does not offer you an option to replace the existing one (thankfully newer WordPress versions now do that), then you must use FTP (or the file manager in your web hosting company’s control panel) to remove the plugin. Log in to your web-space via FTP (or file manager), and entirely remove the directory wp-content/plugins/updraftplus.
This article is also very useful for understanding more about how WordPress installs plugins – it’s useful information for all kinds of situations when something goes wrong.
How do I open my browser’s Developer Tools?
When debugging UpdraftPlus, you will sometimes be told to open the JavaScript Console or Developer Tools.
Here is a quick guide on how to access this console on the most common browsers
Google Chrome
- Navigate to the desired page
- Press CTRL+SHIFT+J (CMD+OPT+J on a Mac) or F12
- A Developer Tools sub-window should appear, as in the screenshot below
- In the Developer Tools window, click the ‘Console’ tab
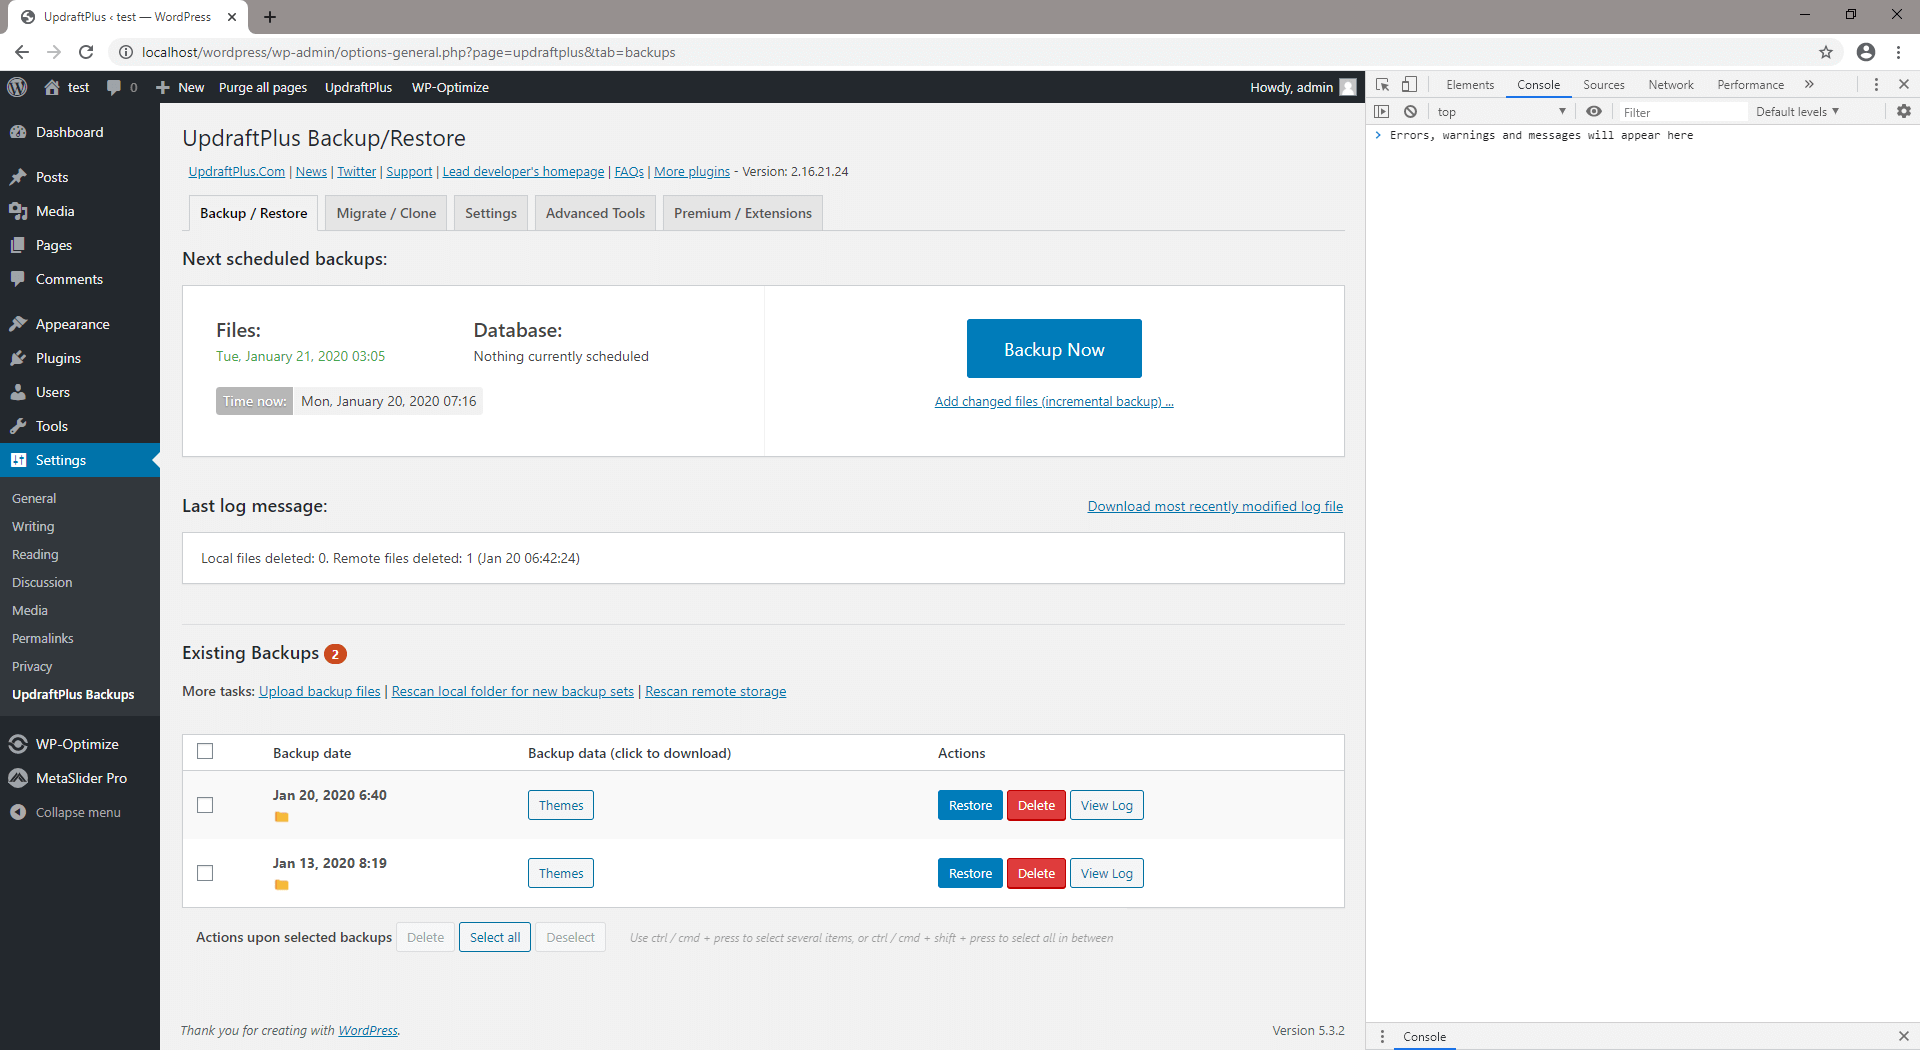
Mozilla Firefox
- Navigate to the desired page
- Press F12
- A Developer Tools sub-window should appear, as in the screenshot below
- In the Developer Tools window, click the ‘Console’ tab
- Alternatively, press CTRL+SHIFT+J (CMD+OPT+J on a Mac) for a pop-out window containing the console
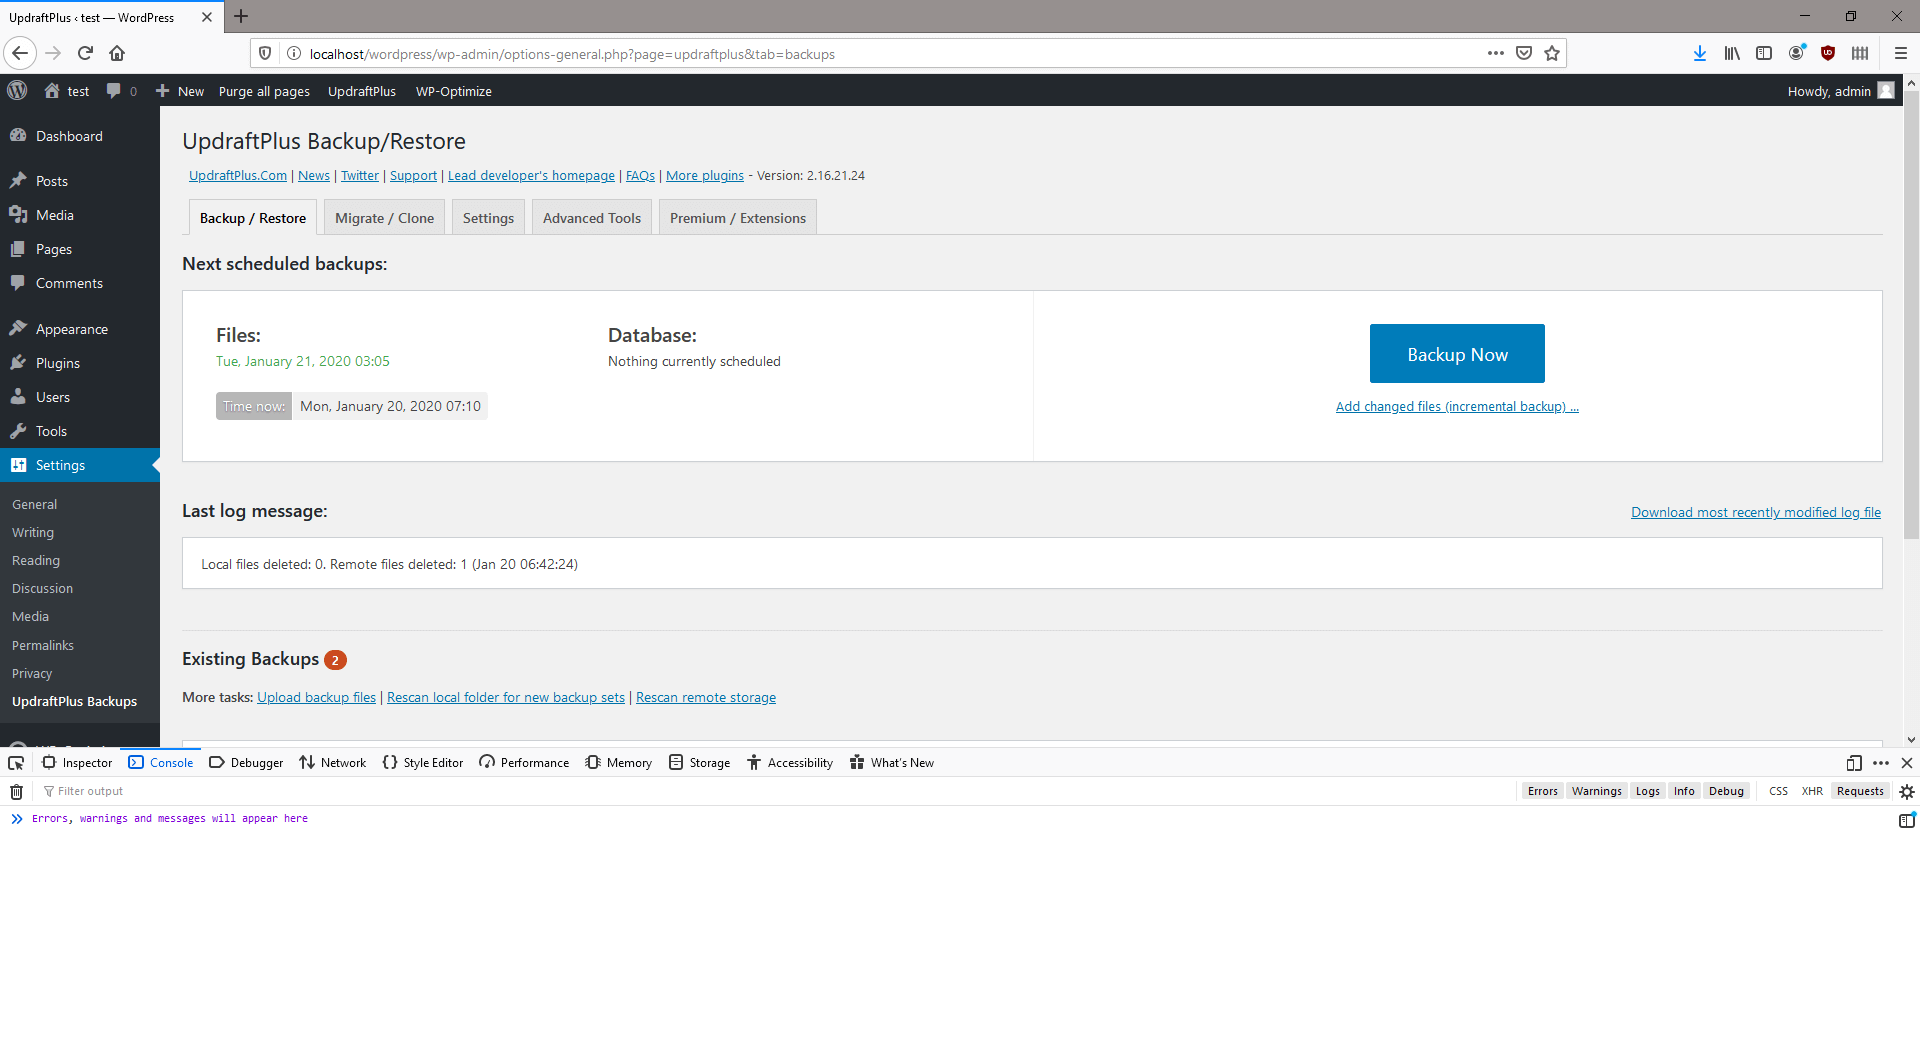
Internet Explorer / Edge
- Navigate to the desired page
- Press CTRL+SHIFT+J or F12
- A Developer Tools sub-window should appear, as in the screenshot below
- In the Developer Tools window, click the ‘Console’ tab
- Reload the current page
Opera
- Navigate to the desired page
- Press CTRL+SHIFT+J (Cmd+Opt+J on a Mac)
- A Developer Tools sub-window should appear, as in the screenshot below
- In the Developer Tools window, click the ‘Console’ tab
Safari
- Open Safari’s preferences, and open the Advanced pane
- Enable the ‘Show Develop menu in menu bar’ setting, and close the preferences pane
- Press CMD+OPT+C
- A Developer Tools window should appear, as in the screenshot below
- In the Developer Tools window, click the ‘Console’ tab
What does the error “Operation timed out after (number) milliseconds with 0 bytes received” mean?
Do you have an error that looks something like this in your log file? (This example is for a backup to Google Drive – but the pattern can occur with various other remote storage methods too).
5226.206 (9) ERROR: Google Drive upload error: Operation timed out after 60004 milliseconds with 0 bytes received (line: 117, file: /home/leehawki/public_html/wp-content/plugins/updraftplus/includes/Google/IO/Curl.php)
This means that there was no network connectivity to the remote storage provider. (In the example above, it is saying that after 60004 milliseconds (i.e. 60 seconds), 0 bytes (i.e. absolutely zero) of data had been transported).
In this case, if the error persists (i.e. it happens again on a fresh try), you will want to talk to your web hosting provider, and show them the log, so that they can investigate. It is theoretically possible that the remote storage provider is temporarily having an outage – but, if it persists, then it’s far more likely that the network problem is at your webserver’s end, rather than at (for example) Google’s.
Note that UpdraftPlus is engineered to re-try if there is a network problem. Network problems happen often enough. You should wait at least half an hour before reporting the problem to anyone, to make sure that it is not just a one-off glitch.
In some cases, the problem is that the webserver has enabled IPv6 networking on the webserver (more information – Wikipedia), but with a broken setup. With IPv4 still dominating Internet traffic, this problem can sometimes pass for a long time on a server without being spotted. This is one possible cause of the above error. In this case, for Google storage (i.e. Google Drive or Google Cloud), you can add this after the opening line of your wp-config.php file, in order to cause UpdraftPlus to use IPv4 only:
define(‘UPDRAFTPLUS_IPV4_ONLY’, true);
If this does resolve the issue, then you should definitely report this to your web hosting provider, so that they can fix the misconfiguration on their server, which is better than just working around it in UpdraftPlus.
There is a “Permission denied” error when UpdraftPlus tries to contact remote storage
Short version: if you run your own server, it may have SELinux or AppArmor, which are likely configured to forbid network access. You need to enable that access. Otherwise, it’s probably a firewall. Long version follows!
There can be many causes why UpdraftPlus is unable to contact your remote storage (e.g. Dropbox, Google Drive, FTP server, etc.). Some of these are:
- An incoming firewall on the remote storage (e.g. your FTP server needs a new firewall rule to allow the incoming traffic)
- A misconfigured firewall on the remote storage (the FTP protocol is particularly susceptible to this, especially if you FTP server is on a private network, and especially if you are using encrypted FTP)
- An outgoing firewall on the webserver or web hosting company’s network (i.e. they are restricting outgoing traffic, and you need to ask them to allow yours)
- The remote storage is currently down
- The network is too congested, and traffic can’t currently get through (in both these latter two cases, you just need to wait for UpdraftPlus to retry)
However, if the error or log file you see specifically has the words “Permission denied” in it, for example like this…
PHP event: code E_USER_NOTICE: Cannot connect to server.example.com:1234 Error 13. Permission denied
… then the problem is on your webserver, which is configured to disallow outgoing network connections. This may be an outgoing firewall (i.e. as mentioned above); or if not, it is another security control mechanism in use on the server. The most common of these are SELinux (on CentOS/RedHat-like systems) and AppArmor (on Ubuntu-like systems).
In the case of SELinux, the solution is usually to turn on the httpd_can_network_connect boolean, to allow Apache (and thus mod_php, if that is how PHP is running on your system) to use the network. More information.
What should I do if malware is detected in my UpdraftPlus files?
If your malware scanner or other security detects possible malware in your UpdraftPlus files, you should take the following steps:
1. Check for false positives
Some libraries used by UpdraftPlus use certain functions which can be flagged by malware scanners, especially on high sensitivity scans. For example phpseclib, the PHP Secure Communications Library, uses the eval() and unpack() functions safely and legitimately for cryptographic purposes. Together, these functions have also been used by malware in other contexts to hide their code.
As such, the first step you should take is to check for a false positive. To do so we recommend comparing the contents of the flagged files with fresh copies from a new download of the plugin. This can be done using a file comparison tool, such as WinMerge or similar tools. If the contents of the files are exactly the same, then the alert was likely a false positive.
You can also use the md5 or SHA-1 has functions to create a hash value for both files and compare those. Files which match exactly will give the same hash output.
2. Reinstall UpdraftPlus
If it appears that an UpdraftPlus file is infected or otherwise compromised, you should then remove the infected version of the plugin and reinstall from a fresh download. A fresh version of UpdraftPlus Premium can be found in your My Account Licences page, while the free version can be found in the WordPress.org Plugin Directory.
3. Investigate further
Malware present in your site’s PHP files is a symptom of malicious action, rather than the cause. The location of the malicious code does not necessarily indicate how the attacker gained access to the site.
If malware or malicious code is found in your UpdraftPlus installation, you should then run a full check on your site, including further scans for malicious code, update passwords and security keys, check the database for any issues, etc. You may be able to ask your hosts or server admin to help you.
More information on how to investigate further and clean your site can be found in this guide from Sucuri: https://sucuri.net/guides/how-to-clean-hacked-wordpress/
When I migrated my site, I did not search/replace the database; what can I do now?
This article is about “migrating” a site – that means, cloning it at a different location (URL). It does not apply to “restoring” a site – when the site’s location stays the same.
In step 5 of the migration instructions, there is an important checkbox to tick. This performs the search/replace on the database, so that all the location references are updated.
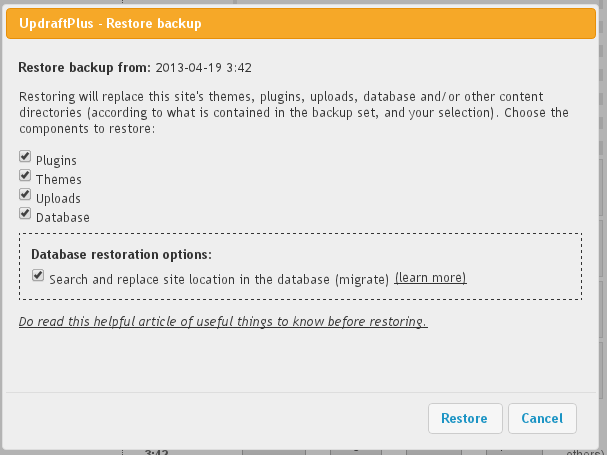
If this checkbox is not ticked, then you will not even be able to log in to your new website; WordPress will keep sending you back to the old one.
But, do not worry! It is easily fixable. Just do this:
1. Open up your wp-config.php file in an editor
Connect via FTP to your website (or whatever other method your web hosting company gives you to access the files stored in your webspace). Find the file in the root of your WordPress install called “wp-config.php”, and open it up to edit.
Add these two lines anywhere near another line beginning with ‘define’, but change https://example.com to match the address of your new website:
define('WP_SITEURL', 'https://example.com');
define('WP_HOME', WP_SITEURL);
Then save the newly edited wp-config.php file back to your webspace.
2. Log in to the WordPress admin dashboard
Visit your site’s /wp-admin page (e.g. https://example.com/wp-admin) and now you should be able to log in.
If the whole site has now crashed and you can’t even visit the admin page, then you must have introduced a typing mistake in step 1 – go back and try again!
3. Perform the database migration again
Perform the database migration again, and make sure that the box is ticked. There is no need (and it will only waste time) to re-migrate the plugins, themes, uploads, etc. Keep the browser window in which the operation takes place open, in case anything goes wrong – then you will want to copy and paste the contents so that they can be analysed.
What does the error message “PCLZIP_ERR_BAD_FORMAT(-10)” mean?
Examples: “PCLZIP_ERR_BAD_FORMAT(-10): Invalid archive structure”; “PCLZIP_ERR_BAD_FORMAT (-10) : Unable to find End of Central Dir Record signature”
This is a message that it is possible to see during a restoration or migration operation. If it occurs, then it will be when UpdraftPlus is unpacking one of the zip files from your backup. (To be more precise, it is when UpdraftPlus asks WordPress to unzip the zip file, using WordPress’s built-in unzipping functions).
Its meaning is that the zip file was corrupt, and could not be unzipped.
When we have seen this message, the situation has generally been like so: the backup zip itself was fine (don’t panic!), but the corruption occurred either when the user downloaded it from their “source” WordPress site (e.g. the download got terminated, and the user wasn’t told or didn’t spot it), or when the user uploaded it into their “destination” WordPress site. i.e. The download/upload was not successful; the uploaded file is not the same as your original backup zip. Either that, or the user attempted to begin the restoration before the upload operation had completed.
The solution, therefore, is to download and upload the zip again. To test that the download was sound, try opening the zip on your PC/Mac – does it open? If not, then you had a problem when downloading.
If the drag-and-drop uploading widget in the UpdraftPlus dashboard was used previously, then an alternative method is to use FTP to directly place your zips into the wp-content/updraft folder on your website; and then when the upload is complete, pressing the “Rescan local folder for new backup sets” link, as shown below. Then try your restore/migration again.
Link to press for rescanning files
Alternatively, connect your destination site to the same remote storage (e.g. same Dropbox folder, or same Amazon S3 bucket) as the source site. Don’t forget to save the settings – and then click the “Rescan remote storage” link in the screenshot above on the destination site. UpdraftPlus will then be able to fetch the backup directly – you won’t need to make sure that your download/upload cycle goes smoothly.
After migrating my site, my front page works, but all other pages give a 404 error
First of all: this is not bad. Even though your front page is only one page, if it migrated correctly, then you’re 99% there.
If your front page works, but others give 404, then there’s only one thing missing: a piece of configuration in your webserver. In particular, it’s the configuration for permalinks – the configuration to send access to pretty URLs like www.example.com/about-us/ into WordPress’s actual files on-disk.
Because this is part of the webserver configuration, it’s one level above WordPress, and not under WordPress’s direct control. Therefore, it sometimes needs a small piece of manual intervention from you to get working.
How can I know what webserver my hosting company is using?
It may tell you on your 404 error page. If not, then go to your UpdraftPlus settings page (remember that you’ll need to use the login details from the site you migrated – login details are part of what’s migrated), and click on the ‘Expert / Debugging Tools’ tab. In that tab, towards the top, there should be a line ‘Web server’.
Failing that, you can ask your web hosting company – they’ll know!
Apache and IIS
The vast majority of webservers are Apache. Apache handles this via .htaccess files (a file called .htaccess in the root directory of your WordPress install), and WordPress can almost always set these up automatically. WordPress also can usually set the configuration file for Microsoft IIS webservers (a file called web.config). If it is not happening automatically for you, then firstly visit the Settings -> Permalinks page in your WordPress dashboard, and press the button to save settings. When you do this, WordPress will make a second attempt to set up the file. This probably will not work, if it did not work the first time. But you can try anyway. If it does not work, and you have Apache or IIS, then you should check the file permissions in the root folder of your WordPress install. Does WordPress (or to be more particular, the PHP engine that WordPress runs on) have permission to create files in that directory?
Finally, on Apache, if you are running your own server, then you should also check that: 1) you have the module mod_rewrite enabled and 2) your Apache configuration settings allow .htaccess files to take effect (perhaps, the AllowOverride setting in your main httpd.conf – but, the best place to get Apache support is in an Apache/XAMMP/MAMP/Bitnami etc. forum, for such issues). WordPress relies on mod_rewrite being available, and .htaccess files being allowed to take effect. (If you are using web hosting, then it is extremely unlikely to not be enabled/in effect already). Depending on how you have installed Apache, mod_rewrite might be called rewrite_module, or something similar.
Other webservers
If your webserver is not Apache or IIS (e.g. is one of the others – nginx, Zeus, lighttpd, LiteSpeed, or some other product), then you are likely to need to do something manually to set up the permalinks. Here are some links that may help; if they don’t, they just try Googling – e.g. Google for something like ‘WordPress permalinks lighttpd’.
- Nginx:
https://codex.wordpress.org/Nginx#URL_Rewrites_.2F_Permalinks
https://nginxlibrary.com/wordpress-permalinks/ - Zeus:
https://www.names.co.uk/support/hosting/linux_hosting/1119-wordpress_rewrite_script.html
https://www.names.co.uk/support/hosting/528-zeus_rewrite_rules_user_guide.html - Lighttpd:
https://www.chrisjohnston.org/tech/setting-up-a-wordpress-blog-on-lighttpd
https://antesarkkinen.com/blog/wordpress-with-lighttpd-pretty-url-permalinks-and-jetpack/ - LiteSpeed: LiteSpeed can read Apache’s .htaccess files, so should work without help, as far as we know.
- IIS (though note, as explained above, your problem is probably file permissions): https://www.iis.net/learn/extensions/url-rewrite-module/enabling-pretty-permalinks-in-wordpress
Add-ons (7)
What is the most secure way to set up Rackspace Cloud Files?
Rackspace Cloud Files allows you to set up users that have access to only one container in your Cloud Files account – and to nothing else. This is the most secure configuration. It means that admin users on your WordPress site, even if they can copy the Rackspace access details from the UpdraftPlus configuration, can do nothing more with them than access the UpdraftPlus backups.
The easiest way to set up Rackspace Cloud Files in this way is using the “Rackspace Cloud Files enhanced” add-on from our shop.
Does UpdraftPlus support WP-CLI?
Yes, via our WP-CLI premium feature, which is part of UpdraftPlus Premium. Check out our documentation here.
How use “Backup time and scheduling” additional retention rules
For written information on how to set up additional retention rules for your UpdraftPlus backup, please click on this link.
I want to lock the UpdraftPlus settings so that other site admins cannot access them
In UpdraftPlus Premium, this is done in the “Advanced Tools” tab:
And scroll down the page a bit…
Don’t forget to remember your password! If you forget it, then there’s an FAQ for how to get back in., assuming that you have write access to the WordPress installation (files or database). This lock feature isn’t meant to provide unbreakable security, but to be a convenience feature to prevent mishaps and casual nosiness. If someone has an unrestricted administrator-level WordPress login, then ultimately there are ways to do anything to the site: that’s the point of an administrator login.
Tell me more about the “Search and replace site location in the database” option
Quick link: Go to the UpdraftPlus shop to find the Migrator add-on, or UpdraftPlus Premium.
If you have the “Migrator” add-on (or UpdraftPlus Premium, which includes all add-ons), then when you restore a site, you will be given the option to “Search and replace site location in the database”:
Migrating a database
What does this option do? If selected, then after restoring your database, it will then perform a search-and-replace operation upon it. It will first look up the address that the site was living at (i.e. the site whose database you are restoring). Then, it will replace all instances of that location in the database with your site’s new address.
This is a vital step if you are migrating a site from one location (URL) to another. For example, if you are moving a site from your development location – e.g. https://localhost/testsite to your live location – e.g. https://example.com – then after copying all the files and database, you then need to search/replace the database to reflect the new location. If you do not, then your site, though sitting at the “new” location, will contain lots of references to the “old” one. This can cause confusion and bugs. Most professional WordPress developers use the tried-and-tested “searchandreplacedb2.php” script to accomplish this task. UpdraftPlus includes the same code as its own search-and-replace engine to give you the same reliability.
So, in summary, here is how to migrate/clone a site from one location where WordPress is installed to another:
- Make sure that the new site (destination) has UpdraftPlus and the “Migrator” add-on installed (either stand-alone, or via UpdraftPlus Premium). (You can get these products from our shop, here).
- Create a backup on the original (old) site.
- Go to the “Existing Backups” tab and then under this click “Upload backup files”, from here you can then import the backup into the new site, by dragging and dropping:
- After the upload has finished, use the “Restore” button on the new site to begin a “restoration” using the backup set that you just uploaded. Make sure that you tick the “search and replace” button when doing so.
That’s all!
You can see a fuller walk-through, with many more screenshots, here.
Can I use UpdraftPlus to migrate a site to a different address?
This is a common need for site developers – or anyone wanting to maintain two copies of a site (e.g. when moving web hosting).
The answer is “yes” – you just need the “Migrator” add-on from our shop; or “UpdraftPlus Premium” which includes every add-on.
With that installed, just take a look at our migration guide.
How can I send site data directly from one site to another?
The instructions below are for UpdraftPlus 2.10.3 (June 2015) or later. The instructions assume that you have a compatible UpdraftPlus version installed on both sites, and that both sites are of the same type (in relation to WordPress single or multisite (a.k.a. “Network“) site installs. If you don’t know what this means, don’t worry – people with multisite installs to whom it applies will know about it!).
A note about firewalls: To be able to send site data (e.g. plugins, themes, database) directly to a remote site (e.g. sending a site backup from your development site to your live site), there needs to be no firewall that will block the sending site from visiting the receiving site. This is most likely when sending from a live site on the Internet to a local development site on your personal development machine. (Your personal development machine probably has a firewall, and/or there is a firewall on your Internet router). In that case, you can instead download the backup manually, or you can configure your local development machine to use the same remote storage (e.g. same Dropbox) as your remote site, and (after saving settings) press the “Rescan remote storage” button on the local site’s UpdraftPlus (in the “Existing Backups” tab) to detect the backup.
For a quick video on how to to do this view our direct site-to-site migration video:
Step 1: Connect the two sites
This only needs to be done once. You need to get a “key” from the receiving site, and copy-and-paste it in the sending site. This gives the sending site access. It will have this access until you delete the key.
To do this, go to the UpdraftPlus settings page on the receiving site (i.e. the site that the backup will be sent to), and click on the “Clone/Migrate” button.

A window like the one below should open.
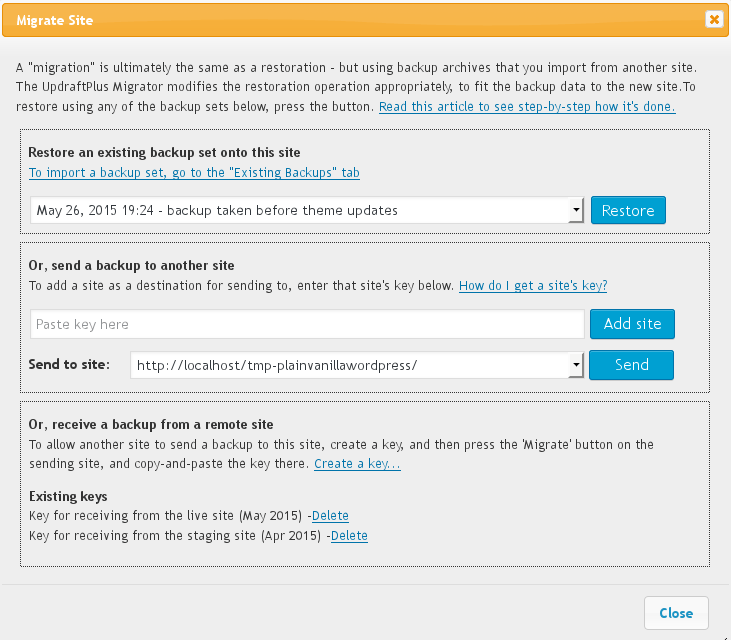
In it, go to the bottom section – the section “Or, receive a backup from a remote site.”
Click on “Create a key…” . You will be asked to give your key a name. You can call it anything you like. The main purpose of the name is to help you to remember which sites you gave permission to send data.
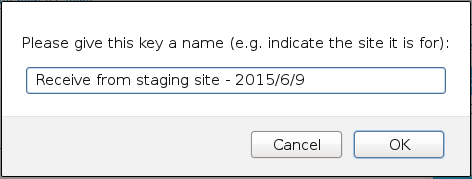
The new key will then be shown. Click on it, and it will be selected. Then all you need to do is copy it to your clip-board. (Press Control-C, or press the right-hand mouse button (or whatever you press to see a menu) and select “Copy”).

Now, go to the same window in the sending site. (i.e. Go to UpdraftPlus on the sending site, and hit the “Clone/Migrate” button).
When the window has opened, go to the second section – the section headed”Or, send a backup to another site“.
There, paste the key in the text entry field next to the “Add site” button. (Press Control-V on your keyboard, or choose “Paste” from a menu).

Press the “Add site” button. It should now tell you that the site has been added, and then show you a “Send to site:” option, for sending to the site that the key came from – like in the next screenshot in step 2, below.
Step 2: Send the backup
We now assume that you have completed step 1. You should now be logged in on the sending site (i.e. the site that is being cloned), and have pressed the “Clone/Migrate” button on the UpdraftPlus settings page, and be looking at the window which then opens.
In the “Or, send a backup to another site” section, choose which site to send to, and press the “Send” button.
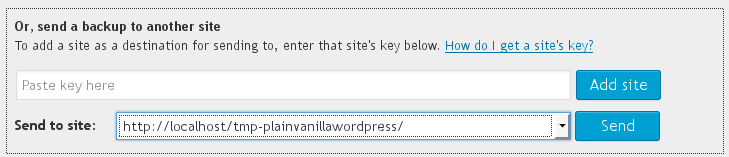
When you do so, UpdraftPlus will then test the connection to the remote site, and (if it succeeds), allow you to choose which parts of your site to send over.
Note that this does not immediately replace the destination site with the backup. Rather, the backup set will be added to UpdraftPlus on the receiving site, and you will restore it there. So, don’t fear – this step is not the final one where everything happens!
After choosing your options, press the “Send” button. UpdraftPlus will then start preparing and sending over the data!
Then watch it go!

Step 3: Restore the backup data on the destination site
This step is one you’re probably already familiar with. Go to the UpdraftPlus settings page on the destination site, and go to the “Existing Backups” tab. Click the big “Restore” button next to the backup set that you’ve just sent over. (You might need to wait half a minute after the backup finished before it appears). Then restore as normal. Locations (URLs) in your database will be search/replaced, just as normal, when importing a remote site.
If you are not familiar with these steps, then follow this link to the traditional clone/migration instructions, and resume from step 4. (Also go there if something goes wrong – that article has extra links for help with trouble-shooting).
That’s all – easy as that!
Dropbox (8)
Where in Dropbox are my files stored?
UpdraftPlus uses what Dropbox calls an “app folder”. This means that UpdraftPlus only has access to its own files – not any other part of your Dropbox.
App folders are all stored in the top-level folder called “apps”, with their own name. In the case of UpdraftPlus, your files are in “apps/UpdraftPlus.Com”. Dropbox does not allow us to access anything outside of there.
If you purchase UpdraftPlus Premium, then you can store your backups inside sub-folders of that directory, e.g. one site in “apps/UpdraftPlus.Com/mysite”, another in “apps/UpdraftPlus.Com/anotherone”, etc.
If you cannot yet see your backup in your Dropbox folder, then you should go to the Dropbox website, and look directly in your Dropbox in there. If you have been viewing your Dropbox on your PC/Mac, then it may not yet be synchronised (it takes time for new data in your Dropbox to get synchronised to the folder on your PC/Mac – the Dropbox website has the “official” contents). Please do check this before you conclude that your backup hasn’t worked!
UpdraftPlus says that a backup to Dropbox completed, but I don’t yet see it in my Dropbox
Are you looking on the Dropbox folder on your computer, and not yet seeing your backup?
This almost certainly means that the Dropbox folder on your computer is not yet synced with your Dropbox account. This can take a while, especially if your backup is big. Instead of waiting for your computer to sync with Dropbox, just go and view your Dropbox directly – go to www.dropbox.com, and view it there (look in Apps/UpdraftPlus).
I want to change or re-authenticate my Dropbox account – how do I do this?
In the “Dropbox” section of the UpdraftPlus settings page (in your WordPress dashboard), there is a “re-authenticate” link. Use this whenever you wish to re-authenticate your Dropbox account (e.g. if you made a change to your Dropbox account that makes this necessary), or to change to an entirely different Dropbox account:
How do I unlink UpdraftPlus from my Dropbox?
If you still have access to the WordPress site you want to unlink, then simply 1) log in and go to the UpdraftPlus settings page and 2) go to the ‘Expert / Debugging’ tab, and press the “Wipe Settings” button at the bottom of the page.
But what if a WordPress site is backing up to your Dropbox, but you no longer have access to that WordPress site, then how can you stop that WordPress site from backing up to your Dropbox?
In Dropbox terminology, this is called “unlinking”.
There’s a good article on WikiHow with screenshots showing the simple steps to do this, here. You want to use “Method 1 of 2: Unlinking Directly from Dropbox”.
The bad news is that after unlinking in that way, you’ll need to go to all your current WordPress sites, and use the link in the Dropbox configuration for UpdraftPlus to re-authorize them again. Dropbox only allows you to unlink everything (so that you then have to re-link the ones you wanted to keep) – they don’t have a facility to unlink only some sites. Unfortunately, UpdraftPlus cannot work around this limitation of Dropbox’s consumer/single-entity-focused design. If you are looking for a remote storage solution that is built more with business rather than individual consumer needs in mind, then we recommend our own UpdraftVault solution, which allows account holders to individually de-authorise connected sites. Another option for more technically-confident users is Amazon S3, with a separate IAM user for each site.
How can I use my own Dropbox app?
N.B. This question is talking about Dropbox “apps”, meaning developer applications, configured at https://www.dropbox.com/developers/apps. It’s nothing to do with your Dropbox “app” on an iPhone, tablet, PC, etc. It’s a question for advanced users and developers.
These instructions assume you are using UpdraftPlus 1.9.61 (free versions) / 2.9.61 (paid versions) or later.
Note that from September 2016 onwards, due to changes Dropbox have made, this will either require that your site either has an SSL certificate and https:// URL, or has a URL beginning with https://localhost.
If you don’t want to use the default UpdraftPlus app, which stores data in (and only has access to) the folder apps/UpdraftPlus in your Dropbox, then you can do the following. This includes being able to use any path in your Dropbox (i.e. not restricted just to the app folder – though, it’s better to stay restricted, for security):
1) Edit your wp-config.php file in your WordPress installation to include this line:
define('UPDRAFTPLUS_CUSTOM_DROPBOX_APP', true);
2) Log in at www.dropbox.com
3) After logging in, visit https://www.dropbox.com/developers/apps
4) Click the ‘Create App’ button
5) Choose “Dropbox API app”, and then choose “Files and datastores”. If you want to go outside the “apps” folder, then also choose “My app needs access to files already on Dropbox” and “All file types”. Call the app with any label you like (it’s just a label). Finally, press “Create App”.
6) In the next screen, find the ‘OAuth 2’ settings. Enter your redirect URL (shown under the Dropbox remote storage settings in UpdraftPlus) into the Redirest URIs field.
7) Find the ‘App key’ and ‘App secret’. Enter these values into your UpdraftPlus settings page. Now, visit the UpdraftPlus settings page in your web browser. Go to the Dropbox settings, and it should now show the Dropbox app key and app secret in the settings.
If you were using an app that has access to the entire Dropbox, then prefix dropbox: onto the key; i.e. dropbox:key-shown-on-dropbox-website
8) If you were using a whole-Dropbox app, then you can now edit the “Store at:” setting, and it should be shown + interpreted as a full Dropbox path – i.e. it should not show ‘apps/UpdraftPlus’ on the front. (It’s the “dropbox:” bit in the appkey setting above that does this).
8) After pressing “Save Changes”, you should then go down to the Dropbox settings again, and click on the authenticate link (in the ‘Authenticate with Dropbox’ section). This will then connect you to your created Dropbox app.
Why has the Dropbox “UpdraftPlus” folder changed to “UpdraftPlus.com”?
To maintain ongoing compatibility with Dropbox (who are deprecating one of their APIs), we recently (as of October 2016) updated UpdraftPlus’ method for authenticating with Dropbox. This included switching to a new Dropbox “App” (i.e. Dropbox application). As Dropbox enforces unique folder names for each App, the folder that UpdraftPlus stores backups on your Dropbox account had to also change.
On new installations, UpdraftPlus now stores backups in the “Apps/UpdraftPlus.com” folder on Dropbox. Installations that were authenticated before the update will still store backups in the old “Apps/UpdraftPlus” folder.
To switch to using the new location on existing installations (ones which currently use Apps/UpdraftPlus), you will need to re-authenticate UpdraftPlus with Dropbox. This can be done through the Dropbox remote storage settings in the UpdraftPlus settings page. After switching, you will need to manually transfer any existing backup files from the old folder to the new location, if you wish UpdraftPlus to be able to see those backups.
What is your privacy policy for the use of your Dropbox app?
This privacy policy is published by the creators of UpdraftPlus, Updraft WP Software Ltd. (please see the footer of this page for company registration number). It applies only if you are using our built-in app for authentication. If you configure UpdraftPlus to use your own app, then it does not apply, and in that case no data comes to any of our servers.
Use of Dropbox with UpdraftPlus involves visiting our authentication server (website) as part of the authentication (OAuth) flow. Note that no backup data or other data from your WordPress site goes to our servers – this all remains on your server on which you are hosting WordPress. The authentication procedure will cause:
- Your IP address to be logged in our webserver logs. No further processing of these logs is carried out. These logs are kept for 6 months in accordance with UK law, and then automatically deleted. We carry out no further processing on them. They are not shared with any third party.
- (If authentication succeeds) your Dropbox account identifier may be stored in the authentication server’s database, so that the necessary authentication token can be given to your site if it requests it again. We carry out no further processing on them. They are not shared with any third party. Note that at the time of writing, we do not currently perform this storage, as Dropbox’s authentication procedures do not make it technically advantageous. (We merely reserve the right to do so if it becomes technically helpful in future).
No other data is sent or implicitly gathered by any of our servers in the process of using Dropbox. Any changes to this privacy policy in future will be notified of on this page.
How do I add DropBox to my UpdraftPlus account settings
Add your personal DropBox account to your UpdraftPlus settings as a remote storage location by following the below video.
Advanced usage (15)
Can I run backups from the shell / cron?
N.B. (April 2018 – the instructions on this page should still work, but we now support WP-CLI, which is the recommended way to interact with UpdraftPlus from the command-line. See our WP-CLI documentation here).
If you have shell access, then running a backup from the command-line has one big advantage over running it via your website: you shouldn’t get time-outs, so the backup will not need to automatically resume, but can run through in one go.
Furthermore, from the shell you can view the progress more easily in real-time. You can also run these as cron jobs.
To kick off a backup from the shell or cron, run a PHP file in the directory of your WordPress installation that looks like this:
<?php

define('UPDRAFTPLUS_CONSOLELOG', true);
define('DOING_CRON', true);
require_once('wp-load.php');
do_action('updraft_backupnow_backup_all', array('nocloud' => 0));
If you don’t want to watch the lines being logged running past, then you can miss out the “define” line.
If you don’t want to send the backup to remote storage, change the ‘nocloud’ parameter to ‘1’.
- To backup just files, replace the ‘do_action’ line with:
do_action('updraft_backup');
- To backup just the database, replace the ‘do_action’ line with:
do_action('updraft_backup_database');
If you want to only backup certain entities (e.g. plugins, themes, database) then replace the do_action line with:
global $updraftplus;
$backup_files = true;
$backup_database = true;
$entities_to_include = array('plugins', 'themes');
$updraftplus->boot_backup($backup_files, $backup_database, $entities_to_include);
If you wish or want to resume an already-started job, then instead of the do_action line above, use this one – but change the 12-digit hex code to the code for your job (which you can easily spot in the log file of a started job, or from the filenames in your wp-content/updraft directory):
do_action('updraft_backup_resume', 'fbb7e2919e0c', 1);
If you wish to run incremental backups, in addition to the normal backup cronjob, you will need to add a second task calling the following action:
do_action('updraft_backup_increments');
For example:
<?php

define('UPDRAFTPLUS_CONSOLELOG', true);
define('DOING_CRON', true);
require_once('wp-load.php');
do_action('updraft_backup_increments');
Schedule this cron task at the times you wish for the incremental backups to run, and the full backup task with a wider interval.
Note that on a WordPress multi-site install, you will also need to add (before the line that loads wp-load.php), lines like these – but change them so that the host and URI together indicate one of your sites. (If they do not match any, then the line that loads wp-load.php will not return; WordPress will die first).
$_SERVER['HTTP_HOST'] = 'site.localdomain';
$_SERVER['REQUEST_URI'] = '/';
On older versions of WordPress, you may instead need to install the patch from this ticket, in order to overcome a WordPress bug; here is the patch for 3.7 (believed to work for some later versions too): https://core.trac.wordpress.org/ticket/14913 (or if you are on 3.6 or 3.7, get an already-patched version of the relevant WordPress file from: https://updraftplus.com/forums/support-forum-group1/paid-support-forum-forum2/problem-whit-uploads-dir-thread33.1/#postid-232).
Will UpdraftPlus leave large temporary files behind like (some other backup plugin)?
The short answer is that UpdraftPlus cleans up (removes) all temporary files that are more than 24 hours old, so you should not need to do so manually. If you spot any temporary files that are taking up a lot of space, then they will be less than 24 hours old, and disappear by themselves later on. More information on how UpdraftPlus temporarily uses disk space is available in this FAQ.
How do I update my install to the development version?
If you’ve been asked to update to the development version (e.g. to test out a new feature, or fix – or if you’re just curious and like being at the cutting edge), then here’s how to do it.
All your settings will be remembered – you won’t need to re-create them. N.B. The version number in the development version may or may not be the same as the current release version; there is no particular rule about what it will be.
1. De-install your existing install of UpdraftPlus
Go to the “Installed Plugins” page on your WordPress dashboard.
Follow the link to “Deactivate”.

Then scroll back to find the same place again, and this time click “Delete”. Confirm your choice.

2. Download the development version
Just download the zip file from this link to your computer.
3. Install the development version into WordPress
Go to WordPress’s plugin installer, and install the new version (i.e. upload the zip file you just downloaded in the previous step).
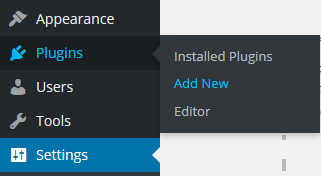
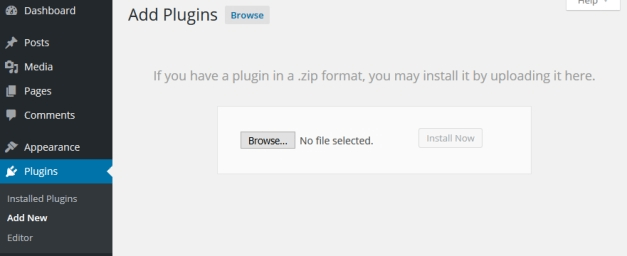
Activate it, and you’re done!
How do I stop an in-progress backup?
If you want to stop an already-running backup, then the final way is to restart the web service on your server. However, you may not have that access, or need something less forceful.
Because PHP can run in many different ways, there is no one way to stop a PHP script, like any part of WordPress, from running. However, UpdraftPlus runs via WordPress’s scheduler. If your backup is taking a long time, then it is likely to be needing several ‘runs’ to complete. UpdraftPlus takes care of all that internally. It re-schedules new attempts to continue the backup job automatically.
If you want to de-schedule the next run of a backup job, then go to the “Current Status” tab whilst the job is running then just above the progress bar click the “delete schedule” link.
That’s all. Note that this won’t stop the current run of a backup job if it is already running; it will prevent further attempts to continue the same backup job after the current run runs out of time. (When that happens again will vary according to your web hosting setup).
How do I exclude all files with a particular extension (e.g. .zip) from my backup ?
Please see this blog post (you will require UpdraftPlus 1.11.11 / 2.11.11 or later).
Does UpdraftPlus support WP-CLI?
Yes, via our WP-CLI premium feature, which is part of UpdraftPlus Premium. Check out our documentation here.
What is the most secure way to set up Rackspace Cloud Files?
Rackspace Cloud Files allows you to set up users that have access to only one container in your Cloud Files account – and to nothing else. This is the most secure configuration. It means that admin users on your WordPress site, even if they can copy the Rackspace access details from the UpdraftPlus configuration, can do nothing more with them than access the UpdraftPlus backups.
The easiest way to set up Rackspace Cloud Files in this way is using the “Rackspace Cloud Files enhanced” add-on from our shop.
I have locked the UpdraftPlus settings page, and forgotten the password – how do I unlock it?
Are you faced with this lock screen, and forgot the unlock password?
The best thing to do is contact whoever set the lock password, and ask them!
If that is you, and you have lost the password completely, then please read on…
If you have access to the site’s wp-config.php file, then simply add this and then reload the settings page:
define('UPDRAFTPLUS_NOADMINLOCK', true);
Otherwise, if you cannot do that, then you will need to find the password in the WordPress database; for this, you will need to either have:
- The ability to install plugins – install and activate the SQL Executioner plugin
- Another way of editing your database (e.g. phpMyAdmin in your web hosting control panel)
If you find the below steps too technical, then you can always purchase a one-time support incident from our shop.
If you installed the “SQL Executioner” plugin, then you can access it in the Tools -> SQL Executioner menu.
You now need to search in your database for the unlock password. The following query will work in SQL Executioner on a WordPress single site installation:
SELECT * FROM $options WHERE option_name = 'updraft_adminlocking';
On a WordPress multisite (i.e. network) installation with UpdraftPlus Premium or the UpdraftPlus multisite add-on, you will need to use this query instead:
SELECT * FROM $sitemeta WHERE option_name = 'updraftplus_options';
If you are not using SQL Executioner, but instead phpMyAdmin or some other SQL tool, then you will need to replace $ with the table prefix from your WordPress site – so, instead of $options, you’ll have something like wp_options (and something like wp_sitemeta instead of $sitemeta). (The tool should show you the names of all the tables, from which you can spot the correct table name; if not, then use the SQL command “SHOW TABLES;”).
When you have successfully run the correct command, then the output should include the text password in it. On a single site, it should be obvious; on a multi-site, search in the output for the text updraft_adminlocking … and very shortly afterwards (a few characters later), you should be able to see the password. (Don’t directly edit it in your SQL editor unless you understand the format of PHP serialized arrays – otherwise you may lose some or all of your UpdraftPlus options).
If you wish to reset your password again afterwards, then you can do so in the “Advanced Tools” (formerly “Debugging / Expert Tools”) tab of your UpdraftPlus settings page in the WordPress dashboard.
How can I configure a site to never back up?
You might have a development site (i.e. a copy of your live site), that you restore backups from the live site onto – and you don’t want the development site itself to ever make any backups. You can achieve this by adding this snippet as a must-use plugin – which means, create a directory wp-content/mu-plugins, and add this as a file ending in .php (e.g. no-backups.php):
<?php add_filter('updraftplus_boot_backup', '__return_false');
If your live site has any must-use plugins, then this will get over-written when you restore; to avoid that, you could deploy a more sophisticated version on both sites (and change ‘localhost’ for part of the address that you visit your development site under);
<?php

add_filter('updraftplus_boot_backup', 'my_updraftplus_boot_backup');

function my_updraftplus_boot_backup($go_ahead) {

return (false !== strpos(site_url(), 'localhost')) ? false : $go_ahead;

}
How can I exclude a specific table from the backup?
(This capability exists in UpdraftPlus 1.9.65 (free) or 2.9.65 (paid) or later).
Are you sure you want to do this? It’s always better to have too much backed up, than too little. If you are sure, then here’s how it’s done.
This option isn’t directly configurable in the UpdraftPlus settings page, but you can create a WordPress filter to do so, like so:
Step 1: Create a directory wp-content/mu-plugins in your WordPress install, if it does not already exist.
Step 2: Inside that directory, create a file ending in .php (e.g. wp-content/mu-plugins/prevent-table.php), with contents like this:
<?php

add_filter('updraftplus_backup_table', 'my_updraftplus_backup_table', 11, 5);

function my_updraftplus_backup_table($go_ahead, $table, $table_prefix, $whichdb, $dbinfo) {
    $tables_to_not_back_up = array('wp_my_table', 'wp_some_other_table');
    if (in_array($table, $tables_to_not_back_up)) return false;
    return $go_ahead;
}
If your WordPress site disappears, then you had a syntax error in that file. Remove it to get WordPress back!
That’s a very simple example – it will exclude the two indicated tables (the line $tables_to_not_back_up = … – you can add as many as you like, of course). You can make it as complex as you like, using all the supplied information. The $whichdb variable is equal to ‘wp’ for the WordPress database, or an integer from zero upwards for others you have set up (in UpdraftPlus Premium). The $dbinfo variable is an array containing the database information (host, username, password). You can use this information to make sure you’re working on the right database, if you have tables with the same name in multiple databases.
How can I add any new scheduling interval to UpdraftPlus?
If the built-in scheduling options (every 1 (for databases) / 2 / 4 / 8 / 12 hours, daily, weekly, fortnightly, monthly, quarterly) do not cover what you wanted, then you can easily add a new schedule to UpdraftPlus. To do so, create a directory wp-content/mu-plugins in your WordPress install (if it does not already exist), and create a file in it named ud-schedules.php with contents as below. Note that the example below is for adding an “half-hourly” schedule (i.e. every 1800 seconds) for database backups; you should adapt it according to your needs.
<?php

add_filter('updraftplus_backup_intervals', 'local_updraftplus_backup_intervals', 10, 2);
function local_updraftplus_backup_intervals($ints, $what_for) {
    // $what_for is either 'db' or 'files'
    if ('db' == $what_for) $ints['halfhourly'] = 'Half-hourly';
    return $ints;
}

add_filter('cron_schedules', 'local_cron_schedules', 31);
function local_cron_schedules($schedules) {
    $schedules['halfhourly'] = array('interval' => 1800, 'display' => 'Half-hourly');
    return $schedules;
}
How can I quickly delete multiple backup sets at once?
If you want to delete multiple backup sets at once, without clicking the “Delete” button lots of times, then do this:
1) Visit your “Existing Backups” tab.
2) Hold down the “Control” key on your keyboard, and click on every backup set that you want to select. The row colour will change to indicate that the backup set is selected, and a pop-up will appear with some options.

3) In the pop-up (shown towards the right of the above screenshot), you then click the “Delete” button. You will then be asked to confirm whether you wish to only delete the backups from UpdraftPlus’s local records, or whether you wish to delete the backups from remote storage (if there is any – UpdraftVault, Dropbox, Google Drive etc.) as well.
That’s all!
What is the “Add an additional retention rule…” option?
This option allows for more sophisticated backup retention. This works by setting up a number of rules for deleting backups, that apply to backups older than the specified time. Only one backup older than the specified age will be kept for each interval. This allows you to save storage space by deleting superfluous older backups.
Here is an example of a set of retention rules, for a database backup. Note that you don’t need to have such a complex set – this is just an example!
Firstly, up to a maximum of 40 scheduled backups are kept. Whatever else is kept or deleted, there will be no more than 40 scheduled backups kept.
Out of any backups older than 12 hours, one backup will be kept in every 8 hour period. What this means is that the first (i.e. youngest) backup that is older than 12 hours will be found; and then no more kept unless it is 12 + 8 hours old (20 hours), then another after 20 + 8 (28) hours, etc.
Out of any backups older than 5 days, a different rule applies. i.e. it is no longer the case that one backup will be kept every 8 hours; instead, one backup will be kept for every 3 day period. The rule applies in the same way: the first (i.e. youngest) backup that is older than 5 days will be kept; and then no more kept until 5 + 3 days later (8 days), etc.
Finally, out of any backups older than 15 days, one backup will be kept per week.
You may add as many additional retention rules as you like. These rules are run every time a backup is completed. Only one rule can apply at a time.
When there are no extra retention rules, any automatic backup (i.e. a backup made before a plugin/theme/WordPress update – not to be confused with a scheduled backup) that is younger than the oldest scheduled backup will be kept. This changes if you have any extra retention rules. Any automatic backup that is older that the time period specified in a retention rule will be deleted – i.e., only automatic backups that are younger than the first rule will be kept.
How can I exclude particular files/directories from the backup?
UpdraftPlus provides a number of ways to exclude files or directories from the backup.
These are:
1. List them directly in the “exclude” settings
Any files or directories that you directly list will be excluded. You can use a wildcard at the beginning or end, in order to exclude any files or directories at the top level matching that pattern. (The default setting uses this to exclude backups created by a number of other plugins). The above screenshot excludes any files or directories in “uploads” whose names begin with “backup”, and also excludes the entire directory 2015/05 (i.e. wp-content/uploads/2015/05).
You can add as many as you like; to do so, separate them with commas. (But not with spaces – a comma only). Also, make sure that you’re adding them to the correct setting.
2. Create a file called .donotbackup in a directory
If you create a file called “.donotbackup” (without the quotes) in any directory, then that directory (and its sub-directories) will be excluded from the backup.
3. Exclude files with particular extensions
You can exclude files with chosen extensions by either:
a) Adding them to the exclusion setting (see 1, above), by identifying them with “ext:”; e.g. ext:mp3,ext:mp4.
b) Or, you can add a line in your wp-config.php to define the constant UPDRAFTPLUS_EXCLUDE_EXTENSIONS; for example (again, extensions are separated by commas, only):
define('UPDRAFTPLUS_EXCLUDE_EXTENSIONS', 'mp3,mp4');
4. Exclude files with particular prefixes
This is the counter-part of excluding files based upon the suffix in their filename; you can also do it via prefix (i.e. the characters that begin the filename). To do this, add them to the exclusion setting (see 1, above), by identifying them with “prefix:”; e.g. prefix:abc will exclude any files whose names begin with abc.
5. Exclude directories using a WordPress filter
You can write a small code snippet (e.g. as an mu-plugin, or in your child theme’s functions.php file) to exclude any directory you desire from the backup, using a WordPress filter. You can make the code as simple or complicated as you like. The filter to use is updraftplus_skip_directory, which returns a boolean (true to skip, or false (the default) to not skip), and whose other parameter is the full directory path. Here is an example of a code snippet to skip all .git directories:
add_filter('updraftplus_exclude_directory', 'my_updraftplus_exclude_directory', 10, 2);

function my_updraftplus_exclude_directory($filter, $dir) {

return (basename($dir) == '.git') ? true : $filter;

}
6. Exclude files using a WordPress filter
In the same way as described above for directories, there is a filter updraftplus_exclude_file which you can use to prevent the backup of particular files. The below example will prevent the backup of any files called bertie.jpg :
add_filter('updraftplus_exclude_file', 'my_updraftplus_exclude_file', 10, 2);

function my_updraftplus_exclude_file($filter, $file) {

return (basename($file) == 'bertie.jpg') ? true : $filter;

}
Tell me more about the “Search and replace site location in the database” option
Quick link: Go to the UpdraftPlus shop to find the Migrator add-on, or UpdraftPlus Premium.
If you have the “Migrator” add-on (or UpdraftPlus Premium, which includes all add-ons), then when you restore a site, you will be given the option to “Search and replace site location in the database”:
Migrating a database
What does this option do? If selected, then after restoring your database, it will then perform a search-and-replace operation upon it. It will first look up the address that the site was living at (i.e. the site whose database you are restoring). Then, it will replace all instances of that location in the database with your site’s new address.
This is a vital step if you are migrating a site from one location (URL) to another. For example, if you are moving a site from your development location – e.g. https://localhost/testsite to your live location – e.g. https://example.com – then after copying all the files and database, you then need to search/replace the database to reflect the new location. If you do not, then your site, though sitting at the “new” location, will contain lots of references to the “old” one. This can cause confusion and bugs. Most professional WordPress developers use the tried-and-tested “searchandreplacedb2.php” script to accomplish this task. UpdraftPlus includes the same code as its own search-and-replace engine to give you the same reliability.
So, in summary, here is how to migrate/clone a site from one location where WordPress is installed to another:
- Make sure that the new site (destination) has UpdraftPlus and the “Migrator” add-on installed (either stand-alone, or via UpdraftPlus Premium). (You can get these products from our shop, here).
- Create a backup on the original (old) site.
- Go to the “Existing Backups” tab and then under this click “Upload backup files”, from here you can then import the backup into the new site, by dragging and dropping:
- After the upload has finished, use the “Restore” button on the new site to begin a “restoration” using the backup set that you just uploaded. Make sure that you tick the “search and replace” button when doing so.
That’s all!
You can see a fuller walk-through, with many more screenshots, here.
Rackspace Cloud Files (3)
There appear to be lots of extra files in my Rackspace Cloud Files / OpenStack container
When you upload larger files to Rackspace Cloud Files or OpenStack (Rackspace’s product is based on OpenStack), an object (file) appears in your container (which, for RackSpace Cloud Files, you can view online – https://mycloud.rackspace.com) for each separate “chunk” (portion) of that file. That is part of the design of OpenStack / Cloud Files. The final file actually occupies zero extra space (for your billing purposes); it is a special file that knows that it is composed of the separate chunks. So, do not delete any of those chunks – because if you do then the final file will be having its parts removed and become unusable. Leave it to UpdraftPlus to manage – when it deletes the backup file itself, it will delete the chunks too.
In UpdraftPlus, because it needs to work on even the most resource-starved of WordPress installations, “larger file” means anything more than 5 megabytes.
Conversely, if you are seeking to download your backups from Rackspace Cloud Files (or whatever your OpenStack flavour is), then you can ignore all the chunk files – you just want the main file. The “chunk” files have names ending in an underscore followed by a number, e.g. _1, _2, _3 (etc.). Those are the ones you can ignore – you just want those ending in .zip (for file backups) or .gz (for databases – or .gz.crypt for encrypted databases).
What is the most secure way to set up Rackspace Cloud Files?
Rackspace Cloud Files allows you to set up users that have access to only one container in your Cloud Files account – and to nothing else. This is the most secure configuration. It means that admin users on your WordPress site, even if they can copy the Rackspace access details from the UpdraftPlus configuration, can do nothing more with them than access the UpdraftPlus backups.
The easiest way to set up Rackspace Cloud Files in this way is using the “Rackspace Cloud Files enhanced” add-on from our shop.
FTP (8)
In the administration section, it shows my (Amazon, FTP, etc.) passwords starred – but I want to see the actual text
Note (July 2015): previous releases of UpdraftPlus showed plain text by default. Though starring adds nothing to security and isn’t best for usability (as explained below), so many people expect stars, that we decided it’d be better to acquiesce, and say goodbye to the repeated questions about it! Until then, this FAQ asked the question the other way round – we’ve left some of the explanation to do with password starring in browsers below, for general usefulness.
When you enter a password and it is starred, in fact this only prevents “shoulder-surfers” (people looking over your shoulder) from seeing the password. It provides no extra protection from other users who can sit at the keyboard, or access the same WordPress admin panel.
Three quick, different ways that people who have access to the settings page can access stored passwords are: 1) Press “View Source” in their web browser, and read it out of there. 2) Download a backup of the site’s database and read it out of there. 3) Install an extension in their web browser to un-star all passwords (e.g. this one).
Starring out the password only protects against people who are a) malicious enough to misuse your password, but b) too technically incompetent to do any of the above. It’s best to keep people like that well away from your admin panel!
A better solution (than starring out), if you have multiple admins on the WordPress site, is to set up a new set of access credentials for the backup storage for each website you are backing up (i.e. a unique FTP login/set of S3 credentials, etc.). For Amazon S3, read this article. You can also lock access to your admin page in UpdraftPlus Premium, as explained here.
If you want to display passwords directly, then do this:
- Using FTP (or equivalent) access to your web hosting space, create (if it does not already exist) a folder called mu-plugins in the content directory of your WordPress install (which is usually called wp-content – i.e. the new directory will be wp-content/mu-plugins).
- In that folder, create a new file called ud-star-passwords.php (or anything else ending in .php) with the following content:
<?php
add_filter('updraftplus_admin_secret_field_type', 'updraftplus_admin_secret_field_type');
function updraftplus_admin_secret_field_type($type) { return 'text'; }
That’s it!
What encryption methods are supported for FTP/SFTP?
Without the SFTP/FTPS add-on, UpdraftPlus supports plain, unencrypted FTP. However, if you are backing up business or other sensitive data, then you may wish to use have your communications with your FTP/SFTP server encrypted.
FTP and SFTP are different protocols, but often confused. SFTP is an always-encrypted protocol, so there’s nothing more to say about that – if you have the add-on, then you have SFTP, which is always encrypted.
With encrypted FTP, both kinds of encryption – i.e. both implicit and explicit encryption – are supported.
“Explicit” encryption happens when you connect to an FTP server without encryption, and then immediately request to upgrade your connection to an encrypted one (the requestor “explicitly” request it). This is the most common kind of FTP encryption. UpdraftPlus’s SFTP/FTPS add-on will attempt this kind of encryption by default.
“Implicit” encryption is when you connect to an FTP server on a port which requires an immediate SSL negotiation – i.e. no non-encrypted communication can take place (encryption is “implicit” in the use of that port). Such FTP servers run on port 990. To use this form of encryption, simply add “:990” to the server name in UpdraftPlus’s configuration:

SFTP – implicit encryption
My FTP stopped working when I upgraded to UpdraftPlus Premium
If you could successfully backup by FTP with UpdraftPlus Free, but it stopped working when you upgraded to UpdraftPlus Premium, then this article is for you.
The cause of this issue is that UpdraftPlus Free only supports unencrypted FTP. UpdraftPlus Premium supports encrypted FTP, and will try to use it by default.
Unfortunately, some FTP servers indicate that they support encrypted FTP, but don’t. Usually the problem is firewalling – the firewall ports to allow encrypted FTP are not open. So when UpdraftPlus tries to connect, it times out.
One solution is to ask the operator of the FTP server to either:
a) Make encrypted FTP possible (open up the firewall ports)
or
b) Configure the FTP server to not advertise itself as offering encrypted FTP (since it doesn’t work – though, you may wish to confirm this first e.g. by using a desktop FTP client)
Alternatively, you can force UpdraftPlus to drop back to non-encrypted FTP as follows:
1) Click on the “Show expert settings” link towards the bottom of the UpdraftPlus settings page:
Expert Options
2) Check the “Disable SSL entirely” option.
After doing so, press the “Save Changes” button.
Disable SSL
That’s all!
My remote storage method is FTP, but I cannot see my backups on my FTP server
Here’s a check-list to help you…
1. Has your backup finished?
If you visit your UpdraftPlus settings page (refresh it if it’s already open, just to be sure), then does it show the backup as having finished?
2. Did you save your settings before starting the backup?
Sometimes users either forget to save their settings before they start the backup… or they change the settings after the backup job began and hope that the backup job will pick up the new settings. That doesn’t work: backup jobs use the settings that were active at the time that the backup began; so, you need to set the FTP settings and save them before you start the backup.
3. Does your FTP software cache directory listings?
Some FTP clients will show you the same directory listing as it last saw – they will only update the listing for files uploaded through the FTP client itself. Close your FTP client and open it again, and press the button for refreshing the directory listing view.
4. Have you ever tested your FTP settings?
If you press the “Test FTP Settings” on the UpdraftPlus settings page, then does it work? If not, then you will need to respond to any error message it gives you when you try it.
If the attempt to connect fails, but the same settings work in an FTP program on your PC, then most probably your web hosting company has a firewall that blocks outgoing FTP connections from your website – you should ask them to open up the port to allow connections for your backup.
5. Does your backup report give any clues?
If you configured UpdraftPlus to email you a backup report, then does it have any useful information in it? Is it showing any warnings or errors? (If not, then you can also read the backup log file if you’re confident enough to read log files… do a search in it for “FTP” to find the right part of the log).If you did not configure UpdraftPlus to email you a report, then try that.
If all that fails, and you’re a paying customer, then please feel free to file a support request… please remember to attach your backup log file (the “Download latest log file” link at the top of the UpdraftPlus settings page should access it; if not, then find it in the section that opens when you press the big “Restore” button).
Why am I being asked for FTP details upon restoration/migration or plugin installation/updates?
On some WordPress setups, you might see something like this when you try to restore your backup, or when you try to install or update UpdraftPlus:
This happens if (and only if) WordPress does not have sufficient file permissions to write to the directories which it needs to write to, or if it finds that when trying to write, the resulting files have different ownership or permissions to WordPress itself. (To be more accurate, the PHP engine that WordPress is running on top of does not have these permissions, or runs under a different ownership). When this happens, WordPress has another trick up its sleeve: it asks you for FTP details. With those FTP details, it writes the files another way: by sending them over FTP to the webspace.
Hence, the key points are:
- This is a feature of WordPress
- It happens if the file permissions do not allow WordPress to write files directly, or they result in unexpected file or group ownership.
- It does not indicate a problem as such
- The FTP details to enter are those for the web hosting space (i.e. the web hosting space that the WordPress install you are working on is installed in)
- If you do not know your FTP details, then you will need to ask your web hosting company (we certainly do not know them!)
- Alternatively, if you are able, you can change the ownership and/or file permissions of your WordPress install, to allow PHP to be able to write to it.
Which directories?
If you see this message installing/updating, then the important directories are: wp-content and wp-content/plugins. If you see it when restoring a backup, then the directory involved depends on the component being updated; you should check the permissions on the directory containing WordPress (if restoring WordPress core), and wp-content, and wp-content/plugins, wp-content/themes and wp-content/uploads, for other entities.
My FTP/SFTP credentials are not working – what shall I do?
1. Read the error message, and try Google!
Our experience is that often people are simply afraid of error messages – and often the reason is staring them in the face. Don’t be put off by an error message; read it, and if you can’t guess what it is telling you, then try Googling it. There are very few problems in the world of WordPress that nobody has had before.
2. Double-check you have the right credentials
Firstly, the obvious one: have you tried the credentials in another FTP program, to check that they are correct? If not, then this is the first thing to check. In this case, you are likely to be getting an error about wrong credentials.
3. Double-check you entered those credentials correctly
Secondly, another obvious one: double-check you have entered the credentials correctly in UpdraftPlus. For the FTP server name (a.k.a. host name), it should simply be a host name with nothing added, e.g. “ftp.example.com”.
4. Does your FTP server require encryption, and you’re not using Premium?
Thirdly, perhaps your FTP server requires encryption, but you are using the free version of UpdraftPlus? If your FTP server requires an encrypted connection (i.e. forbids non-encrypted connections), then you will need to use UpdraftPlus Premium, which includes the encrypted FTP add-on. The same holds if you are using SFTP (which is actually a different protocol than FTP, despite the similar name).
5. Is the FTP server deliberately blocking your webserver’s IP address?
Fourthly, is it possible that the FTP/SFTP server has an access control list, which limits logins to certain IP addresses only? You’d be likely to know about this – but we all forget from time to time! Similarly, is it possible that your FTP server blocks login attempts after you’ve got the password wrong too many times? Or possibly, it has limits on how many users can login at once – and those limits have been temporarily reached?
6. Mis-configured FTP server / firewall
If you are seeing the error message “php_connect_nonb() failed: Operation now in progress (115)” as part of the message shown, then you can be forgiven for finding that a rather cryptic message (from PHP’s FTP engine).
The meaning/cause of this message is your FTP server is misconfigured. Part of the FTP protocol involves the FTP server telling the FTP client its own IP address. This can break if your FTP server is behind a particular type of firewall (known as a NAT firewall). The NAT firewall is meant to re-write the FTP traffic to change the indicated address; or, the FTP server needs to be re-configured to indicate the external address. You can read some of the technical details about this setup, here.
How to fix it, in this case? If you are using UpdraftPlus Premium, then by default FTP is encrypted. It may be that if you switch to non-encrypted FTP, then the problem will be resolved. (This happens if the NAT firewall is meant to be doing re-writing, but the encryption prevents it from doing so). To do this, go into the “expert” settings (at the bottom of the UpdraftPlus settings page) and turn off SSL (encryption), then you get better success (test first – and if it works, then remember to save your settings).
If non-encrypted FTP also does not work for you, then the fault is on the FTP server, and you will need to contact the FTP server administrator to ask them to resolve the issue.
Sometimes the question arises – “Why does this work for me in (some FTP program, e.g. Filezilla), but not in UpdraftPlus?” There are two reasons for this: 1) the FTP program (e.g. Filezilla) may not be running from the same network as UpdraftPlus is on (e.g. the FTP program is on your PC, whereas UpdraftPlus is on a webserver at a hosting company, so they are facing different firewalls on route to the FTP server). 2) Some FTP programs (including Filezilla) have a work-around in them to detect this situation, and guess what the FTP server meant to say, instead of responding to what it actually did say. PHP’s FTP engine (which PHP applications, like WordPress/UpdraftPlus get to use) in older versions does not have this (there’s an open request in PHP’s issue tracker for it to be added). A version of this feature was added to PHP in version 5.6.18 and 7.0.2 – so, if you update your PHP install to those versions, you might then have success.
7. Other firewalling issues
Sixthly (and, most cases of this problem are this one), if you have got this far, then your problem will almost certainly be with firewalling on outgoing traffic from the webserver. i.e. The webserver is configured to only allow outgoing traffic that the server owner (i.e. the web hosting company, usually) has specifically configured to allow. In this case, you will need to ask for support from the people whose server it is.
One variation on this problem (firewalling) is that the firewall is theoretically open, but partially broken. You may find that if you go into the “expert” settings (at the bottom of the UpdraftPlus settings page) and turn off SSL (encryption), then you get better success. (This suggestion does not apply to the free version of UpdraftPlus, which does not support encrypted FTP at all; and does not apply to SFTP, as that is always encrypted).
Another variation on this problem is simply that some ultra-low cost web hosting companies disallow websites to use FTP entirely… because their business model is based on making sure you use very small amounts of resources… and backups that want to copy your entire site don’t fit into this model. If you suspect your web host might be of this kind, then it’s also worth confirming that with them.
One obvious pointer to a firewalling issue (though this need not always happen) is that there’s a significant delay before the error message is given. This indicates that the network traffic is simply being dropped. (Some firewalls immediately send back “that traffic didn’t get through!” replies, but others do not, and a timeout eventually occurs).
Why does UpdraftPlus store my FTP/SFTP password unencrypted?
In order to upload backups to your server via SFTP or FTP, a security token is required to give the plugin access. In the case of FTP, this is a password, while SFTP can use a password or security key. To allow the plugin to access the server unattended, this password is stored in the WP database.
Due to how the FTP and SFTP protocols use and send passwords, this cannot be stored using one-way encryption like the WordPress password.
In this situation, UpdraftPlus does not encrypt the password in the database, as this would be redundant. The only persons who should have access to your WP database are yourself and any trusted administrators.
But doesn’t encrypting the password provide an extra level of security?
There are two methods by which an attacker or other malicious individual could gain access to the database, and therefore the password.
If they have accessed the database via the backups stored in your FTP/SFTP server, then apparently they already have access to your password or another method of accessing the server, thus reading the password from the database would be redundant.
If they instead have access to the live database, then they have complete access to your site and data, including any encryption scheme which could be used to encrypt the FTP password.
As such, encrypting the FTP/SFTP credentials in the database would not provide any real additional security. It is instead better to keep strong user passwords and up-to-date security plugins for the site.
Why must I use a non-encrypted SFTP key?
When you enter SFTP settings in UpdraftPlus, if you choose to use a key (rather than a password), then UpdraftPlus will only accept a non-encrypted key. Why is this?
Simply, because an encrypted key cannot be used to login to your SFTP server. “Encrypted” means that it is in a scrambled form, and useless to anyone who has it (that’s the point of encryption). It only becomes useful when unscrambled, via the decryption passphrase.
If there were a setting in UpdraftPlus to allow the decryption passphrase to also be entered, then this would be entirely equivalent to simply entering the unencrypted key instead. The only point of an encrypted key is if the decryption phrase is kept somewhere separate to the encrypted form – e.g. the key is on disk, and you type in the decryption phrase at the moment of using it. An unattended procedure (like scheduled backups) where both parts are in the same place (e.g. plugin settings) isn’t such a situation.
Migration (12)
How to Migrate your WordPress website with UpdraftPlus
This step-by-step guide shows you how to migrate your WordPress website with both the free and premium versions of UpdraftPlus, starting with the free version. Click to jump to ‘How to migrate your site with UpdraftPlus Premium‘
How to migrate your site with free UpdraftPlus
In this tutorial we refer to your ‘source site’ and your ‘destination site’. The source site is the site you would like to copy / migrate. The destination site is the site you’re migrating to.
1. Install and activate UpdraftPlus on both the source site and destination site
- Click into the ‘Plugins’ menu in WordPress to install.
- Select ‘Add New’ and search for UpdraftPlus.
- After installing, click ‘Activate’ to complete the process.
- UpdraftPlus is located under ‘Settings’ on the left hand side of the WordPress menu.
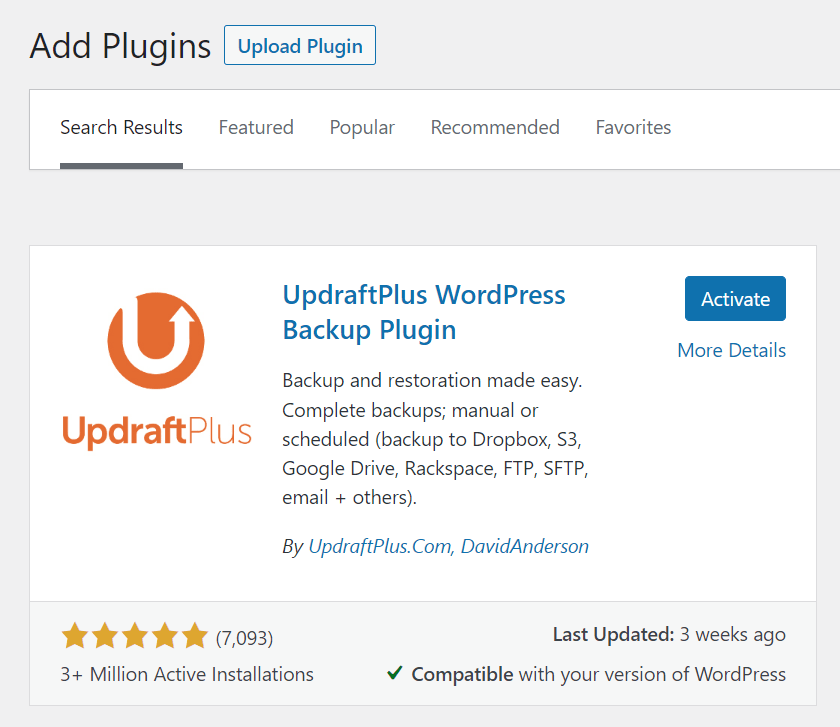
2. Choose a remote storage location in the source site
- Click the ‘Settings’ tab in UpdraftPlus.
- Select from the remote storage locations shown.
- Selecting an option takes you through a user journey that connects UpdraftPlus to the remote storage location.
Note, only the locations highlighted in the screenshot below are available in free UpdraftPlus i.e Dropbox, Amazon S3, Rackspace, Google Drive, FTP, OpenStack, DreamObjects and email. To backup to the other cloud storage options, upgrade to UpdraftPlus Premium.
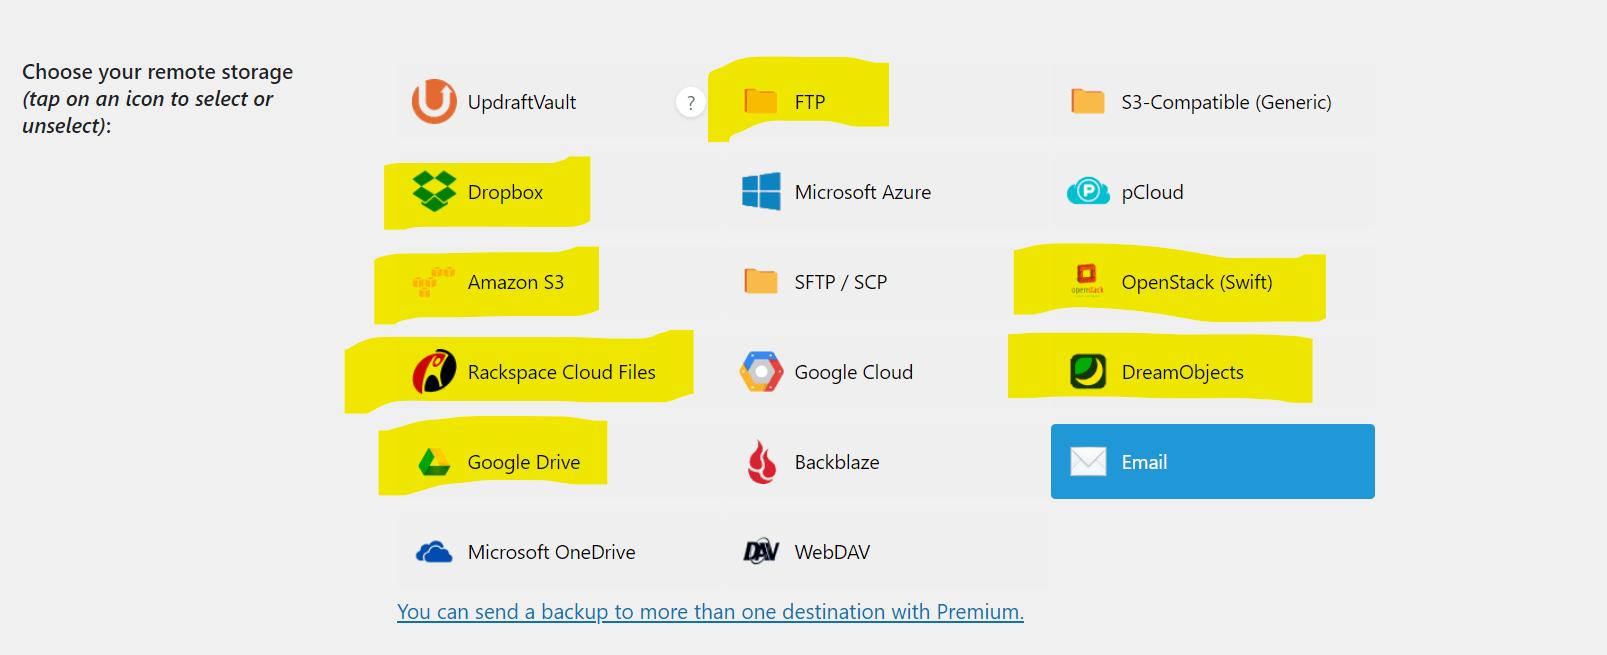
3. Take the backup
- Click the ‘Backup/Restore’ tab.
- Click ‘Backup Now’. A progress bar will be displayed, indicating the backup’s progress.
- The script will indicate which section of your site is currently being backed up.
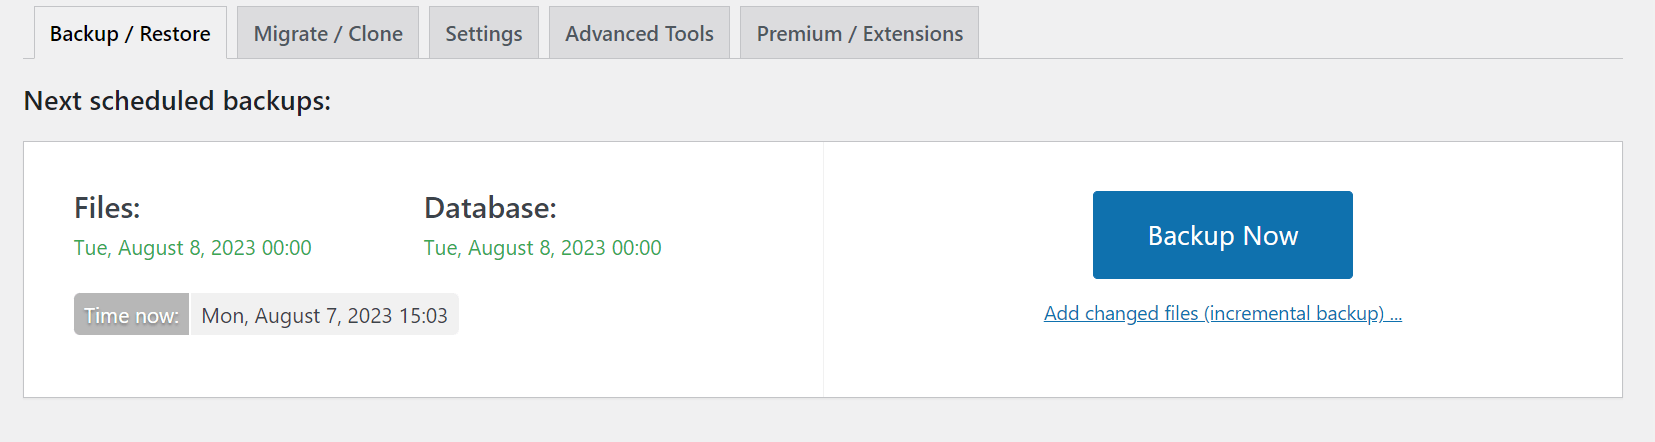
4. Open the destination site
- Make sure you’ve installed and activated the UpdraftPlus plugin as you did before.
- Select the same remote storage location as you did before.
5. Restore the backup to complete the WordPress migration
- Scroll to the bottom of the ‘Backup / Restore’ tab.
- You should see a section called ‘Existing backups’.
- With both sites connected to the same remote storage location, you should see the backup that you made of the source site, in the destination site.
- Press the ‘Restore’ button next to it.
If your backup isn’t listed, click ‘Rescan remote storage’ under ‘More tasks’. Note this will display all backups from all sites connected to the remote storage location.
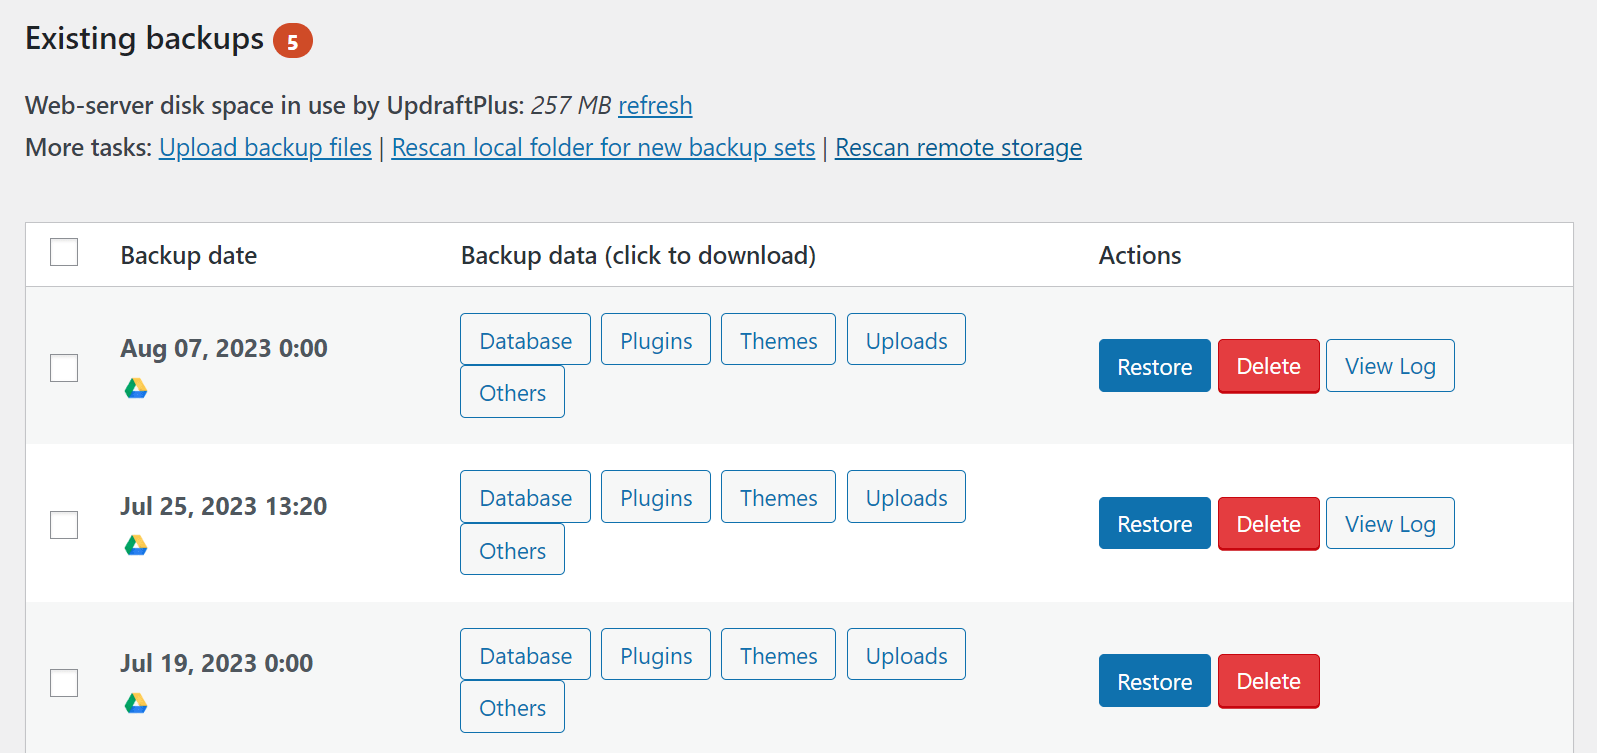
6. This will launch the wizard to guide you through the rest of the migration process
- Simply tick the relevant boxes to tell UpdraftPlus what to restore e.g. plugins, themes, uploads etc.
- Click ‘Next’, then ‘Restore’ and your restoration / migration is complete.
Remember, because your source site’s database has been migrated, the sign-in credentials for your destination site will no longer work and you’ll need to use the ones from your source site to login.

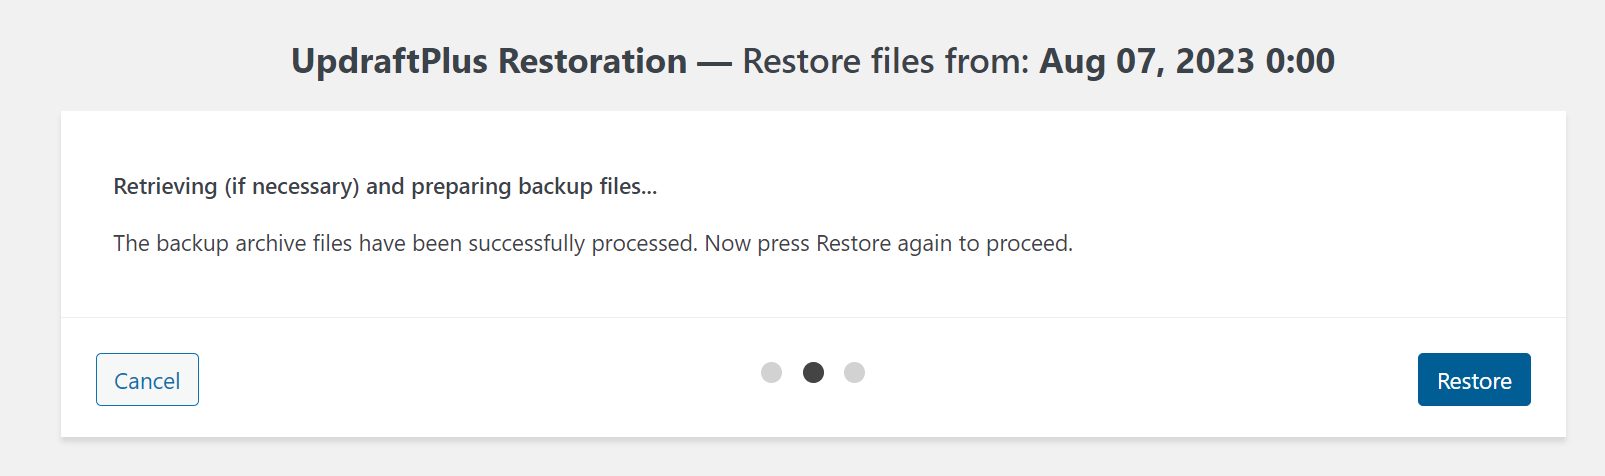
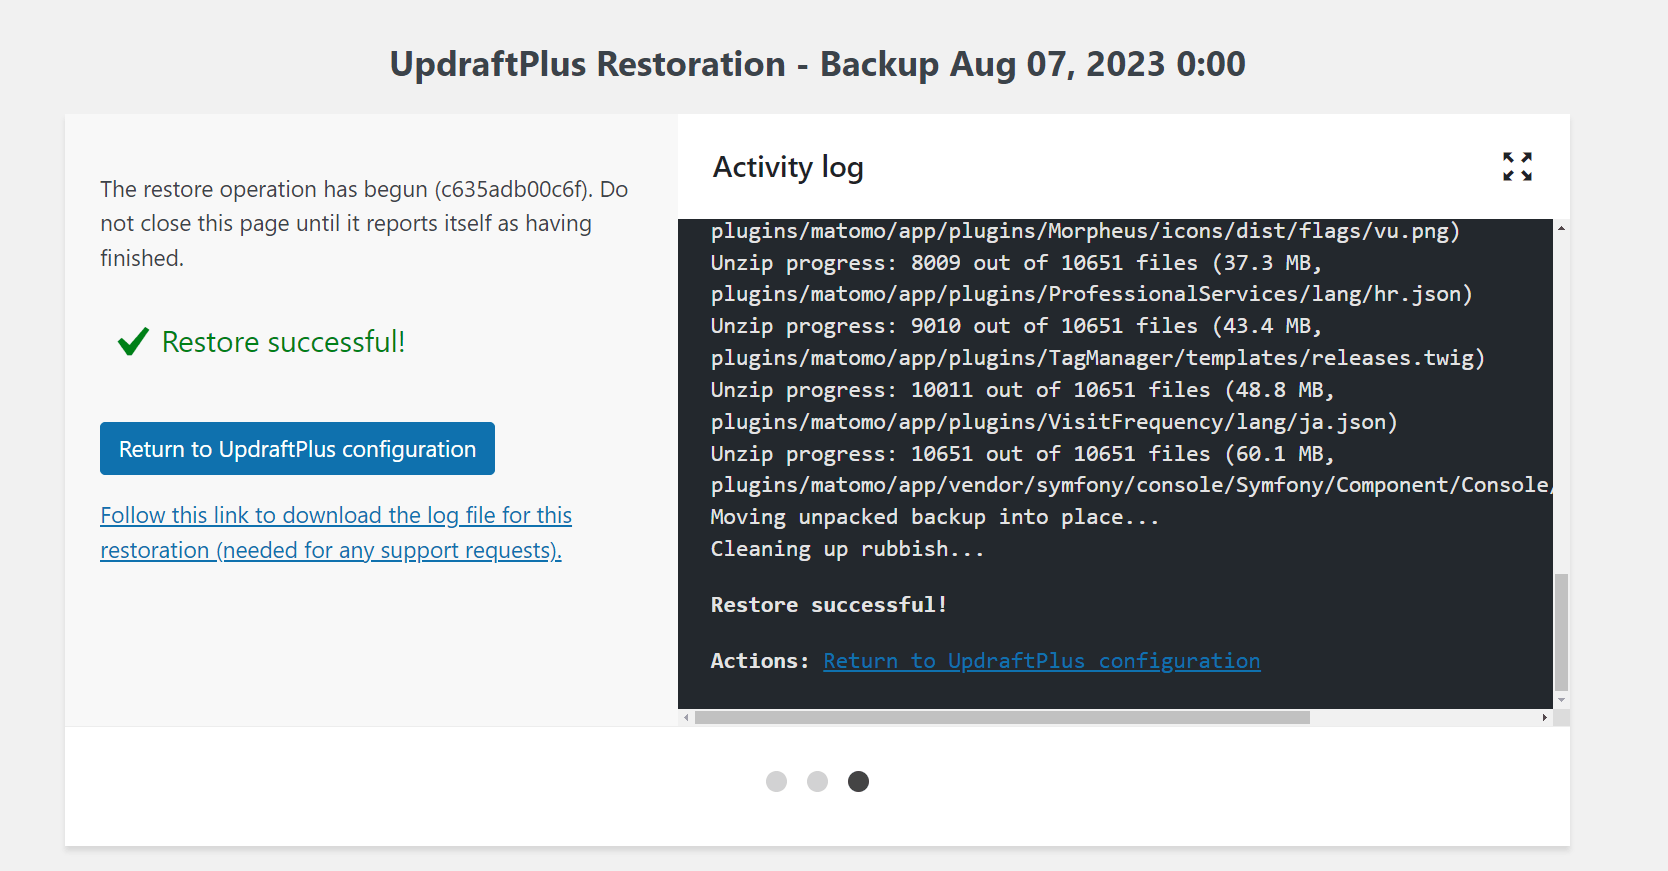
While the free version of UpdraftPlus can simplify the process of migrating your website to a new domain, it’s important to acknowledge that migration is a tricky process. In some cases, a little technical expertise may be required to address any issues that may arise.
Getting help
Note, Our team can offer more support with UpdraftPlus Premium than is allowed via free support in the WordPress support forums. We can do things like take a copy of your site (minus the user data) to replicate any errors you may be experiencing or access your server configuration.
How to migrate your site with UpdraftPlus Premium
Unlike the free version, UpdraftPlus Premium allows users to fully customise every aspect of their migration, down to which plugins and themes are carried across. Another advantage is you only need to connect two sites once to then make multiple migrations in just a few clicks.
In this tutorial we continue to refer to the ‘source site’ and ‘destination site’. The source site is the site you would like to copy / migrate. The destination site is the site you’re migrating to.
1. Purchase and install UpdraftPlus Premium on the source site and destination site
- Purchase UpdraftPlus Premium. You’ll then see a link to download the plugin which you’ll also receive via email.
- Click into the ‘Plugins’ menu in WordPress to install.
- Select ‘Add New’ then ‘Upload Plugin’ .
- After installing, click ‘Activate’ to complete the process.
- UpdraftPlus is located under ‘Settings’ on the left hand side of the WordPress menu.
Note if you already have free UpdraftPlus, you’ll need to deactivate and delete before installing Premium. See here for full installation instructions.
2. Go to the ‘Migrate / Clone’ tab
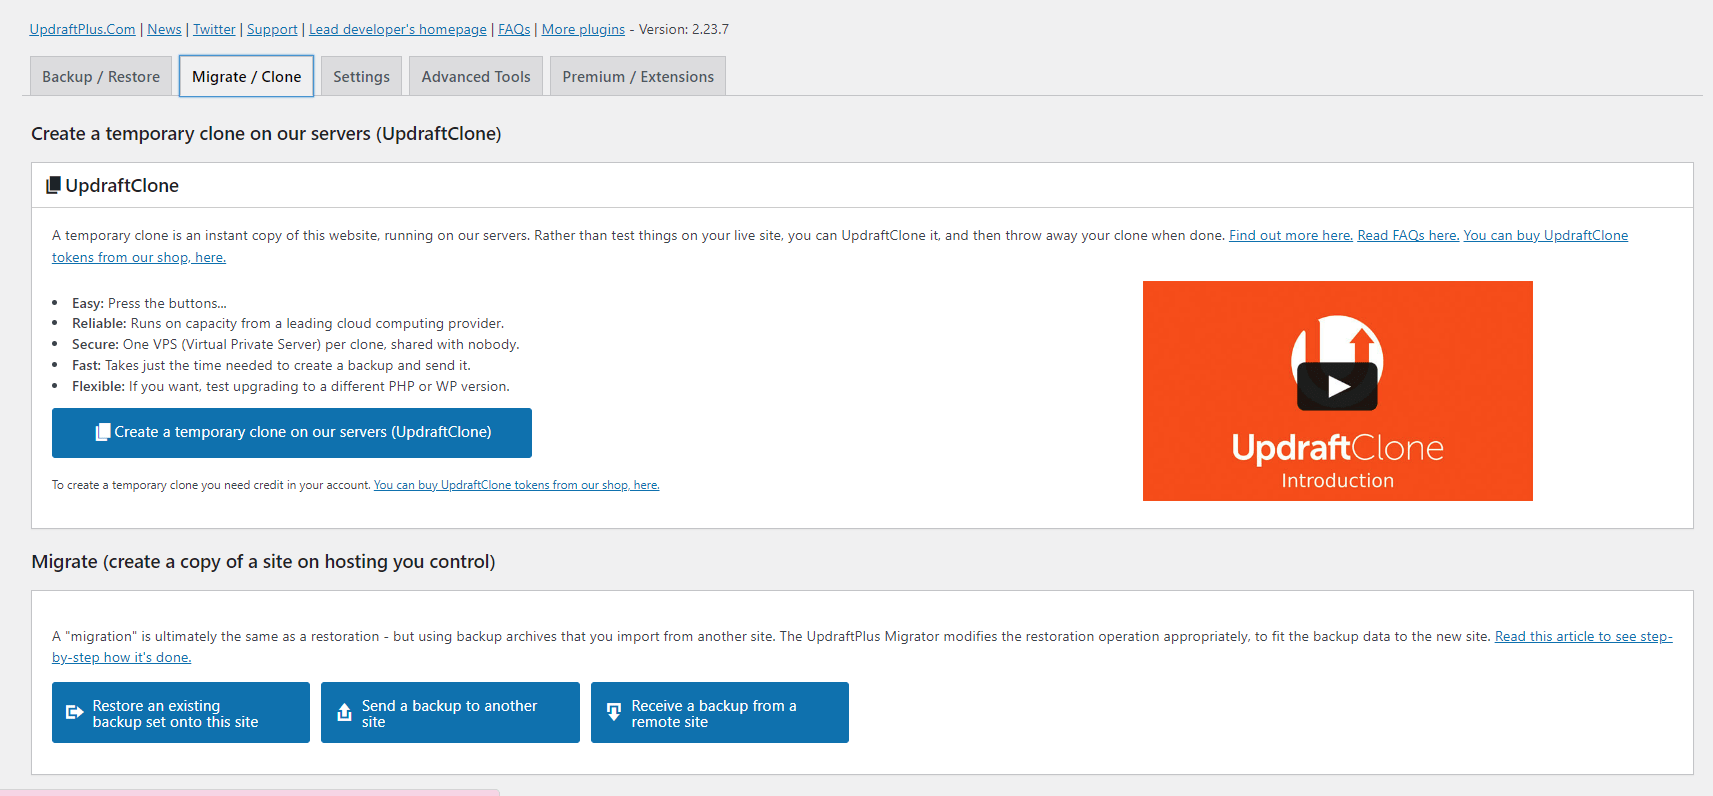
- Scroll to the ‘Migrate’ section at the bottom of the page.
- Click the third blue box ‘Receive a backup from a remote site’.
3. Create a key
- Enter a key name to identify the migration. It helps to have a clear and concise key name to keep track of which migration the key belongs to.
- Click ‘Create a key’.
- Select (ctrl + A) and copy (ctrl + X) the generated key.
Save it in a secure location. Once you leave this page you won’t be able to see the key again.
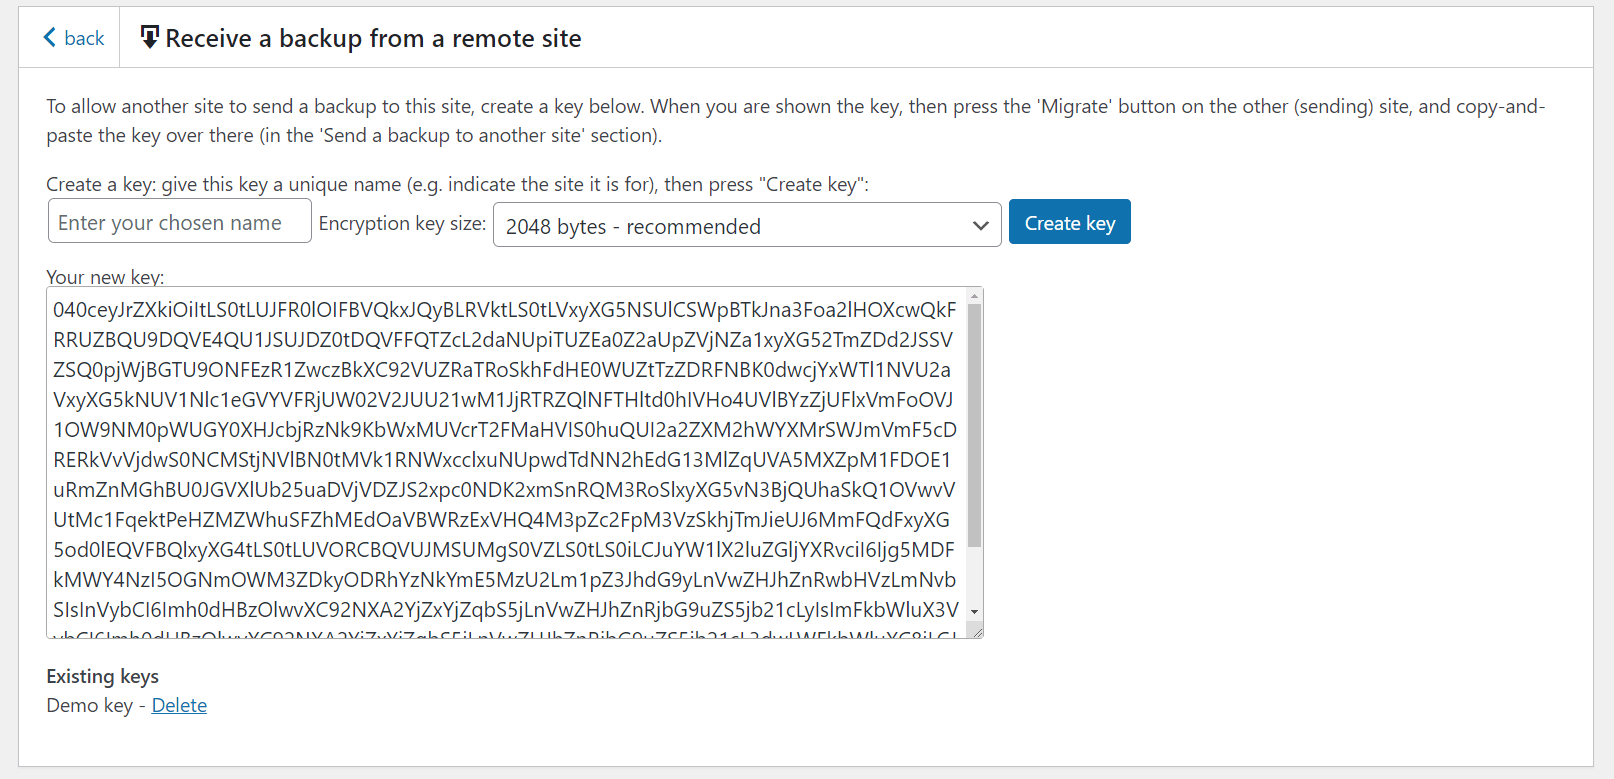
4. Open UpdraftPlus Premium on the source site and navigate again to the ‘Migrate / Clone’ tab
- Scroll to the bottom of the page and this time select ‘Send a backup to another site’.
- Next to ‘Site key’ paste in the key you copied from the new WordPress instance and press ‘Add site’.
- Your site should now appear as an option in the dropdown menu next to the words ‘Send to site’.
- Click ‘Send’ to begin the automatic process of migrating your WordPress site to the destination site.

5. Configure your WordPress migration
- Select which aspects of your site to migrate.
Generally, it is recommended to check all the boxes for a complete migration, but there may be cases where it’s unnecessary or undesired. For instance, if you have an existing production database for the new site and do not want to overwrite it with data from the old site.
- When you’re ready, click ‘Send’.
6. Jump back into the destination site to restore the sent backup
- The last step is to ‘restore’ the migrated backup onto the destination site.
- Log into the destination site and navigate to the ‘Backup / Restore’ tab.
- In the ‘Existing backups’ section at the bottom of the page, you should find an entry related to the migrated backup. Click on the ‘restore’ option.
7. Customise your migration
- Choose whether you want to restore plugins, themes, uploads, databases and/or other types of files to migrate and select ‘Next’.
- Choose which plugins, themes etc. to restore on the next screen.
- Ensure the ‘Search and replace site location in the database’ option is checked.
It is important to check this option as WordPress stores site URLs and page links in the database. Failure to run the search and replace could result in broken links or links pointing back to the old domain.
- When you’re ready, click ‘Restore’.
8. Migration successful
If all goes as expected, you should see a screen similar to this one.
Depending on what you chose to migrate, your sign-in credentials for the new site will now have changed to be the same as the source site.
UpdraftPlus Premium makes a WordPress site migration the work of a few mouse clicks. If you encounter any issues, our friendly support team will be happy to help. 94% of support tickets are responded to in 24 hours.
Tell me more about the “Search and replace site location in the database” option
Quick link: Go to the UpdraftPlus shop to find the Migrator add-on, or UpdraftPlus Premium.
If you have the “Migrator” add-on (or UpdraftPlus Premium, which includes all add-ons), then when you restore a site, you will be given the option to “Search and replace site location in the database”:
Migrating a database
What does this option do? If selected, then after restoring your database, it will then perform a search-and-replace operation upon it. It will first look up the address that the site was living at (i.e. the site whose database you are restoring). Then, it will replace all instances of that location in the database with your site’s new address.
This is a vital step if you are migrating a site from one location (URL) to another. For example, if you are moving a site from your development location – e.g. https://localhost/testsite to your live location – e.g. https://example.com – then after copying all the files and database, you then need to search/replace the database to reflect the new location. If you do not, then your site, though sitting at the “new” location, will contain lots of references to the “old” one. This can cause confusion and bugs. Most professional WordPress developers use the tried-and-tested “searchandreplacedb2.php” script to accomplish this task. UpdraftPlus includes the same code as its own search-and-replace engine to give you the same reliability.
So, in summary, here is how to migrate/clone a site from one location where WordPress is installed to another:
- Make sure that the new site (destination) has UpdraftPlus and the “Migrator” add-on installed (either stand-alone, or via UpdraftPlus Premium). (You can get these products from our shop, here).
- Create a backup on the original (old) site.
- Go to the “Existing Backups” tab and then under this click “Upload backup files”, from here you can then import the backup into the new site, by dragging and dropping:
- After the upload has finished, use the “Restore” button on the new site to begin a “restoration” using the backup set that you just uploaded. Make sure that you tick the “search and replace” button when doing so.
That’s all!
You can see a fuller walk-through, with many more screenshots, here.
Can I use UpdraftPlus to migrate a site to a different address?
This is a common need for site developers – or anyone wanting to maintain two copies of a site (e.g. when moving web hosting).
The answer is “yes” – you just need the “Migrator” add-on from our shop; or “UpdraftPlus Premium” which includes every add-on.
With that installed, just take a look at our migration guide.
Can I migrate a standalone WordPress site into a WordPress network?
Yes – with UpdraftPlus Premium since version 2.11.20 (December 2015).
I am trying to upload my database backup from a Mac so that I can restore/migrate from it, but it is greyed-out
Some versions of Mac OS appear to show the database file (ending in db.gz) as greyed-out when you try to upload it from the file selector. (This is apparently because the Mac doesn’t know what a db.gz file is).
If this happens to you, then open the Mac’s directory browser application, and drag-and-drop the file instead. If that doesn’t work, then drag-and-drop it more slowly!
Can I use UpdraftPlus to move hosts without changing my domain?
Yes. For full information, please see this guide.
Is there a video tutorial that shows how to use Migrator?
Yes. The following video will walk you through the source site to destination site migration process.
How to clone a WordPress site using Updraft Migrator
Full written and video instructions on how to clone a WordPress site using Updraft Migrator can be found at the following link: How to Clone a WordPress site using Updraft Migrator
When I migrated my site, I did not search/replace the database; what can I do now?
This article is about “migrating” a site – that means, cloning it at a different location (URL). It does not apply to “restoring” a site – when the site’s location stays the same.
In step 5 of the migration instructions, there is an important checkbox to tick. This performs the search/replace on the database, so that all the location references are updated.
If this checkbox is not ticked, then you will not even be able to log in to your new website; WordPress will keep sending you back to the old one.
But, do not worry! It is easily fixable. Just do this:
1. Open up your wp-config.php file in an editor
Connect via FTP to your website (or whatever other method your web hosting company gives you to access the files stored in your webspace). Find the file in the root of your WordPress install called “wp-config.php”, and open it up to edit.
Add these two lines anywhere near another line beginning with ‘define’, but change https://example.com to match the address of your new website:
define('WP_SITEURL', 'https://example.com');
define('WP_HOME', WP_SITEURL);
Then save the newly edited wp-config.php file back to your webspace.
2. Log in to the WordPress admin dashboard
Visit your site’s /wp-admin page (e.g. https://example.com/wp-admin) and now you should be able to log in.
If the whole site has now crashed and you can’t even visit the admin page, then you must have introduced a typing mistake in step 1 – go back and try again!
3. Perform the database migration again
Perform the database migration again, and make sure that the box is ticked. There is no need (and it will only waste time) to re-migrate the plugins, themes, uploads, etc. Keep the browser window in which the operation takes place open, in case anything goes wrong – then you will want to copy and paste the contents so that they can be analysed.
What does the error message “PCLZIP_ERR_BAD_FORMAT(-10)” mean?
Examples: “PCLZIP_ERR_BAD_FORMAT(-10): Invalid archive structure”; “PCLZIP_ERR_BAD_FORMAT (-10) : Unable to find End of Central Dir Record signature”
This is a message that it is possible to see during a restoration or migration operation. If it occurs, then it will be when UpdraftPlus is unpacking one of the zip files from your backup. (To be more precise, it is when UpdraftPlus asks WordPress to unzip the zip file, using WordPress’s built-in unzipping functions).
Its meaning is that the zip file was corrupt, and could not be unzipped.
When we have seen this message, the situation has generally been like so: the backup zip itself was fine (don’t panic!), but the corruption occurred either when the user downloaded it from their “source” WordPress site (e.g. the download got terminated, and the user wasn’t told or didn’t spot it), or when the user uploaded it into their “destination” WordPress site. i.e. The download/upload was not successful; the uploaded file is not the same as your original backup zip. Either that, or the user attempted to begin the restoration before the upload operation had completed.
The solution, therefore, is to download and upload the zip again. To test that the download was sound, try opening the zip on your PC/Mac – does it open? If not, then you had a problem when downloading.
If the drag-and-drop uploading widget in the UpdraftPlus dashboard was used previously, then an alternative method is to use FTP to directly place your zips into the wp-content/updraft folder on your website; and then when the upload is complete, pressing the “Rescan local folder for new backup sets” link, as shown below. Then try your restore/migration again.
Link to press for rescanning files
Alternatively, connect your destination site to the same remote storage (e.g. same Dropbox folder, or same Amazon S3 bucket) as the source site. Don’t forget to save the settings – and then click the “Rescan remote storage” link in the screenshot above on the destination site. UpdraftPlus will then be able to fetch the backup directly – you won’t need to make sure that your download/upload cycle goes smoothly.
After migrating my site, my front page works, but all other pages give a 404 error
First of all: this is not bad. Even though your front page is only one page, if it migrated correctly, then you’re 99% there.
If your front page works, but others give 404, then there’s only one thing missing: a piece of configuration in your webserver. In particular, it’s the configuration for permalinks – the configuration to send access to pretty URLs like www.example.com/about-us/ into WordPress’s actual files on-disk.
Because this is part of the webserver configuration, it’s one level above WordPress, and not under WordPress’s direct control. Therefore, it sometimes needs a small piece of manual intervention from you to get working.
How can I know what webserver my hosting company is using?
It may tell you on your 404 error page. If not, then go to your UpdraftPlus settings page (remember that you’ll need to use the login details from the site you migrated – login details are part of what’s migrated), and click on the ‘Expert / Debugging Tools’ tab. In that tab, towards the top, there should be a line ‘Web server’.
Failing that, you can ask your web hosting company – they’ll know!
Apache and IIS
The vast majority of webservers are Apache. Apache handles this via .htaccess files (a file called .htaccess in the root directory of your WordPress install), and WordPress can almost always set these up automatically. WordPress also can usually set the configuration file for Microsoft IIS webservers (a file called web.config). If it is not happening automatically for you, then firstly visit the Settings -> Permalinks page in your WordPress dashboard, and press the button to save settings. When you do this, WordPress will make a second attempt to set up the file. This probably will not work, if it did not work the first time. But you can try anyway. If it does not work, and you have Apache or IIS, then you should check the file permissions in the root folder of your WordPress install. Does WordPress (or to be more particular, the PHP engine that WordPress runs on) have permission to create files in that directory?
Finally, on Apache, if you are running your own server, then you should also check that: 1) you have the module mod_rewrite enabled and 2) your Apache configuration settings allow .htaccess files to take effect (perhaps, the AllowOverride setting in your main httpd.conf – but, the best place to get Apache support is in an Apache/XAMMP/MAMP/Bitnami etc. forum, for such issues). WordPress relies on mod_rewrite being available, and .htaccess files being allowed to take effect. (If you are using web hosting, then it is extremely unlikely to not be enabled/in effect already). Depending on how you have installed Apache, mod_rewrite might be called rewrite_module, or something similar.
Other webservers
If your webserver is not Apache or IIS (e.g. is one of the others – nginx, Zeus, lighttpd, LiteSpeed, or some other product), then you are likely to need to do something manually to set up the permalinks. Here are some links that may help; if they don’t, they just try Googling – e.g. Google for something like ‘WordPress permalinks lighttpd’.
- Nginx:
https://codex.wordpress.org/Nginx#URL_Rewrites_.2F_Permalinks
https://nginxlibrary.com/wordpress-permalinks/ - Zeus:
https://www.names.co.uk/support/hosting/linux_hosting/1119-wordpress_rewrite_script.html
https://www.names.co.uk/support/hosting/528-zeus_rewrite_rules_user_guide.html - Lighttpd:
https://www.chrisjohnston.org/tech/setting-up-a-wordpress-blog-on-lighttpd
https://antesarkkinen.com/blog/wordpress-with-lighttpd-pretty-url-permalinks-and-jetpack/ - LiteSpeed: LiteSpeed can read Apache’s .htaccess files, so should work without help, as far as we know.
- IIS (though note, as explained above, your problem is probably file permissions): https://www.iis.net/learn/extensions/url-rewrite-module/enabling-pretty-permalinks-in-wordpress
How can I send site data directly from one site to another?
The instructions below are for UpdraftPlus 2.10.3 (June 2015) or later. The instructions assume that you have a compatible UpdraftPlus version installed on both sites, and that both sites are of the same type (in relation to WordPress single or multisite (a.k.a. “Network“) site installs. If you don’t know what this means, don’t worry – people with multisite installs to whom it applies will know about it!).
A note about firewalls: To be able to send site data (e.g. plugins, themes, database) directly to a remote site (e.g. sending a site backup from your development site to your live site), there needs to be no firewall that will block the sending site from visiting the receiving site. This is most likely when sending from a live site on the Internet to a local development site on your personal development machine. (Your personal development machine probably has a firewall, and/or there is a firewall on your Internet router). In that case, you can instead download the backup manually, or you can configure your local development machine to use the same remote storage (e.g. same Dropbox) as your remote site, and (after saving settings) press the “Rescan remote storage” button on the local site’s UpdraftPlus (in the “Existing Backups” tab) to detect the backup.
For a quick video on how to to do this view our direct site-to-site migration video:
Step 1: Connect the two sites
This only needs to be done once. You need to get a “key” from the receiving site, and copy-and-paste it in the sending site. This gives the sending site access. It will have this access until you delete the key.
To do this, go to the UpdraftPlus settings page on the receiving site (i.e. the site that the backup will be sent to), and click on the “Clone/Migrate” button.
A window like the one below should open.
In it, go to the bottom section – the section “Or, receive a backup from a remote site.”
Click on “Create a key…” . You will be asked to give your key a name. You can call it anything you like. The main purpose of the name is to help you to remember which sites you gave permission to send data.
The new key will then be shown. Click on it, and it will be selected. Then all you need to do is copy it to your clip-board. (Press Control-C, or press the right-hand mouse button (or whatever you press to see a menu) and select “Copy”).
Now, go to the same window in the sending site. (i.e. Go to UpdraftPlus on the sending site, and hit the “Clone/Migrate” button).
When the window has opened, go to the second section – the section headed”Or, send a backup to another site“.
There, paste the key in the text entry field next to the “Add site” button. (Press Control-V on your keyboard, or choose “Paste” from a menu).
Press the “Add site” button. It should now tell you that the site has been added, and then show you a “Send to site:” option, for sending to the site that the key came from – like in the next screenshot in step 2, below.
Step 2: Send the backup
We now assume that you have completed step 1. You should now be logged in on the sending site (i.e. the site that is being cloned), and have pressed the “Clone/Migrate” button on the UpdraftPlus settings page, and be looking at the window which then opens.
In the “Or, send a backup to another site” section, choose which site to send to, and press the “Send” button.
When you do so, UpdraftPlus will then test the connection to the remote site, and (if it succeeds), allow you to choose which parts of your site to send over.
Note that this does not immediately replace the destination site with the backup. Rather, the backup set will be added to UpdraftPlus on the receiving site, and you will restore it there. So, don’t fear – this step is not the final one where everything happens!
After choosing your options, press the “Send” button. UpdraftPlus will then start preparing and sending over the data!
Then watch it go!
Step 3: Restore the backup data on the destination site
This step is one you’re probably already familiar with. Go to the UpdraftPlus settings page on the destination site, and go to the “Existing Backups” tab. Click the big “Restore” button next to the backup set that you’ve just sent over. (You might need to wait half a minute after the backup finished before it appears). Then restore as normal. Locations (URLs) in your database will be search/replaced, just as normal, when importing a remote site.
If you are not familiar with these steps, then follow this link to the traditional clone/migration instructions, and resume from step 4. (Also go there if something goes wrong – that article has extra links for help with trouble-shooting).
That’s all – easy as that!
Amazon S3 (4)
In the administration section, it shows my (Amazon, FTP, etc.) passwords starred – but I want to see the actual text
Note (July 2015): previous releases of UpdraftPlus showed plain text by default. Though starring adds nothing to security and isn’t best for usability (as explained below), so many people expect stars, that we decided it’d be better to acquiesce, and say goodbye to the repeated questions about it! Until then, this FAQ asked the question the other way round – we’ve left some of the explanation to do with password starring in browsers below, for general usefulness.
When you enter a password and it is starred, in fact this only prevents “shoulder-surfers” (people looking over your shoulder) from seeing the password. It provides no extra protection from other users who can sit at the keyboard, or access the same WordPress admin panel.
Three quick, different ways that people who have access to the settings page can access stored passwords are: 1) Press “View Source” in their web browser, and read it out of there. 2) Download a backup of the site’s database and read it out of there. 3) Install an extension in their web browser to un-star all passwords (e.g. this one).
Starring out the password only protects against people who are a) malicious enough to misuse your password, but b) too technically incompetent to do any of the above. It’s best to keep people like that well away from your admin panel!
A better solution (than starring out), if you have multiple admins on the WordPress site, is to set up a new set of access credentials for the backup storage for each website you are backing up (i.e. a unique FTP login/set of S3 credentials, etc.). For Amazon S3, read this article. You can also lock access to your admin page in UpdraftPlus Premium, as explained here.
If you want to display passwords directly, then do this:
- Using FTP (or equivalent) access to your web hosting space, create (if it does not already exist) a folder called mu-plugins in the content directory of your WordPress install (which is usually called wp-content – i.e. the new directory will be wp-content/mu-plugins).
- In that folder, create a new file called ud-star-passwords.php (or anything else ending in .php) with the following content:
<?php
add_filter('updraftplus_admin_secret_field_type', 'updraftplus_admin_secret_field_type');
function updraftplus_admin_secret_field_type($type) { return 'text'; }
That’s it!
What settings should I use for Amazon S3, and how should I configure my Amazon S3 account?
This answer assumes that you have already created your Amazon S3 account, and have made a note of your S3 access key and secret key. If not, then go here.
When you enter your Amazon S3 details in the UpdraftPlus setup, the only thing that some people find non-obvious is what to enter into the “S3 location:” field. All you have to enter is the name of the bucket that you wish to use. (If this bucket does not yet exist, then that is also fine – it will be created for you).

Amazon S3 setup
The other question that sometimes arises is, “what permissions do I need to set on the Amazon S3 bucket (in the Amazon S3 console)?”
Firstly, if you are using your master S3 access and secret keys, then these have permission to do anything upon any bucket in your account. So you will not need to adjust any permissions to make these work. If you are not an advanced user, and do not wish to read about the most secure possible configurations, then you can stop reading now.
If, however, you have set up a different user with its own access and secret keys (which can be done using the Amazon AWS console’s “IAM” service), then you will need to make sure that that user has enough permissions.
 console in Amazon AWS")
Finding the Identity and Access Management (IAM) console in Amazon AWS
To do this, you will need to add a policy. To do this:
- In your AWS dashboard, go to Services->Users
- Select the IAM user you wish to use
- Under the ‘Permissions’ tab, select ‘Add permissions’
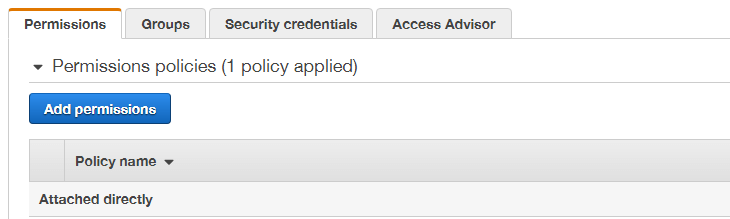
- On the next page, select the ‘Attach existing policies directly’ option and then ‘Create policy’ (This will open a new tab)
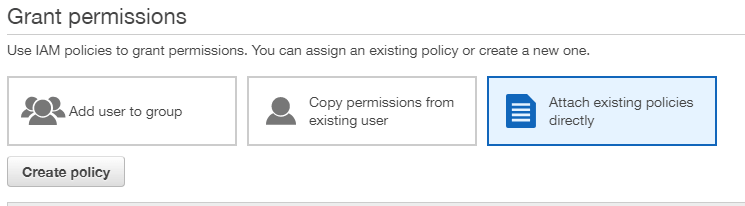
- Open the ‘JSON’ tab and replace the contents with your policy (see below for examples). Select ‘Review Policy’
- Give the policy a name and finish creating it
- In the IAM permissions window, search for your new policy and select it. Go to ‘Review’
- Select ‘Add permissions’
Exactly what user policy is right for your use-case depends upon what that use-case is. However, if you have a user “myuser” and a bucket called “mybucket”, then the following policy is sufficient to give that user all the permissions that UpdraftPlus requires to access that bucket, and only that bucket:
{
  "Version": "2012-10-17",
  "Statement": [
    {
      "Effect": "Allow",
      "Action": [
        "s3:ListBucket",
        "s3:GetBucketLocation",
        "s3:ListBucketMultipartUploads"
      ],
      "Resource": "arn:aws:s3:::mybucket",
      "Condition": {}
    },
    {
      "Effect": "Allow",
      "Action": [
        "s3:AbortMultipartUpload",
        "s3:DeleteObject",
        "s3:DeleteObjectVersion",
        "s3:GetObject",
        "s3:GetObjectAcl",
        "s3:GetObjectVersion",
        "s3:GetObjectVersionAcl",
        "s3:PutObject",
        "s3:PutObjectAcl",
        "s3:PutObjectVersionAcl"
      ],
      "Resource": "arn:aws:s3:::mybucket/*",
      "Condition": {}
    },
    {
      "Effect": "Allow",
      "Action": "s3:ListAllMyBuckets",
      "Resource": "*",
      "Condition": {}
    }
  ]
}
What is the most secure possible setup?
Since UpdraftPlus needs to store an S3 API key and secret to upload your backups to S3, there is a potential point of weakness. If a hacker breaks into your site, then he can steal that API key + secret, and use it to access your backups. Ideally, the hacker should not be able to delete or change your backups – you want to know that backups taken before hackers break-in are “clean” and can be deployed without fear.
To accomplish this with an Amazon S3 setup, implement these recommendations. They involve more complexity, but given the securest possible setup:
- Do not use your “master” API key + secret (which can access all your S3 data). Instead, set up a separate IAM user (which will thus have its own API key and secret). (Note – this is an IAM policy, not a bucket policy. You will need to switch back and forth in the Amazon AWS console between S3 to IAM a few times during these steps.)
- Set up a bucket from the Amazon S3 console (https://console.aws.amazon.com/s3/) for your UpdraftPlus backups, and only for these.

- In the Configure options step, enable versioning. What is versioning? It means that if an attacker gains access to your bucket, and over-writes your backups (e.g. with a new, hacked version), then the previous versions still remain. accessible. They are not deleted. (This can also be done later in the AWS console, bring up the bucket’s properties (select the bucket in the S3 dashboard and choose “Properties” from the menu).
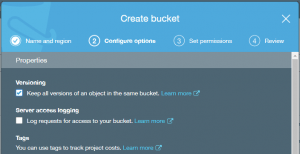
- Set up a policy for that IAM user, as above, but without the two delete permissions. i.e. Without these two lines:
"s3:DeleteObject", "s3:DeleteObjectVersion", - Finally, since UpdraftPlus cannot now delete historic backups, you will need to manage this another way (the “retain this many” setting in UD will take no effect). The easiest way to do this is to use S3’s built-in “life-cycle” feature. In the S3 dashboard, select the bucket and open the ‘Management’ section. Under ‘Lifecycle’, add a lifecycle rule.

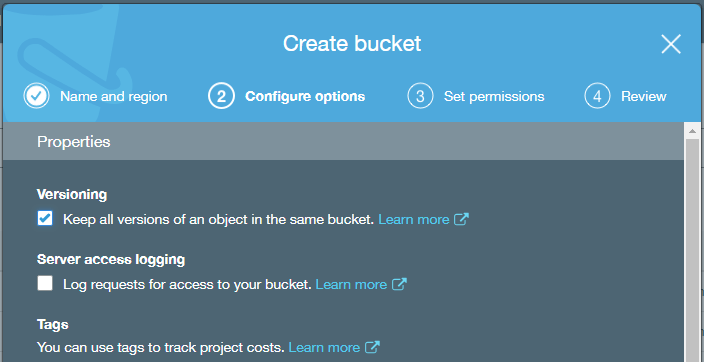
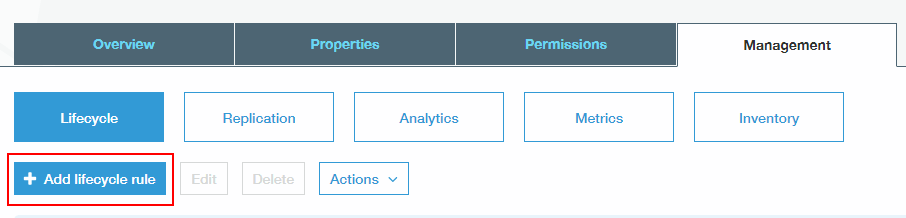
That’s it. What is the total effect of those changes? It means that UpdraftPlus is configured with Amazon S3 access credentials that can only write to the defined bucket, and no others. It cannot delete any existing backups. Its ability to write, however, still means that it can overwrite existing backups, which is effectively a way of deleting them, as well as tampering with them. Therefore, we add versioning in order to make sure that over-writing does not destroy existing backups.
The final part of this is that, 1) if restoring, you should retrieve your backup sets directly from the Amazon S3 console rather than from the UpdraftPlus dashboard’s built-in method 2) if you press the “Test S3 Settings” button, then it will create a test file, and report that it failed to be able to delete it. This is now expected, so do not worry about it.
Can I use Amazon S3’s reduced redundancy storage?
UPDATE (September 2017):
AWS S3’s Reduced Redundancy Storage (RRS) is being phased out lately. For this reason we removed this option from the S3 Enhanced add on settings panel.
Multisite (3)
I am restoring a pre-WordPress-3.5 multisite into a 3.5-or-later multisite – what happened to my blogs.dir?
Before WordPress 3.5, a new WordPress Network (i.e. Multisite) install used to keep media uploads (images, etc.) in the uploads directory (for the “main” site on the network, site ID 1), and in a separate directory (called blogs.dir by default) for other sites. By default, blogs.dir was found at wp-content/blogs.dir, and UpdraftPlus’s multisite add-on would back it up separately.
From WordPress 3.5 onwards, a newly set up (i.e. not upgraded) multisite would instead put all blogs’ uploads in the uploads directory (wp-content/uploads, by default). This is more consistent, and leads to fewer backup zips.
However, this presents a small issue if you have a backup from a pre-3.5-era multisite, and wish to restore it into a 3.5-or-later multisite. You have a backup of blogs.dir – but your new site has no such location.
This issue does not arise if you have only upgraded your pre-3.5-era multisite to 3.5 or later – in that case, WordPress will run it in a compatibility mode, and keep the blogs.dir setup). Furthermore, this issue is not relevant if you are restoring a database from a pre-3.5.-era multisite, because doing this will trigger WordPress’s compatibility handling.
What to do? You can do this:
- Unzip your blogs.dir backup zip (i.e. the one that UpdraftPlus created). It will contain subdirectories for each site on the network, like blogs.dir/2, blogs.dir/3, etc.
- Also unzip your uploads backup zip. This will contain a subdirectory, “uploads”.
- Create a subdirectory “sites” inside it the “uploads” subdirectory (i.e. “uploads/sites”).
- Move the contents of the blogs.dir directory into uploads/sites (so now you will have “uploads/sites/1”, “uploads/sites/2”, etc.).
- Zip up the uploads directory again, so that you have a zip file with one subdirectory in the top level (“uploads”).
- You can then use the new uploads zip to import your site uploads.
Alternatively, just perform the restoration, and then copy over the contents manually from your blogs.dir backup zip into wp-content/uploads/sites on your new site.
You can do the same procedure in reverse if wanting to transfer content from a post-3.5-era setup into a pre-3.5 multisite.
How do I restore a single sub-site on a Multisite Network?
To restore a single sub-site on a WordPress multisite, click to restore your backup as normal. The restoration wizard will give you the option to choose a specific site to restore.
Please view this instructional video:
Or see this guide for details.
Can I migrate a standalone WordPress site into a WordPress network?
Yes – with UpdraftPlus Premium since version 2.11.20 (December 2015).
Account management (8)
Tell me about my UpdraftPlus.Com account (including data protection and privacy issues)
N.B. Simple use of the UpdraftPlus plugin does not necessarily mean that you have an updraftplus.com account. You only have an updraftplus.com account if you created one (please see the details below).
Implications of having an updraftplus.com account
In order to buy UpdraftPlus add-ons, UpdraftPlus Premium or UpdraftVault storage space, or to purchase or use a free trial for UpdraftCentral Cloud, you have to create an updraftplus.com account. (In the cases of purchases, this is done when you go through the checkout in our shop). When you do so, you will be asked to give your email address and give yourself a password. With an account at updraftplus.com, you can use the purchased facility (if it is a software-as-a-service purchase like UpdraftVault or UpdraftCentral Cloud), or to download your software or invoices, or to claim support.
Creating an account in itself does not allow us to:
- Make purchases, or access your PayPal account in any way. That is technically impossible. All payments handled by PayPal are handled on their site (www.paypal.com). All that we get to know about it is that PayPal send us a notification that the payment has cleared – and our PayPal account balance then increases. All details of how you paid, bank accounts, bank cards, etc., remain entirely between you and PayPal. That’s PayPal’s design, it’s great, and we have no desire or power to change it. The exception to this is subscription purchases, which provide us with a secure token which can (only) be used to subsequently make a repeat purchase of the same item later.
- Do anything with your WordPress site. It is not your WordPress password. It can’t be used to log in to your WordPress site or do anything else on it. (Of course, if you subsequently explicitly connect a WordPress site to our remote control application, UpdraftCentral Cloud, then, the purposes of that applicationis remote control. We, however, have no legal right to exercise this facility; only you do, unless you specifically ask us to do so (e.g. as part of a support request)).
If someone gets hold of your updraftplus.com password, then what could they potentially do with it? In the normal case, not very much. Basically, they can log in to your UpdraftPlus.Com account. You can prevent that by turning on two-factor security. From there, they can view details of your purchases. They could also claim licences for software add-ons that you purchased on their sites. You’ll be able to see if they do this, because when you log in and see the list of which sites you’re using add-ons on, you’ll spot it. If you have connected other services, then they can do more. If you have purchased UpdraftVault storage space, then they could store their backups in your storage space. If you have connected sites to UpdraftCentral Cloud for remote control, then they could control your connected site. If you are using UpdraftCentral Cloud, then we would underline our recommendation of two-factor security.
You will need to type in your updraftplus.com username and password into your WordPress site when connecting to your updraftplus.com account, in order to claim your purchases. This then allows you to receive automatic updates to UpdraftPlus through the usual WordPress dashboard. If at any time you don’t wish to receive updates, or wish to not connect to your updraftplus.com account any more, then simply remove the username from your settings. It will not delete your already-downloaded add-ons. So removing it is quite safe.
Note that after you have successfully connected and activated your add-ons, you can then remove your password (i.e. enter a blank password and press the ‘Connect’ button again). Your password will then not be stored on the WordPress site, but it will still be able to access updates. (This is done automatically since version 1.11.1, August 2015).
Note that you can lock access to the UpdraftPlus settings page in your WordPress dashboard using the “lock admin” feature, which is part of UpdraftPlus Premium.
Data processing and privacy
Concerning data processing in relation to the use of UpdraftPlus, UpdraftVault, UpdraftCentral, site cloning and other features, and visiting our websites, please see the information on this page. You must agree to these uses in order to have an updraftplus.com account.
Right to deletion
You have a right to delete your account at any time. This will, out of technical necessity, mean that connected services (e.g. access to plugin updates, use of UpdraftVault space, use of UpdraftCentral) will stop working. It will not cause UpdraftPlus itself, installed on your WordPress site, to stop working (there is no requirement to maintain an updraftplus.com account in order for UpdraftPlus to operate). If you wish to delete your account, then please make a request here. We will need to authenticate your request to prevent abuse. Please note that we will need to retain some data on any purchases in order to comply with taxation and auditing laws (note that the EU’s GDPR regulation specifically recognises that the right to deletion does not apply to data that other laws require to be maintained).
I would like a printed or PDF invoice / receipt for my purchase, please
- Log in to your account, here.
- After logging in, you will see a list of your orders.
- Click on the “Download invoice (PDF)” button next to the relevant order.
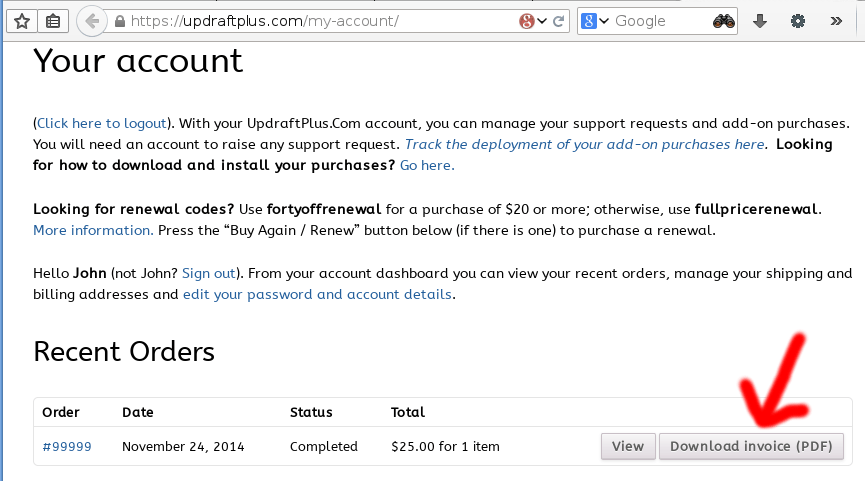
How do I reset my password?
You can reset a lost password using this link, here.
If you do not have access to the email account that your lost password reset link is sent to, then you can fill in the following form to re-establish your identity, here.
What data is gathered when UpdraftPlus is used, and how is that data processed?
This page is intended to explain what data is accessed or processed during usage (both installation and ongoing usage) of the UpdraftPlus backup/restore plugin, both free and Premium versions. In the general case this is “nothing – or, if using an explicit online service, then the minimum required to deliver that service” – but you can and should read the full details below. If you explicitly take other actions whose obvious nature is to sign up for something – e.g. sign up for a newsletter, or follow us on Twitter – then these may involve some data sharing. In such cases, the information will be available in the place where that action is taken. This page is intending to describe plugin usage only.
General note on logging of server requests
In the case of any HTTP requests sent to our servers (including not just explicit visits in your web browser, but API calls made by any software involved), under UK law these requests are logged and stored for 6 months. They are then automatically rotated. We do not process these logs for other purposes except as part of normal server operation (e.g. summarising statistics, or searching for information on particular server events, e.g. investigating unusual load or access patterns). They are never processed for any marketing purposes. Note that this information is assumed in all sections below where it applies and is not repeated.
General notes on data collection and sharing
Where any data needs to be processed by us for an indicated or necessary usage described on this page, then the definition of “us” includes our partner, Xibo Limited (UK registered company 6841995), who provide us with various support services in both customer support and product development, under a strict data sharing agreement for defined usages only. Where “third parties” are mentioned below, these references exclude Xibo.
When taking and restoring backups
In the general case, taking and restoring backups does not result in any communications at all with any of our servers. i.e. No data is gathered by us, and hence none is processed in any way. Neither is there any other gathering of telemetric data on the WordPress dashboard in UpdraftPlus. i.e. There is no observation of how you use the plugin within your WordPress install, and no reporting back of the resulting data to our servers.
In the case of backup destinations which provide security via an OAuth communication flow which uses our authentication server as part of the OAuth protocol (this includes Dropbox, Google Drive, Google Cloud and Microsoft OneDrive in cases where you have not explicitly set up a personal application for authentication), out of necessity of the OAuth protocol, an authentication token passes through our authentication server. No personally identifiable information is stored, or processed, by us as part of this procedure.
Backup storage in UpdraftVault
If you are using UpdraftVault as your storage option, then your site will communicate with our servers over a secure SSL connection to obtain a credential (a ‘token’) (i.e. verify that you currently have an account with us). This token is then used to communicate with our object storage servers which are part of the Amazon AWS platform. Your backup data itself does not pass through any of our servers. All data on this platform is encrypted using server-side encryption (SSE). You can additionally use the feature in UpdraftPlus Premium to encrypt your database backup file using your own key. We do not process any of your backup data in any way (except in response to an explicit support request). It will be retrieved directly to your UpdraftPlus install, or to your computer via your web browser if you use the Vault browser, upon your request. There are no circumstances in which your backup data is processed for any other purpose than backup and restoration, and it is not shared with any other parties.
Site cloning
Site-to-site cloning
When using UpdraftPlus Premium’s “site-to-site clone” feature, there are no communications with any of our servers, and hence no data is either stored or processed by us.
Temporary cloning
When using UpdraftPlus’s “temporary clone” (“UpdraftClone”) feature, your site needs to communicate with our servers in order to establish entitlement (i.e. that you have sufficient ‘credits’, of whatever sort), and request the clone to be created, including the specifics of the clone desired (including WP version to install, PHP version, and the username who created the clone so that they can log in on it). Data on how many clones you currently have active is stored in our databases. It is not processed for any purpose beyond providing the service, and advising you of the credit level on your account and any appropriate actions to take. It is not shared with any third party. When your clone is created, it will have its own VPS (Virtual Private Server), not shared with any other site or customer. Your site will send your backup data directly to the new WordPress install on the clone directly (i.e. not using our servers as an intermediary). We do not access the cloned site except for explicitly requested support, and for general monitoring of the health of the platform. We do not take, or keep, any copy of your data; i.e. when the clone is destroyed, none of your data from it remains.
When you use UpdraftPlus to initiate a new clone, your webserver may make a request to ipinfo.io (or a similar service, if we change it in future) to work out which country your server is located in, in order to show you a suitable default region choice for your clone). You can prevent this lookup and selection of a default choice by defining the constant UPDRAFTPLUS_DO_NOT_USE_IPINFO with value truein your site’swp-config.php file.
Connecting for updates in paid versions
If you connect UpdraftPlus for receiving updates in your WordPress dashboard, then the information on which site has been connected to receive updates is stored in our database. It is used only via automated code to then send back information on update availability upon request from your site, and for other directly related tasks (e.g. providing information on upcoming licence expiry events). When an update request is sent, it includes your WordPress, PHP and UpdraftPlus version numbers, current language in WordPress, whether your install is a multisite install or not, and the PHP memory limit. Our plugin updates server is capable of using this information to decide what is an appropriate update for you. We reserve the right to summarise this data (i.e. anonymise and aggregate it) for the purpose of producing aggregated statistics on our user base, which we may use to guide our development.
UpdraftCentral self-install
If you are using a self-install version of UpdraftCentral (whether free or paid), then no data is sent to, or processed by, any of our servers. Communications are only between your servers on which the controlled site, and dashboard, are. In the case of the paid version, the above section on connecting for updates also applies.
UpdraftCentral Cloud
If you are using our hosted UpdraftCentral product, UpdraftCentral Cloud, then our servers necessarily store information on which sites you have connected to UpdraftCentral, how many licences you have purchased, and they dispatch commands to those sites in accordance with UpdraftCentral’s normal operation. We do not process any data stored or obtained for unrelated purposes. If you approach your licence limit then we may inform you and present your options for upgrades. UpdraftCentral Cloud data is not shared with any third party.
News feed
UpdraftPlus may fetch a news feed from our blog and display headlines within the WP admin dashboard. This news feed is fetched from Feedburner, a service operated by Google. As a conseqence, we do not receive (and therefore do not process) any data when this is done.
How can I find my order number?
If you’re not sure of your order number, then here are some ways to find it…
- In your account page, here. This is the easiest way.
- In your email order receipt – search your emails for “UpdraftPlus”
- In your PayPal receipt, if you paid by PayPal – not the PayPal transaction ID, but further down… look for the words “Invoice ID: UD-(some numbers)”
Failing that, we can usually find your order number from other information if you are using the email address that you purchased with, or if your site has been connected for updates – just indicate that you don’t know it when filling in the support form. However, note that this will delay support whilst we perform a manual search, so it is always better if you can supply it.
What are the terms and conditions for having an updraftplus.com account?
Our policy here comes down to: 1) understand that having an account means that some data that concerns you must be processed and stored (including by third parties whom we have authorised for appropriate and limited access) in order to operate the account and 2) you can lose your account if you behave badly.
- Firstly, you should understand and accept the implications of having an updraftplus.com account, as detailed on this page, together with the explanation of how data is processed and privacy is protected in the use of different UpdraftPlus/UpdraftCentral features.
- Terms and conditions for support responses are detailed here.
- It is understood and accepted that any fraudulent, corrupt, abusive or offensive behaviour towards any of our staff, delegates or representatives in any context (whether on a website that we host, or in any other virtual or physical setting), or towards any of our computer systems or networks, or any attempts to gain unauthorised access to any part of our website(s), database(s) or other physical or virtual resources, is grounds for immediate and unilateral termination of your account (together with all associated services), without requirement for notice or refund, at our absolute and sole discretion.
How can I release / re-cycle a licence?
You can release an assigned licence and make it available for re-use elsewhere any time from 30 days after de-installing the paid version of UpdraftPlus on the site. (You can re-install the free version at any time, including immediately). To do so (i.e. assuming you have de-installed it 30 or more days ago) visit the ‘Licences’ page in your account. There, if the licence can be released, there will be a link to do so, as shown in the screenshot below.
If you need to purchase more licences, then you can do so from our shop.
Remember that an active licence is not needed for UpdraftPlus to run. Licences are required for ongoing support and access to new versions. If you wish to run old versions then you are free to do so (but of course, it is unsupported).
Do unused UpdraftClone tokens expire?
No. Once you have purchased UpdraftClone tokens, they remain on your account until they are used.
The only exception to this is if no activity happens on your account for some years (no logins, no purchases, no use of UpdraftClone, UpdraftVault, UpdraftCentral, etc.), then for data privacy reasons you may eventually be deemed an ex-customer, and your account deleted.
Payment questions (5)
I attempt a card payment and there appears to be a small charge (around $1) charge left over
Our card processor tells us this:
When someone attempts to store their card to be charged later, we send over a request to their issuing bank for either a $0 or a $1 authorization (different banks permit different amounts) to verify that the card is issued and the bank will allow it to be authorized. Regardless of whether or not the authorization is declined, we reverse our authorization request immediately. However, even if the bank declines the authorization, some people may still see an authorization for $1 on their credit card statement. The important thing to remember is that this is not a charge, and it will disappear from their statement; depending on the bank, it will be removed from their statement in anywhere from a few minutes to a few weeks.
It’s also important to note that just because the bank approved a $1 authorization, it doesn’t guarantee approval when you actually charge the card. The authorization helps weed out a lot of the cards that would definitely be problematic, but it’s not able to guarantee that your next payment will be successful.
Why does my order status still show as “Pending”?
An order enters the “pending” state when you have pressed the “Place Order” button at the checkout, but we have received no payment. Our system immediately fulfils orders when payment is received.
If you were attempting to pay via PayPal, then you can verify the status of your payment in your PayPal account. (If no payment was successful, then there won’t be an entry in your PayPal statement; or if the payment was delayed because your PayPal account is not funded, it will show as a pending “eCheque” (eCheck) payment, and estimate when the payment will be made).
If you were attempting to pay via a card, then you can check your card statement, or ask us to check our account at this end… it’s best, though, to just attempt to pay again. We have never had a payment that was made without our card processor’s systems notifying ours. If that did happen, you could report it either to us or to your card vendor for a prompt refund. But, if you really do prefer not to check your statement and prefer us to check ours then send us a pre-sales question.
If you were attempting to pay via the debit/credit card option, then you could also try a card payment via the PayPal option – PayPal also process cards in the normal way, not only PayPal account payments.
To attempt payment again, just log in to your account, and press the “Pay” button next to your order.
Is the UpdraftPlus team able to provide additional documentation?
Our support team is able to provide additional documentation and assistance for purchases.
Please note, some additional services may incur an administration fee.
Documents which our support team are able to provide:
- Quotes
- Invoices/payment confirmations with additional information to comply with local tax authorities
- Our UK registered company and VAT information
- Our W-8BEN-E form
The following services require an additional administrative services fee.
- Signing non-disclosure agreements
- Signing additional data protection agreements
- Completing supplier account forms
- Processing purchase orders and/or taking payment via a direct bank transfer
To enquire about any of the above, please contact our support team via our pre-sales question form.
Why is a surcharge added for PayPal payments?
A 2.5% surcharge will be added to orders made outside of the United Kingdom using PayPal as the payment option.
PayPal’s several compulsory charges to us relating to national borders and internal currency conversions (which are largely accounting fictions devised by PayPal; they hold large currency balances on both sides of the transaction and so no actual transfers or conversions actually happen) result in them charging us around 3 times overall the payment fees of non-PayPal transactions. Therefore, we make PayPal still available for customers who prefer to use it, but pass on some of the costs.
My billing details have changed and I require a new invoice
Our team will always do their utmost to help resolve any account or billing queries that you may have. One of the few things we can’t do unfortunately is change the details on a previously generated invoice e.g. VAT number, VAT amount or billing address.
Updraft WP Software Ltd. Is a UK registered business, bound by laws which require us to collect ‘evidences’ at time of payment which we are not permitted to change retrospectively.
What we can do as a work-around, is issue a refund allowing you to place a new order and receive a new invoice to reflect the changes on your side.
Microsoft OneDrive (4)
How can I disconnect UpdraftPlus from my Microsoft OneDrive?
You can do that from your this page in your Microsoft account: https://account.live.com/consent/Manage
Please note that Microsoft only provide a facility to disconnect UpdraftPlus completely – i.e. all instances. They do not provide a way to disconnect only one website (if you happen to have multiple websites that are backing up to OneDrive). To disconnect websites individually,you will need to log in to the WordPress dashboard and deselect OneDrive as a backup option.
What is your privacy policy for the use of your Microsoft OneDrive app?
This privacy policy is published by the creators of UpdraftPlus, Updraft WP Software Ltd. (please see the footer of this page for company registration number). It applies only if you are using our built-in app for authentication. If you configure UpdraftPlus to use your own app, then it does not apply, and in that case no data comes to any of our servers.
Use of Microsoft OneDrive with UpdraftPlus involves visiting our authentication server (website) as part of the authentication (OAuth) flow. Note that no backup data or other data from your WordPress site goes to our servers – this all remains on your server on which you are hosting WordPress. The authentication procedure will cause:
- Your IP address to be logged in our webserver logs. No further processing of these logs is carried out. These logs are kept for 6 months in accordance with UK law, and then automatically deleted. We carry out no further processing on them. They are not shared with any third party.
- (If authentication succeeds) your Microsoft OneDrive account identifier may be stored in the authentication server’s database, so that the necessary authentication token can be given to your site if it requests it again. We carry out no further processing on them. They are not shared with any third party. Note that at the time of writing, we do not currently perform this storage, as OneDrive’s authentication procedures do not make it technically advantageous. (We merely reserve the right to do so if it becomes technically helpful in future).
No other data is sent or implicitly gathered by any of our servers in the process of using Microsoft OneDrive. Any changes to this privacy policy in future will be notified of on this page.
UpdraftPlus Vault (22)
What is UpdraftVault?
UpdraftVault is built-in storage space for your UpdraftPlus backups, which saves you depending on another storage system (and all the complication of figuring out what to buy and how to use it). Because it’s been tailored specifically for use in UpdraftPlus, it’s as simple as possible to understand and to use.
How reliable is UpdraftVault?
UpdraftVault will store multiple (i.e. redundant) copies of your backups at data-centres in multiple locations with 99.999999999% reliability. We’ve built it on top of Amazon’s world-leading storage cloud; no vendor provides a higher reliability. So you don’t have to compromise between simplicity and quality: UpdraftVault has both.
Where is my data stored?
UpdraftVault will store multiple (i.e. redundant) copies of your backups at data-centres in multiple locations. Although we cannot guarantee the precise location of your data, it will be at the nearest possible location, prioritising data centres within your continent, and you can see where it is in your account. Currently there are data centres in the USA, Canada, India, South Korea, Singapore, Australia, Japan, Germany, Ireland, the UK, France, Sweden, Brazil and Hong Kong.
Is my WordPress backup data routed via your (UpdraftPlus)’s servers?
No. The UpdraftPlus plugin, installed on your website, will send your backup data directly to the storage cloud. It is not routed through any of our servers.
Is UpdraftVault data encrypted?
Yes: data is both sent over an encrypted connection to the storage cloud and stored encrypted on the server. Encrypted storage on the server requires your WordPress install to be running PHP 5.3 or later (which is very likely – the PHP version before that, 5.2, was end-of-lifed in January 2011).
You can also encrypt your database with a passphrase only known to you (whether for storing in UpdraftVault, or any other remote storage method) using the option in the ‘Settings’ tab in your UpdraftPlus page in your WordPress dashboard.
Is there any limit on the number of sites I can connect to my UpdraftVault storage?
No. You can connect as many as you wish. The purchased storage space (i.e. quota) is available for all connected sites.
What happens when my Vault quota fills up?
If your quota allowance is full, no more backups can be sent to your UpdraftPlus Vault until either some space is made (e.g. by deleting some backups) or more quota is purchased. In the meanwhile, the backups will be kept on your webserver (and fully usable). Your UpdraftPlus backup report will inform you of this situation; make sure that you configure a backup report in your settings.
How can I see my total UpdraftVault quota usage?
You can see this either in the ‘Settings’ tab of UpdraftPlus in any of your connected WordPress sites, or here: via your account page at updraftplus.com.
How can I access UpdraftVault backups if lose access to the website that created them (e.g. it is hacked)?
If you lose access to a website (e.g. it is hacked, or the hosting company disappears), then you can access, download or delete your backups by logging in at updraftplus.com, and going to your Account Page. There is a Vault browser available at updraftplus.com.
These backups can then be used to recreate your website.
Will backups be deleted from my Vault if my quota fills up?
No. New backups will not be sent to UpdraftPlus Vault until quota is available (e.g. by deleting some backups, or purchasing more quota). They will remain stored and fully usable in the web hosting space for your website. Your UpdraftPlus backup report will inform you of this situation; make sure that you configure a backup report in your settings.
How can I access what is stored in my UpdraftVault?
You can see, download and delete the contents of your Vault from your Account Page at updraftplus.com.
Can I unsubscribe from UpdraftVault at any time?
Yes. If you are paying for extra UpdraftVault storage space (i.e. beyond any space included in a purchase of UpdraftPlus Premium), then you can cancel at any time, from your account page.
Can I be refunded if I stop using UpdraftVault before my subscription period ends?
No. UpdraftPlus subscriptions are for defined periods (quarterly, or annually), and if you stop using UpdraftVault before the end of that time, you will not be refunded for any unused part-periods.
Can I resell access to my UpdraftVault?
Yes. You are welcome to set up your clients’ websites to back up to your UpdraftVault account and charge them whatever you like. After one-time authorisation using your updraftplus.com login, your updraftplus.com login details are never needed again and are not stored in the UpdraftVault settings on your clients’ websites (in its place is a unique token with no other usefulness).
How do I disconnect a site so that it no longer sends backups to my UpdraftVault?
You can either…
1) Log in to the WordPress website, go to the UpdraftPlus ‘Settings’ tab, and click the ‘Disconnect’ button in the ‘Remote Storage’ section, or
2) Log in at updraftplus.com, where you will be able to see a list of connected sites in your account and disconnect any you wish. Sites disconnected in this way will no longer be able to send backups to your Vault.
How are payments for UpdraftVault taken?
If you are using the free Vault storage space included with your purchase of UpdraftPlus Premium, this is paid for in the ordinary way: you simply go through the checkout and use PayPal or a payment card, as you prefer.
If you buy extra UpdraftVault storage space, this is also paid for using PayPal or a card. In the case of card payments, payments will be processed automatically each quarter or year (depending on your choice). We do not store your card details under any circumstances; rather (for card payments) we use stripe.com, one of the web’s most trusted and most widely-used payment vendors, complying with the highest standards for card security. You can cancel your recurring payments at any time by logging in at updraftplus.com.
What happens if an automatic UpdraftVault payment fails?
If an automatic payment for UpdraftVault storage fails, you will be notified by email. You will then have the opportunity to pay for your next subscription period via card or PayPal. This can be done from your Account Page on updraftplus.com.
If you still haven’t paid by the time that your subscription period runs out, there is a grace period of approximately one week. After this, your UpdraftVault quota will be lost and you will need to take out a new subscription.
Please note that a chargeback (whether from PayPal or your card company) will automatically count as a cancelled payment, reducing your UpdraftVault quota immediately. Also, in terms of purchased support, once your paid period has expired, you are not entitled to any support with issues pertaining to UpdraftVault.
How can I get free space for UpdraftVault?
All purchases of UpdraftPlus Premium include free storage space for UpdraftVault for 12 months (which can then be renewed along with access to New Versions/Personal Support for UpdraftPlus Premium here at a generous discount.
How can I purchase more space for my UpdraftVault?
From our shop. There are no limitations on how many units of storage you can purchase.
What happens to my free space if I stop being an UpdraftPlus Premium customer?
The free space that’s included with a purchase of UpdraftPlus Premium is granted for 12 months (i.e. the same period as access to New Versions/ Personal Support). After that, it will be removed from your quota. If you renew your access to new versions/ support of UpdraftPlus Premium, your quota will be maintained.
What happens to my backups stored in UpdraftVault if I decided to cancel my UpdraftVault subscription?
Once your subscription period ends, your files will be deleted. Please save them to a different location before your subscription ends.
Note, you may have different subscriptions contributing to your UpdraftVault storage space. For example, you may have purchased storage on top of space given to you as part of an UpdraftPlus Premium purchase.
If you cancel one of those subscriptions, you’ll lose part of your storage space when that subscription period comes to an end. If you’re over your allowance at that time, UpdraftVault will delete backups until you’re back under your allowed storage limit.
UpdraftVault may delete backups that you don’t need, but it may delete backups that you do. It’s therefore safer to manually delete backups beforehand to ensure you keep your most important files.
Are there any special terms and conditions for use of UpdraftVault?
UpdraftVault is exclusively for the storage of backups created by the UpdraftPlus WordPress plugin, and use for any other purpose is strictly forbidden. Furthermore, any and all other FAQs about UpdraftVault which describe how UpdraftVault works constitute part of the user agreement in using UpdraftVault. Information on data privacy in relation to UpdraftVault is available here.
Support (7)
What are the implications of changing a table’s character set?
Background: Since UpdraftPlus 1.13.8 (autumn 2017), UpdraftPlus has been able to do extra checks upon your database prior to restoration for compatibility. In particular, it will look at the MySQL server that WordPress is running on, and make sure that it supports the character sets which are used by your database backup. Of course, if you are restoring on the same site/server, then this won’t be an issue. But it can very occasionally be an issue when people create a site on one setup which is unusual, and then try to restore somewhere else. (The normal situation with modern MySQL and WP versions is that you’re using a character set which supports a full range of international characters).
In this case, UpdraftPlus will show you a warning, and ask if you want to change to a different character set, as below:
In the past, UpdraftPlus used to crash in this case. But now it will detect it, and give you this option, whether to carry on with an attempted substitution, or to abort.
So – is it safe?
The answer, unfortunately, is “sometimes”. If your database content includes characters which do not exist in your chosen character set, then the import will either fail, or MySQL will silently drop parts of the data. If your database content does not include characters which do not exist in your chosen character set, then the import will be successful. For this reason, you should choose a character set that is as similar as possible to the one that your are trying to replace, and to be ready for things to not work. It is difficult to give more advice than this, because the issue can become very technical.
The most fail-safe thing to do is to speak to the administrator of your destination server (i.e. the MySQL server), and ask him if he can enable the missing character sets on the server (which might mean upgrading MySQL). Then you will be able to be sure that there won’t be a problem.
Is the UpdraftPlus team able to provide additional documentation?
Our support team is able to provide additional documentation and assistance for purchases.
Please note, some additional services may incur an administration fee.
Documents which our support team are able to provide:
- Quotes
- Invoices/payment confirmations with additional information to comply with local tax authorities
- Our UK registered company and VAT information
- Our W-8BEN-E form
The following services require an additional administrative services fee.
- Signing non-disclosure agreements
- Signing additional data protection agreements
- Completing supplier account forms
- Processing purchase orders and/or taking payment via a direct bank transfer
To enquire about any of the above, please contact our support team via our pre-sales question form.
What should I do if malware is detected in my UpdraftPlus files?
If your malware scanner or other security detects possible malware in your UpdraftPlus files, you should take the following steps:
1. Check for false positives
Some libraries used by UpdraftPlus use certain functions which can be flagged by malware scanners, especially on high sensitivity scans. For example phpseclib, the PHP Secure Communications Library, uses the eval() and unpack() functions safely and legitimately for cryptographic purposes. Together, these functions have also been used by malware in other contexts to hide their code.
As such, the first step you should take is to check for a false positive. To do so we recommend comparing the contents of the flagged files with fresh copies from a new download of the plugin. This can be done using a file comparison tool, such as WinMerge or similar tools. If the contents of the files are exactly the same, then the alert was likely a false positive.
You can also use the md5 or SHA-1 has functions to create a hash value for both files and compare those. Files which match exactly will give the same hash output.
2. Reinstall UpdraftPlus
If it appears that an UpdraftPlus file is infected or otherwise compromised, you should then remove the infected version of the plugin and reinstall from a fresh download. A fresh version of UpdraftPlus Premium can be found in your My Account Licences page, while the free version can be found in the WordPress.org Plugin Directory.
3. Investigate further
Malware present in your site’s PHP files is a symptom of malicious action, rather than the cause. The location of the malicious code does not necessarily indicate how the attacker gained access to the site.
If malware or malicious code is found in your UpdraftPlus installation, you should then run a full check on your site, including further scans for malicious code, update passwords and security keys, check the database for any issues, etc. You may be able to ask your hosts or server admin to help you.
More information on how to investigate further and clean your site can be found in this guide from Sucuri: https://sucuri.net/guides/how-to-clean-hacked-wordpress/
Why are my backups slow?
When creating a backup, UpdraftPlus uses Binary Zip or PHPZip to compress the backup files. If neither Binary Zip or PHPZip are available on your server, UpdraftPlus will use PclZip. PclZip is older and slower than Binary Zip or PHPZip and this may be causing your backups to slow down. Please ensure the PHPZip module is turned on. You can action this directly via cPanel or by contacting your web host for support.
How do I set clipboard permissions for different browsers?
Giving your browser permission to access the clipboard makes it easy for you to copy the information that you need to connect to UpdraftCentral. Enabling this feature will save you time; instead of manually copying the generated connection key, you’ll see an icon that will copy it for you in one click. Use this guide to set up your browser correctly. Simply select your browser from the list below, and follow the instructions:
Chrome
- Open Chrome browser settings here
- Select Security & Privacy > Site Settings > Permissions > Clipboard
- Select Allow
Edge
- Select the lock icon in the address bar
- Change the Permissions for this site > Clipboard setting to Allow
Firefox
- Open Firefox Browser
- In the address bar, type ‘about:config’ and search
- A page will appear with the option ‘Accept the Risk and Continue’
- For the following two Parameters change the preferences as True:
- dom.events.asyncClipboard.readText
- dom.events.testing.asyncClipboard
If you’re struggling to implement these steps, then as a Premium user, you can reach out for ticketed support. Free users can seek support via the WordPress forum.
My billing details have changed and I require a new invoice
Our team will always do their utmost to help resolve any account or billing queries that you may have. One of the few things we can’t do unfortunately is change the details on a previously generated invoice e.g. VAT number, VAT amount or billing address.
Updraft WP Software Ltd. Is a UK registered business, bound by laws which require us to collect ‘evidences’ at time of payment which we are not permitted to change retrospectively.
What we can do as a work-around, is issue a refund allowing you to place a new order and receive a new invoice to reflect the changes on your side.
Google Cloud Storage (3)
What does the error “Error: redirect_uri_mismatch” mean?
It means that you wrongly copied across the URL shown in your admin console to Google Drive/Cloud at the relevant step. Please return to the relevant step of the instructions (these instructions, for Google Drive, or these ones, for Google Cloud Storage), and try again.
Where do I find my Google Project ID?
You can find your Google Project ID in your Google API console, go to the Google API console, choose your project from the drop-down selector, and then you will find the project ID in the “Home” screen.
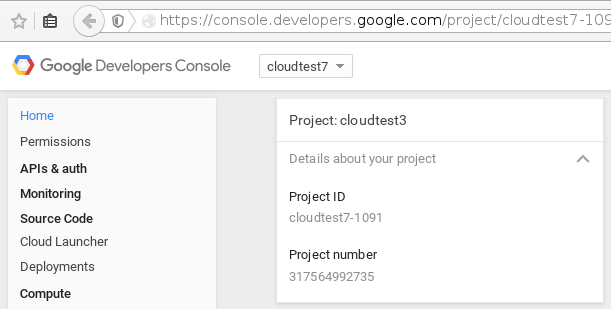
If you have not yet set up your Google project, then of course you will need to do that first.
How do I configure access to my Google Cloud Storage account?
For detailed written instructions, please follow this link.
Microsoft Azure (blob storage) (2)
Microsoft Azure (blob storage) setup guide
Note: These screenshots/instructions are aimed at the newer Azure portal (last updated: November 2015). If you are using the older portal then some of the layout will be different.
1. Sign in to Microsoft Azure
Sign into your Microsoft Azure account using this link; https://portal.azure.com.
2. Create a new storage container
To create a new storage container click the “Storage accounts (classic)” link on the left hand side of the screen (look under ‘Browse’ if you cannot see this option). Click the “Add” button.

You will then have options available to enter your storage name. This can be anything you like. You can also choose other Azure storage options (such as the pricing tier).
You will also need to create or add a ‘Resource Group’.
Once you have entered the required details click the “Create” button.

The storage name you entered when creating is the name which will be entered into the UpdraftPlus storage account options:

3. Get your keys, for entering into UpdraftPlus
Go back to the “storage accounts (classic)” screen and your new storage will be listed for you (as below). Clicking this will then show more options for the account.
Scroll to the right, and then on the settings ’tile’, under the manage header click “keys”. From here you can see your storage name, primary and secondary key, and other details.
Copy either the primary, or secondary key (reasons why there are two access keys can be found here). Then, paste this into UpdraftPlus’ storage settings.

4. Choose a container name
The Azure “container” option in UpdraftPlus will be the name of the container inside the storage. This can be whatever you wish. It does not need to already exist – if it does not exist, then UpdraftPlus will create it for you.
Finally, the Azure prefix (which is optional) will be a folder inside the storage container. For example, if you was to set the prefix to be “backups”, and the Azure container as “UpdraftPlus” then backups will be stored under the “wordpress/” directory inside the container. Note that in Azure, folders are “virtual” – i.e. whether they show as folders, or simply as long path names, depends on the tool that you are using.
5. Test your settings, and then save them
To ensure that your settings were entered correctly and are working then click the “Test Azure settings” button. After a short delay, a message will be displayed depending on if the test was successful or not.
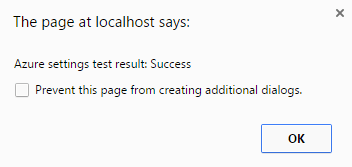 Don’t forget to save your settings!
* * *
You’re now finished: the notes below show show you how to browse your files on the Microsoft Azure management website; this extra information is given just for help (of course, UpdraftPlus do not run the Microsoft Azure management website!).
To browse the files go to the list of storage accounts, click the one you wish to browse, then on the panel to the immediate right click “blobs” (found under “Services)”.
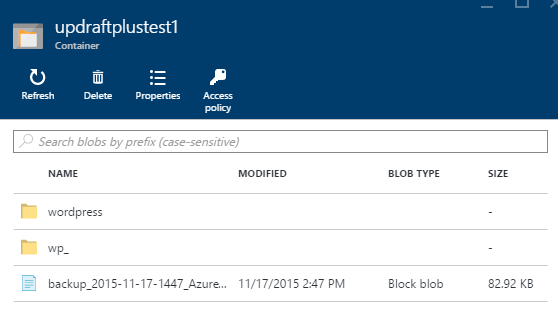
This will open another panel to the right, which will have a list of the Azure container specified in the UpdraftPlus settings.
Click the container which you have specified, a window will then show on the right which will display a list of directories, and files which are inside the storage container. This list of files can be browsed like a normal file system.
UpdraftCentral (17)
What is UpdraftCentral?
UpdraftCentral is remote control for WordPress sites, allowing you to manage lots of WordPress sites from a single dashboard. No need to log in to and juggle lots of dashboards – you can look after them all from a single page, with a single login.
How can I change the order of my sites in my UpdraftCentral dashboard?
You can do this by dragging and dropping them. Pick up the site by tapping on any empty area of its row in the main dashboard, and drag it.
This requires UpdraftCentral 0.6.1 or later.
How do I use UpdraftCentral theme and plugin management?
For a quick and easy guide to using these features, please watch the following video.
How can I allow non-admin users to have an UpdraftCentral dashboard?
(These instructions are valid for UpdraftCentral 0.5.2 and later).
If you want non-admin users to be able to have their own UpdraftCentral dashboard, so that they can add sites and control them, then there are two steps:
1. Add parameters to the short-code
When putting the updraft_central shortcode on a page, use the require_role parameter. This shold be a comma (not space) separated list of roles whom you wish to have access to an UpdraftCentral dashboard. Example:
2. Add a code fragment
The first step will allow users to see a dashboard. To also grant them permissions to use it, you will need to add a bit of code to your site, either as an mu-plugin, or to your child theme’s functions.php file. (You can Google these techniques if they are new to you).
add_filter('updraftcentral_user_can', '__return_true');
That fragment will grant non-admin users who are logged in the ability to UpdraftCentral. This explicit step is possibly slightly annoying, but required for maximum security. (Without it, it would be theoretically possible for a malicious logged-in user to use the facilities of UpdraftCentral, if he was sufficiently skilled, even though not permitted by your short-code). If you are only wanting to add this facility to some users, and not all users, then you will want to inspect the UpdraftCentral source code to see the full potential of this filter.
How do I set clipboard permissions for different browsers?
Giving your browser permission to access the clipboard makes it easy for you to copy the information that you need to connect to UpdraftCentral. Enabling this feature will save you time; instead of manually copying the generated connection key, you’ll see an icon that will copy it for you in one click. Use this guide to set up your browser correctly. Simply select your browser from the list below, and follow the instructions:
Chrome
- Open Chrome browser settings here
- Select Security & Privacy > Site Settings > Permissions > Clipboard
- Select Allow
Edge
- Select the lock icon in the address bar
- Change the Permissions for this site > Clipboard setting to Allow
Firefox
- Open Firefox Browser
- In the address bar, type ‘about:config’ and search
- A page will appear with the option ‘Accept the Risk and Continue’
- For the following two Parameters change the preferences as True:
- dom.events.asyncClipboard.readText
- dom.events.testing.asyncClipboard
If you’re struggling to implement these steps, then as a Premium user, you can reach out for ticketed support. Free users can seek support via the WordPress forum.
What features does UpdraftCentral have?
As well as centralized and remote control of all your UpdraftPlus backups, restorations and migrations, you can also manage and update the themes, plugins and cores of every website you manage.
Built with the latest, state-of-the-art technology, UpdraftCentral is crammed full of features that ensure that you enjoy the best possible user experience:
• As a single-page/dynamic JavaScript application, it won’t annoyingly refresh the page on every action. And because it runs in the front end and on full-screen mode, you won’t have the wp-dashboard getting in your way.
• It sends all communications directly from the browser, rather than through a back-end server, making it much faster and more efficient than traditional management applications.
• For maximum security, all communications between sites are RSA encrypted and signed, and every connection has a unique key-pair. It can be run by localhost, so as an extra security precaution, you can have the dashboard website (i.e. the one that controls all the others) off the public internet.
• It’s mobile-ready and responsive, built to run on any device from day one.
• It’s also extensible and developer friendly: it uses WordPress hooks widely, and all its JavaScript is documented with JSDoc.
UpdraftCentral Premium only:
• A sophisticated WordPress user management system that enables you to create, edit and delete users to contribute whilst giving you full control over their levels of access and permission.
• Fully supported via a professional, fast, ticketed support service and active forum.
• Choice of Cloud hosted. With UpdraftCentral Cloud you have all the features of UpdraftCentral Premium, but we do all the hosting and maintenance of the app for you.
What does it require to run?
If using the UpdraftCentral dashboard via updraftplus.com, all you need is a modern web browser – any version that has not been end-of-lifed by its maker should be fine. (For Internet Explorer, that means IE 10 or later).
For a self-hosted version, your webserver will need to be running PHP 5.3 or later, and WordPress 4.0 or later.
Controlled sites, whatever your version, must have UpdraftPlus 1.12.2 (free version) or 2.12.2 (paid version) or later installed, and can use any PHP version that WordPress runs on, and any WordPress version as far back as 3.2.
How do I install and add a site to UpdraftCentral?
On the sites that you wish to control, you need to have an active copy of UpdraftPlus (the backup/restore plugin) installed.
There are three ways to use UpdraftCentral:
1) Create a new UpdraftPlus account setup option via the UpdraftPlus plugin.
2) Via self-hosting (not via UpdraftPlus.com): Installing the dashboard plugin on your own site.
3) The easiest option: Via your UpdraftCentral dashboard at UpdraftPlus.com (i.e. on our site).
The following video walks you through these three options, or you can read the descriptions below.
1) New UpdraftPlus account setup option via the UpdraftPlus plugin
Make sure you have installed the UpdraftPlus plugin on your WordPress site.
After installing the plugin, press “Settings” in your UpdraftPlus plugin and scroll down to the UpdraftCentral box. Here you can enter and register your email account and password for an UpdraftPlus account and connect your site to the UpdraftCentral Cloud.
Press the “Connect this site to UpdraftCentral Cloud” button, enter your preferred email and password and press “Connect to UpdraftCentral Cloud”. You have now created your own UpdraftPlus account (which can be logged into using the details you just entered) and have connected your site to the UpdraftCentral dashboard.
2) Your dashboard hosted on UpdraftPlus.com
If you want to use UpdraftCentral via your dashboard on UpdraftPlus.com, first make sure you are logged into the UpdraftPlus.com website. Next, navigate to the UpdraftPlus plugin on your WordPress site and press “Advanced Tools”, then “UpdraftCentral”. To connect the site to the UpdraftCentral dashboard in UpdraftPlus.com, just press the blue “UpdraftPlus.com” button to generate a key.
Next, select “Create” and copy the generated key. Finally, go to UpdraftPlus.com/My Account/My UpdraftCentral to access your dashboard. From here you can add a new site using the key you just copied. Just press the plus button, paste the copied key into the box, press “Add website” and your site will be added to your UpdraftCentral account.
You can also purchase some more licences to add to your free allowance!
3) Hosting your dashboard on your own WordPress site
You can also install and activate the plugin in the normal way, via the “Plugins” page in your WordPress dashboard. For the free WordPress.org version of UpdraftCentral, search for the plugin and install (its plugin page is here). For a paid self-hosted version, install via the “upload” facility in that page.
On all the sites that are to be controlled, you will need to install and activate UpdraftPlus via the “Plugins” page in your WordPress dashboard. For the free version you should search in the WordPress.org directory using the search facility on that page – For a paid version, install via the upload facility.
In this plugin, highlight and copy the [updraft_central] short-code and then press the “Pages – > Add New” link. Next, create a short-code widget on your new page and add the copied UpdraftCentral short-code you just copied and save the page. When you visit the new page you just created, it will now show the UpdraftCentral dashboard.
To add your site, go to your UpdraftPlus plugin and and press the “Advanced Tools” tab and the press “UpdraftCentral”.
Press the “Self-hosted dashboard” button, enter your site address and press “create” to generate your UpdraftCentral key. Copy this key and return to your web-page containing the dashboard. In the dashboard, press the plus symbol, paste the copied key into the box and press “add website”. Your site has now been successfully added to your self-hosted UpdraftCentral dashboard.
If you wish non-admin users to be able to use UpdraftCentral (each user has their own list of sites – this won’t give them access to your list of sites), then use the require_role attribute, e.g.[updraft_central require_role="administrator,editor"]
What version of UpdraftPlus do I need to have installed?
On sites that you want to control from your UpdraftCentral dashboard, you will need any version of UpdraftPlus from version 1.12.2 (free version) or 2.12.2 (paid version) onwards is compatible. (This requires a release from March 2016 onwards). Both free and paid versions can be controlled by UpdraftCentral.
How can I control a site that has access controls (e.g. brower password, IP address restrictions)?
This FAQ is about trying to connect your UpdraftCentral remote control dashboard to a site which has additional access restrictions beyond WordPress’s ordinary login mechanism. For example, perhaps it requires a browser password to be entered, or is restricted to specific IP addresses.
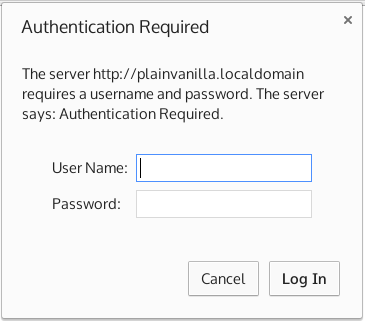
Example of being asked for a browser password
There is no “one-size fits all” answer to this question. This is mainly because:
- there are many different possible access restrictions
- different webservers are configured in different ways
- different web browsers also behave differently and
- the CORS protocol which handles direct authentication (UpdraftCentral, by default, connects directly from the browser to your managed site) interacts with HTTP authentication in complex ways. We have collected together relevant information below, based on all our testing and experience.
- web browsers also have security restrictions on processing of non-https content on https dashboards
Some of the information below is quite technical. Not all of it is relevant to every situation. You ca solve most problems just by tweaking the available options in the UpdraftCentral site configuration, and, as a last resort, trying the “via mothership” connection mode (see the relevant section below).
The most common case: Apache with password-protection
Here’s the short summary of what to do in the most common case: that your webserver is Apache, and protected by a password that’s configured in your .htaccess file. In that case, just complete all of these steps…
- Stick a <LimitExcept> container around your “Require” statement in .htaccess, so that it does not apply to OPTIONS commands.
- Add some extra lines to your .htaccess, so that Apache will send some extra headers that are needed
- Turn off the “Send CORS headers” option in the site configuration for the site in your UpdraftCentral dashboard.
Here’s how the .htaccess file then looks, with Apache 2.4; if copying this, then remember to change the lines indicated to fit with your setup:
# Added a rewrite to respond with a 200 SUCCESS on every OPTIONS request.

RewriteEngine On

RewriteCond %{REQUEST_METHOD} OPTIONS

RewriteRule ^(.*)$ $1 [R=200,L,E=HTTP_ORIGIN:%{HTTP:ORIGIN}]]
# Add the necessary headers. Remember to tweak your site configuration in UpdraftCentral so that UpdraftCentral does not send CORS headers - otherwise, there will be two sets, and it will break.

# Adjust the next line so that it has the address of the server that your UpdraftCentral site is on, including either https:// or https:// as relevant (but not the full path)

Header always set Access-Control-Allow-Origin "https://localhost"

Header always set Access-Control-Allow-Methods "POST, GET, OPTIONS"

Header always set Access-Control-Max-Age "1000"

Header always set Access-Control-Allow-Headers "authorization,x-secondary-user-agent"

Header always set Access-Control-Allow-Credentials "true"
AuthType Basic

AuthName "Authentication Required"

# Adjust the next line so that it points to your .htpasswd file

AuthUserFile "/home/mysite/public_html/.htpasswd"

<LimitExcept OPTIONS>

Require valid-user

</LimitExcept>
If this isn’t your setup, then read on for the more detailed discussion…
SSL dashboard (mothership) controlling non-SSL websites
If the site that your UpdraftCentral dashboard is on (which we call the “mothership”) is using SSL (which is the case for updraftplus.com), then all communications to the controlled site go via the mothership. They cannot be sent direct to the site, because web browsers’ “mixed content” security policies forbid SSL sites from contacting non-SSL sites. As such, regardless of what connection mode you set in the UpdraftCentral settings, if you access your dashboard via SSL, then UpdraftCentral will handle the connection in “via mothership” mode. Please bear that in mind when reading the below! This being so, in this case, none of the material about CORS below will apply (as explained further down).
IP address restrictions
If your webserver restricts access based upon IP addresses, then you will need to add the IP address that you are browsing from to the list of allowed IP addresses. (Connections in UpdraftCentral come directly from the browser, not from the server that the UpdraftCentral dashboard is installed on (a.k.a. the “mothership”) if these are different). If that is not possible (e.g. you are on the move, with limited access to configure your webserver), then you may wish to switch UpdraftCentral’s mode to route all connections via the mothership and allow the IP address of the mothership – see the section on doing so further down.
In Apache 2.4, this is done with statements like the below:
<RequireAll>

Require all granted

# Change the IP address on the next line to yours

Require ip 1.2.3.4

</RequireAll>
Older Apache versions have a different syntax.
Browser passwords (i.e. HTTP authentication)
If access to your website is protected by a password (i.e. not just the ordinary WordPress login password – but a pop-up in your browser that is before you see anything from WordPress), then UpdraftCentral will need this in order to be able to connect.
Settings for configuring a browser password are in the expert section of the “Add Site” window. They can also be edited later by editing the site configuration. Note that it is normal for your browser to also ask you to type in the username and password as well. Whether UpdraftCentral’s configured password, or the one you enter in your browser directly, gets used, can depend upon some complicated (under the hood) interactions.

You will also see the option “Send CORS headers” in this section. Normally, this option should be on. It tells UpdraftCentral on the controlled site to set the headers that are required by the CORS protocol (the protocol which controls what resources a web browser is allowed to fetch from a controlled site). However, CORS and HTTP authentication have some difficult interactions. If you are sure that you are entering the correct username and password, then you should open your web browser’s developer console. If you see errors there about CORS, then try turning off this option. Note, though, that it may also be necessary to add new configuration directly to your webserver. More information on this is below. Also, you can try the “Via mothership” connection mode, also described below. That connection mode eliminates the complexities of the CORS protocol entirely.
Setting CORS headers on password-protected sites
CORS is a protocol for making sure that a web browser can only run code from authorised sites. UpdraftCentral is normally able to handle all of this automatically. However, on password-protected sites, there can be a chicken-and-egg situation:
- UpdraftCentral on the remote site can’t be contacted without the password, and thus it can’t set the needed authentication headers
- But, without the needed authentication headers, the browser won’t allow the resource to be accessed at all, and so won’t even ask for the password
In many cases, UpdraftCentral can detect this issue and work around it, or provide appropriate advice. This cannot be done, however, in 100% of cases. In such cases, you may need to tweak your webserver’s configuration to help.
If you have this problem, then your web brower’s JavaScript console will be mentioning problems to do with CORS and/or access controls.
There are two important things: 1) That your webserver sends CORS headers 2) That your webserver only sends one lot of CORS headers. Please read on for advice. If all else fails, then you can switch UpdraftCentral’s connection mode to route all traffic via the webserver that you have UpdraftCentral installed on (i.e. the “Mothership”) – see the section below on “UpdraftCentral connection mode”.
It’s best to configure your webserver to not require password authentication for an HTTP OPTIONS request. These requests are used by browsers to work out whether the request is allowed. By turning off authentication for OPTIONS requests, this allows UpdraftCentral on the remote site to be reached and to respond that the further requests (which will be password-protected) should be allowed through. This is generally safe to do. OPTIONS requests do not send commands or pass information.
To do this in Apache, edit the Apache configuration where the password is being required, and add a <LimitExcept> statement to cause it to not be required for an OPTIONS request, plus smoe further lines to make Apache return a 200 status code instead of a 401 (unauthorised) code on these requests. Here is an example below of a normal Apache password configuration in an .htaccess file:
AuthType Basic

AuthName "Authentication Required"

AuthUserFile "/home/mysite/public_html/.htpasswd"

Require valid-user
And here is the same configuration, but now with the <LimitExcept> command added so that it will not require a password with an OPTIONS request, and the other extra lines:
# Added a rewrite to respond with a 200 SUCCESS on every OPTIONS request.

RewriteEngine On

RewriteCond %{REQUEST_METHOD} OPTIONS

RewriteRule ^(.*)$ $1 [R=200,L,E=HTTP_ORIGIN:%{HTTP:ORIGIN}]]
AuthType Basic

AuthName "Authentication Required"

AuthUserFile "/home/mysite/public_html/.htpasswd"

<LimitExcept OPTIONS>

Require valid-user

</LimitExcept>
In the lighttpd webserver, you can do similiar things like so:
$HTTP["request-method"] != "OPTIONS" {

auth.backend = "htdigest"

# (etc. - the rest of your authentication configuration)

}
If you need to get your webserver to send the CORS headers, then go to the UpdraftCentral site configuration, and turn off the option for UpdraftCentral on the remote site to send them (otherwise, you will have two sets – which breaks the CORS protocol). Then, add webserver configuration to send these directly. Here is an example for Apache – you will need to change the origin header to specify the server (but not the full path) for the site that has the UpdraftCentral dashboard on it; in the example below, the dashboard is on https://localhost
# Change the next line to match where your UpdraftCentral dashboard is hosted

Header always set Access-Control-Allow-Origin "https://localhost"

Header always set Access-Control-Allow-Methods "POST, GET, OPTIONS"

Header always set Access-Control-Max-Age "1000"

Header always set Access-Control-Allow-Headers "authorization,x-secondary-user-agent"

Header always set Access-Control-Allow-Credentials "true"
With the lighttpd server, it is easiest to leave the option for UpdraftCentral to send CORS headers (in the site configuration on), and only configure lighttpd to send those headers with OPTIONS requests, with a fragment like the below (again, remember to edit the origin header):
$HTTP["request-method"] == "OPTIONS" {

# Edit the origin header to indicate the address of the site with your UpdraftCentral dashboard

setenv.add-response-header = (

"Access-Control-Allow-Origin" => "https://localhost",

"Access-Control-Allow-Methods" => "POST, GET, OPTIONS",

"Access-Control-Max-Age" => "1000",

"Access-Control-Allow-Headers" => "authorization,x-secondary-user-agent",

"Access-Control-Allow-Credentials" => "true" )

}
Remember that, if this all gets too complex, you can change UpdraftCentral’s connection mode (see below), to avoid issues with CORS completely.
UpdraftCentral connection mode
In the vast majority of cases, UpdraftCentral will “just work”. However, sometimes, it may be necessary to go into the advanced settings, and change the “connection mode” for a particular site, in order to be able to control it.
Normally, UpdraftCentral will connect to the site directly from the browser, for the fastest possible results. However, on some setups, this may be problematic – e.g. if your site only allows access to specific IP addresses and your browser is on a floating IP, or if you use HTTP authentication and are unable to configure your server to send the necessary CORS headers to get this to work (see the relevant sections above for information on what this means). In this case, changing your connection mode may help. A description of the available modes is below.
The available connection modes are:
- “Direct (authentication method chosen automatically)” – this is the default. It contacts the remote site directly via AJAX (cross-site request). In the event of an HTTP username/password being entered in the configuration, it will decide itself on the best way to try this. This decision is based on your web browser, because different web browsers behave differently in this case.
- “Direct (authentication via jQuery)” – this also contacts the remote site directly. It’s identical, unless there’s an HTTP password. If there is, it’ll use the method of sending HTTP authentication that works in most web browsers. This can support any method of HTTP authentication (e.g. basic, digest, NTLM) that your web browser supports.
- “Direct (manually constructed authentication)” – also direct, and uses (if necessary) the HTTP authentication method that works in Firefox, and possibly other browsers too. If the site does have HTTP authentication, then only HTTP “basic” authentication can work; digest (or other) forms of authentication are not supported.
- “Via mothership (slower, but better compatibility with some awkward setups)” – this works like traditional remote control plugins do. It sends the request via AJAX to the mothership (i.e. the UpdraftCentral plugin on the mothership), which then sends it on to the remote site. If HTTP authentication is needed, it can support HTTP “basic” authentication and “digest”, as long as your mothership is running PHP 5.4+; if running an earlier version, then digest (or other) forms of authentication are not supported. It is slower, because of the relaying of the request and reply (instead of direct browser-to-site communications).
How are payments for the managed UpdraftCentral dashboard taken?
If you purchase a subscription to access the UpdraftCentral dashboard on updraftplus.com, then this is paid for using PayPal or a card. In the case of card payments, payments will be processed automatically each month or year (depending on your choice). We do not store your card details under any circumstances; rather (for card payments) we use stripe.com, one of the web’s most trusted and most widely-used payment vendors, complying with the highest standards for card security. You can cancel your recurring payments at any time by logging in at updraftplus.com.
If you purchase the self-install plugin for hosting the dashboard on your own site (i.e. running your own mothership), then this is a one-time purchase (and hence has a one-time charge).
I want to use UpdraftCentral in “full screen” mode, so that I don’t have screen space used by all the other things on my site.
Tap on the full-screen icon in the top-right of your UpdraftCentral dashboard. Tap it again to leave full-screen mode. Alternatively, double-click the “U” logo in the top-left.
I accidentally deleted my site or connection keys, and need to reconnect.
This is done via adding the site again as a new site, following the same procedure as for a new site.
How can I disconnect a site from an UpdraftCentral dashboard?
A site can be disconnected from either end. If you have access to the UpdraftCentral dashboard, then you click on the site’s menu, and choose the “Remove site” option. The connection will then be destroyed (specifically, the encryption keys used to make the encryption are deleted). If you have access to the site that is being controlled, then you should go to UpdraftPlus, and to the “Advanced” tab, and delete the encryption key for the connection.
What are your future plans?
We have big plans for UpdraftCentral. It has been coded to be modular and extensible, allowing us to add features for controlling much more of WordPress.
How can I see the event log for managed (child) sites for UpdraftCentral?
If you want or need to see the event log for a managed (i.e. child) site with UpdraftCentral, then do this:
1. Go to the UpdraftCentral key management in the managed site
Log in to your WordPress dashboard on the managed site. Go to the UpdraftPlus settings page, and to the “Advanced Tools” tab (the easiest way to do this is using the drop-down menu on your admin bar, after logging in).
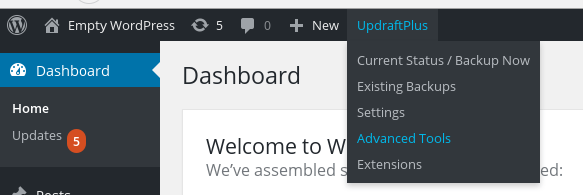
Within the “Advanced Tools”, scroll down to the “UpdraftCentral (Remote Control)” section.
2. Click on the link to fetch the log at the bottom
At the bottom of the UpdraftCentral section is the words “View recent UpdraftCentral log events” (or similar), and a link next to it. In the screenshot below, it is at the bottom, with the word “Fetch…”. Click on it!

This should then show you your recent log events, most recent first. It shows you the time of the log event, the IP address of the site that sent the command (which should be your mothership site’s (i.e. dashboard webserver’s) IP address), the key that was used (these correlate with the list of keys further up the page), and then the log data.
Two-Factor Authentication (2)
Two-Factor Authentication WordPress Plugin | Screenshots
Screenshots
The user is asked for their one-time password, after successfully entering their username and password on the WP login form:
This is what the user sees if they enter their pass-code wrongly:
The user is asked for their one-time password, after successfully entering their username and password on the WooCommerce login form:

This is what the user sees if they enter their pass-code wrongly:

This screen is of the user editing their two-factor settings in the WP dashboard:
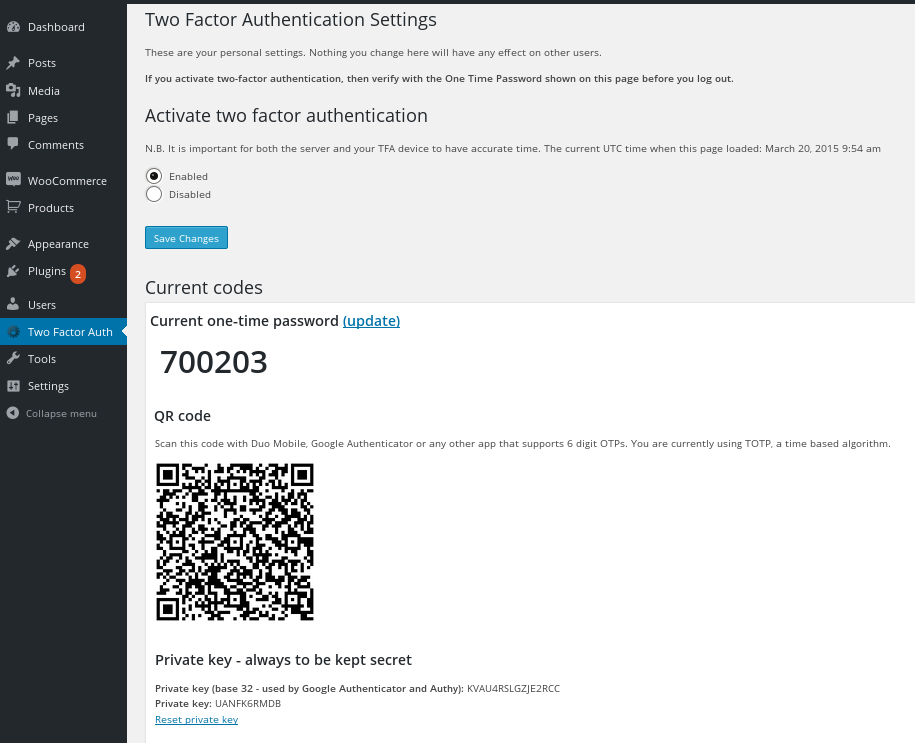
The user’s settings can also be made available to edit on the front-end, via a shortcode:
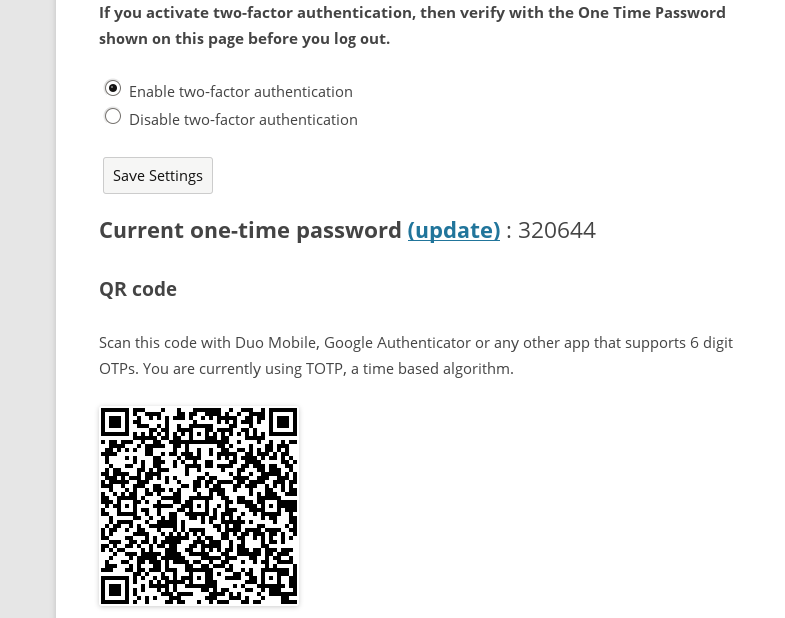
Site-wide settings for the plugin:
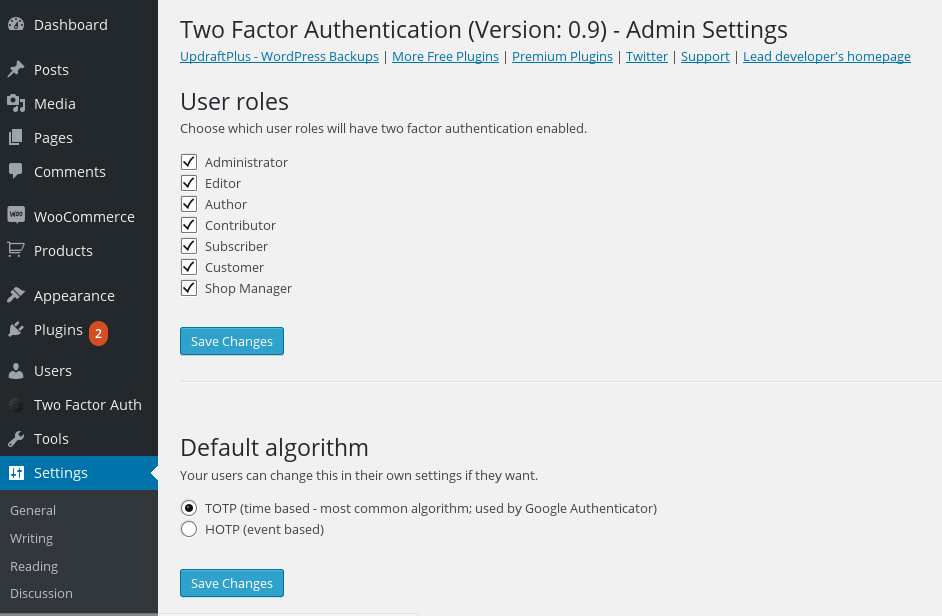
Setting policy to require TFA:
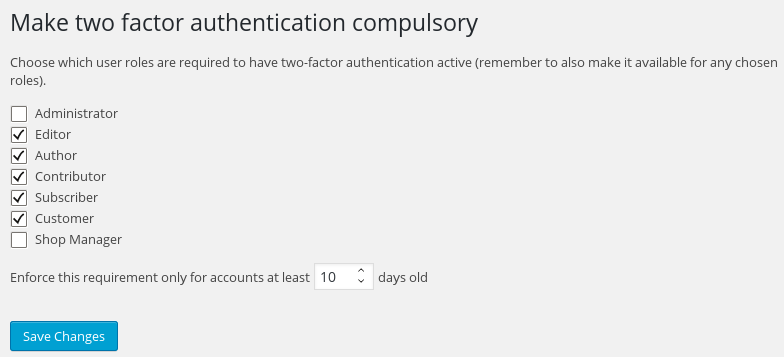
Emergency codes:

Adjusting other users’ TFA codes as an administrator:

Designing your own page for users, using shortcodes:
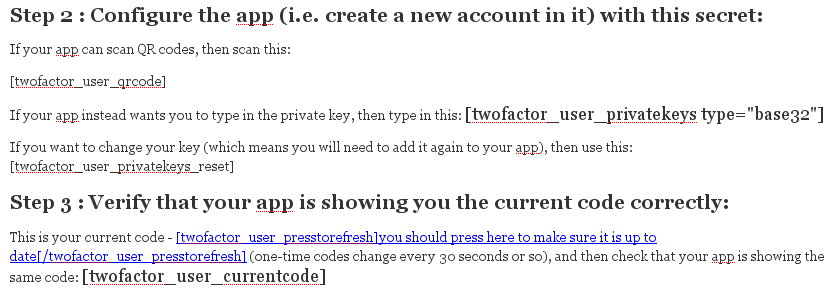
Two-Factor Authentication | Shortcodes
Short-codes
The following short-codes are available:
twofactor_user_settings : This short-code will display the whole user configuration. Use this to allow your users to get/set their TFA settings. Alternatively, to design the page yourself, you can use the individual short-codes, following:
twofactor_user_settings_enabled : Display the option to turn TFA on or off.
twofactor_user_qrcode : Display the user’s QR code for scanning.
twofactor_user_emergencycodes : Display the user’s emergency codes.
twofactor_user_advancedsettings : Display the user’s advanced settings (e.g. selecting TOTP or HOTP).
twofactor_user_privatekeys : Display the user’s private keys. Use the ‘type’ parameter, with values ‘full’ (default), ‘plain’, ‘base32’ or ‘base64’ to control exactly what is displayed.
twofactor_user_privatekeys_reset : Display a link for the user to reset (change) their private key.
twofactor_user_currentcode : Display the current TFA code.
twofactor_user_presstorefresh : Wrap this shortcode around any HTML that you want to cause the current TFA code (displayed by the twofactor_user_currentcode shortcode) to refresh when clicked.
twofactor_conditional : Wrap this shortcode around any content that you wish to be displayed only if the condition is met. The condition is specified by the “onlyif” parameter, with valid values: activate, inactive, available, unavailable. The content will be shown depending on whether the user has TFA available (i.e. the administrator has allowed it for their user level)/activated. You can use this, for example, to display notices to your users to suggest that they activate TFA, or to remind them that it is available, etc.
Other remote storage questions (2)
Do you / will you support Amazon Cloud Drive as a storage destination?
N.B. This question is about Amazon Cloud Drive, not about Amazon AWS S3. UpdraftPlus has supported sending backups to Amazon S3 for several years.
No, UpdraftPlus does not support Amazon Cloud Drive, and we have no plans to support it. Amazon are pitching this as a storage solution for media, particularly photos. They have not made any developer documentation or development toolkits available for arbitrary storage. All their signals are that they wish things like website backups to be stored in S3, for which they have abundant developer support. As such, to try to support Cloud Drive would be trying to fight uphill, and past experiences of supporting storage backends that the vendor was lukewarm about have not been positive. Therefore, we will not be doing it.
Why does UpdraftPlus store my FTP/SFTP password unencrypted?
In order to upload backups to your server via SFTP or FTP, a security token is required to give the plugin access. In the case of FTP, this is a password, while SFTP can use a password or security key. To allow the plugin to access the server unattended, this password is stored in the WP database.
Due to how the FTP and SFTP protocols use and send passwords, this cannot be stored using one-way encryption like the WordPress password.
In this situation, UpdraftPlus does not encrypt the password in the database, as this would be redundant. The only persons who should have access to your WP database are yourself and any trusted administrators.
But doesn’t encrypting the password provide an extra level of security?
There are two methods by which an attacker or other malicious individual could gain access to the database, and therefore the password.
If they have accessed the database via the backups stored in your FTP/SFTP server, then apparently they already have access to your password or another method of accessing the server, thus reading the password from the database would be redundant.
If they instead have access to the live database, then they have complete access to your site and data, including any encryption scheme which could be used to encrypt the FTP password.
As such, encrypting the FTP/SFTP credentials in the database would not provide any real additional security. It is instead better to keep strong user passwords and up-to-date security plugins for the site.
Google Analytics (1)
What is the privacy policy for use of your Google Analytics app?
Use of Google Analytics with UpdraftCentral involves visiting our authentication server (website) as part of the authentication (OAuth) flow. Note that no data from your WordPress site goes to our servers – this all remains on your server on which you are hosting WordPress. The authentication procedure will cause:
- Your IP address to be logged in our webserver logs. No further processing of these logs is carried out. These logs are kept for 6 months in accordance with UK law, and then automatically deleted. We carry out no further processing on them. They are not shared with any third party.
- (If authentication succeeds) your Google account identifier to be stored in the authentication server’s database, so that the necessary authentication token can be given to your site if it requests it again. We carry out no further processing on them. They are not shared with any third party.
No other data is sent or implicitly gathered by any of our servers in the process of using Google Analytics. Any changes to this privacy policy in future will be notified of on this page.
GDPR (6)
I wish you to delete all personal data which you hold upon me (GDPR “right to be forgotten” / “right to erasure”)
EU individual citizens have a right to erasure of their personal data, under the GDPR law. At UpdraftPlus, we are happy to extend this right to all users, world-wide, as we believe it is based upon good principles. You can read more about this legal right here, at the website of the UK Information Commissioner’s Office (the UK body which overseas data protection, including GDPR issues).
Data that we process
Firstly, you may want to familiarise yourself with how UpdraftPlus / UpdraftCentral process data, which you can read about here. If you have not got an updraftplus.com account (e.g. to use UpdraftCentral Cloud) then, as you can read there, we have no data that concerns you. You do not have an updraftplus.com account unless you created one (either manually, or by purchasing something). Please help us to invest as much resources as we can in improving our products by not asking us to delete data if we do not have any! To be clear: if you have no login at https://updraftplus.com/my-account/, then we do not have, and cannot process, any of your data, and thus have nothing to delete.
Data that we do not hold
Secondly – note that if you are using the free version of UpdraftPlus from https://wordpress.org/plugins/updraftplus/ or of UpdraftCentral from https://wordpress.org/plugins/updraftcentral/ , or any other wordpress.org plugin, then any data relating to updates of that version (i.e. updates requests sent to wordpress.org, and the information which they store relating to such requests/updates), or support of that version in their forum, is held by wordpress.org – i.e. the WordPress Foundation. We have no more access to it than you do. If you wish it to be deleted, then you will need to contact the WordPress Foundation.
Limitations upon rights to delete data
There are other laws, except the GDPR, which touch upon the deletion of data. In particular, there is some data which we are legally required to maintain for a time. For example, VAT (sales tax) laws require us to keep purchase data for audit purposes for a minimum of 10 years after purchase. UK data retention laws require us to keep webserver access logs for 6 months – after which they are automatically deleted. The GDPR also allows anonymization, instead of deletion of data, in some circumstances. Anonymization means that there is no way to trace the data back to you. Specific information follows.
What data we will delete or anonymize/scramble
- All your support form entries will be deleted from our website’s database. (This also happens automatically after 6 months).
- All your support ticket entries in our account with our support helpdesk software supplier (Helpscout) will be deleted.
- All your posts in our website support forum will be immediately deleted.
- If you are a customer, then your updraftplus.com account will be locked to prevent future logins. If you are not a customer, then it will be deleted. (See further below for the reason for the distinction).
- Any/all data in your UpdraftVault storage will be deleted.
- Any/all data in our licensing database tables concerning licences owned and sites connected will be deleted.
- Any/all entries in our UpdraftCentral Cloud database tables will be deleted.
- Any/all entries in our UpdraftClone database tables will be deleted.
- Any/all data pertaining to you in our MailChimp account will be deleted.
Things that are not deleted, or which are deleted later, with reasons
- Webserver access logs are deleted automatically after 6 months, but not before, for compliance with UK data retention laws, and for auditing and security purposes.
- We do not delete information out of our website backups, because this is technically too difficult to accomplish. However, they are stored encrypted after a number of months (depending on our current policy). We also keep a log of deletion requests so as to be able to a) demonstrate compliance and b) re-run any deletion requests in the event of needing to restore a backup.
- Sales records and data held by payment vendors (PayPal, Stripe) are retained for a minimum of 10 years, to comply with taxation/auditing laws, and our own accountancy and auditing requirements.
Requesting deletion
To request deletion of your personal data, please use this form. If you are not a paying customer, then you can leave the relevant fields empty, and explain in the message input area. If you are an EU citizen, then we are granted one month to respond to the request (usually, one month to carry it out). We will take steps to verify your identity, to prevent fraud/abuse (“social engineering” attacks).
What is your privacy policy for the use of your Microsoft OneDrive app?
This privacy policy is published by the creators of UpdraftPlus, Updraft WP Software Ltd. (please see the footer of this page for company registration number). It applies only if you are using our built-in app for authentication. If you configure UpdraftPlus to use your own app, then it does not apply, and in that case no data comes to any of our servers.
Use of Microsoft OneDrive with UpdraftPlus involves visiting our authentication server (website) as part of the authentication (OAuth) flow. Note that no backup data or other data from your WordPress site goes to our servers – this all remains on your server on which you are hosting WordPress. The authentication procedure will cause:
- Your IP address to be logged in our webserver logs. No further processing of these logs is carried out. These logs are kept for 6 months in accordance with UK law, and then automatically deleted. We carry out no further processing on them. They are not shared with any third party.
- (If authentication succeeds) your Microsoft OneDrive account identifier may be stored in the authentication server’s database, so that the necessary authentication token can be given to your site if it requests it again. We carry out no further processing on them. They are not shared with any third party. Note that at the time of writing, we do not currently perform this storage, as OneDrive’s authentication procedures do not make it technically advantageous. (We merely reserve the right to do so if it becomes technically helpful in future).
No other data is sent or implicitly gathered by any of our servers in the process of using Microsoft OneDrive. Any changes to this privacy policy in future will be notified of on this page.
Who is your appointed data protection officer?
Updraft WP Software Ltd. does not fall under the requirements of article 37 of the GDPR, and as such, is not mandated to designate a single individual as the legally named data protection officer. (The GDPR does not intend this to imply, and this in no way implies, a lessening in our data protection responsibilities). If you have any data protection issues that you want to address with us, then please feel free to do so using any of our available support/contact channels.
What is your privacy policy for the use of your Dropbox app?
This privacy policy is published by the creators of UpdraftPlus, Updraft WP Software Ltd. (please see the footer of this page for company registration number). It applies only if you are using our built-in app for authentication. If you configure UpdraftPlus to use your own app, then it does not apply, and in that case no data comes to any of our servers.
Use of Dropbox with UpdraftPlus involves visiting our authentication server (website) as part of the authentication (OAuth) flow. Note that no backup data or other data from your WordPress site goes to our servers – this all remains on your server on which you are hosting WordPress. The authentication procedure will cause:
- Your IP address to be logged in our webserver logs. No further processing of these logs is carried out. These logs are kept for 6 months in accordance with UK law, and then automatically deleted. We carry out no further processing on them. They are not shared with any third party.
- (If authentication succeeds) your Dropbox account identifier may be stored in the authentication server’s database, so that the necessary authentication token can be given to your site if it requests it again. We carry out no further processing on them. They are not shared with any third party. Note that at the time of writing, we do not currently perform this storage, as Dropbox’s authentication procedures do not make it technically advantageous. (We merely reserve the right to do so if it becomes technically helpful in future).
No other data is sent or implicitly gathered by any of our servers in the process of using Dropbox. Any changes to this privacy policy in future will be notified of on this page.
What data do we send to Mailchimp?
We export data for all users who have an getwpo.com account (via a purchase or direct sign-up – you do not have one merely by using the free WP-Optimize plugin) into a Mailchimp account managed by our partner. (You can see details of the strict data processing agreement with our partner here).
Any campaign or multiple-recipient email that we send with Mailchimp goes to a list which is a defined subset of this data. The fields we import into our Mailchimp account are the full name (to allow personal addressing of emails), email address (so that the email can reach the recipient) and purchase history (so that we can create mail-outs that target the desired set of people, e.g. notifying of an important enhancement for a product you have bought, without mailing people who have not bought it).
Under the GDPR right to be forgotten, any user who requests to be forgotten will have their data deleted from our website, which in turn will be deleted automatically from Mailchimp.
What is your privacy policy for the use of your pCloud app?
This privacy policy is published by the creators of UpdraftPlus, Updraft WP Software Ltd (UK) (please see the footer of this page for company registration number). It applies only if you are using our built-in app for authentication. If you configure UpdraftPlus to use your own app, then it does not apply, and in that case no data comes to any of our servers.
Use of pCloud with UpdraftPlus involves visiting our authentication server (website) as part of the authentication (OAuth) flow. Note that no backup data or other data from your WordPress site goes to our servers – this all remains on your server on which you are hosting WordPress. The authentication procedure will cause:
- Your IP address to be logged in our webserver logs. No further processing of these logs is carried out. These logs are kept for 6 months in accordance with UK law, and then automatically deleted. We carry out no further processing on them. They are not shared with any third party.
- (If authentication succeeds) your pCloud account identifier may be stored in the authentication server’s database, so that the necessary authentication token can be given to your site if it requests it again. We carry out no further processing on them. They are not shared with any third party. Note that at the time of writing, we do not currently perform this storage, as pCloud’s authentication procedures do not make it technically advantageous. (We merely reserve the right to do so if it becomes technically helpful in future).
No other data is sent or implicitly gathered by any of our servers in the process of using pCloud. Any changes to this privacy policy in future will be notified of on this page.
Privacy policy (1)
What data do we send to Mailchimp?
We export data for all users who have an getwpo.com account (via a purchase or direct sign-up – you do not have one merely by using the free WP-Optimize plugin) into a Mailchimp account managed by our partner. (You can see details of the strict data processing agreement with our partner here).
Any campaign or multiple-recipient email that we send with Mailchimp goes to a list which is a defined subset of this data. The fields we import into our Mailchimp account are the full name (to allow personal addressing of emails), email address (so that the email can reach the recipient) and purchase history (so that we can create mail-outs that target the desired set of people, e.g. notifying of an important enhancement for a product you have bought, without mailing people who have not bought it).
Under the GDPR right to be forgotten, any user who requests to be forgotten will have their data deleted from our website, which in turn will be deleted automatically from Mailchimp.
UpdraftClone (11)
Can you tell me about the security of UpdraftClone?
We have sought to make UpdraftClone secure by design, by default, and make sure that all your data remains private. Measures taken include the following:
- When you create a temporary clone of your website with UpdraftClone, a new VPS (virtual private server) is started up, just for this clone. You share the virtual machine with nothing. There is no other website on the machine that can (if it were able to break out of its own constraints) touch your clone.
- All clones have a fresh, unique SSL certificate registered for them, so that they can be accessed securely. The backup set for the site being cloned is also additionally encrypted in transit at the application layer.
- All clones are run in a contained SELinux (security-enhanced Linux) environment.
- The option to prevent non-administrators from logging in to the clone is provided. i.e. If you are cloning a site with other users, then even if one of those users should find the site, he still won’t be able to log in to it.
- For the administrative shell on the server, at the operating system level, administrative login is forbidden, and password-based initial logins are forbidden. The only way that even our own staff can obtain administrative access to the server in order to provide any requested support is via two factors.
Can I use UpdraftClone to test out my site on a different WP or PHP version?
Yes, you can. After you have connected to your account, you will be shown options for WordPress and PHP versions:
How can I view the PHP log on my UpdraftClone?
Sometimes a developer wants to view the PHP log. With a site cloned via UpdraftClone, there are two ways to do this:
- The PHP log was it was a few minutes after your clone began can be viewed in your updraftplus.com account, in the ‘clones’ section. This is best for finding problems that stop you being able to reach WordPress entirely (e.g. You are trying out a clone of your site on a different PHP version).
- You can install a suitable plugin in WordPress, like this one, and view your log there.
I no longer need my UpdraftClone. How can I shut it down?
You can do this in your updraftplus.com account, on the ‘clones’ page.
How can I show someone else a website I am working on in UpdraftClone?
Simply give them the URL (i.e. address) for it. You can get this either from the email you received when it was set up, or from the ‘Clones’ section in your updraftplus.com account.
How can I get shell or FTP access on my UpdraftClone?
This is not a current feature; currently, only our support staff have this access to the VPS (Virtual Private Server) that runs an UpdraftClone cloned website. We will consider adding it if there is enough demand.
What are the terms and conditions for using UpdraftClone?
You must accept the following terms and conditions to use UpdraftClone.
UpdraftClone is intended for website owners to be able to easily create a quick clone of their WordPress website, for “internal” or development use. It is not intended for public website hosting or storage facility of any sort, or for any other purpose than the one given above, and use for any other purpose than this intended one is explicitly forbidden.
Furthermore, all hosting of any content either illegal or forbidden by any sort of statue (e.g. not just criminal law, but also copyright or intellectual property statues) or forbidden by us in any of your jurisdiction, the EU, the UK, the US, New York or any jurisdiction that you choose to host the clone in (should a regional hosting optional be made available) is also explicitly forbidden.
Content forbidden by us (for the purposes of the above paragraph) includes any content (whether video, audio, written or otherwise) that is pornographic, sexually explicit, in any way obscene or in any way abusive (regardless of whether or not those involved have given any form of consent to the material). If in doubt about you can and should ask us in advance for clearance. Failure to comply with this term means that you accept that any clones and your account may be deleted without further notice or refund. The sole exception to the above clause is for legally registered charities whose registered purposes include campaigning against sexual exploitation, and the clone is made as part of carrying on this purpose.
Furthermore, also explicitly forbidden is the running of any of the following: (i) trojans, (ii) key loggers, (iii) viruses, (iv) malware, (v) botnets, (vi) denial of service attacks, (vii) flood or mail bombs, (viii) logic bombs, or (ix) other actions which we reserve the sole right to determine to be malicious in intent.
You must, in all cases, agree that 1) you are entirely liable for all hosted content and that 2) we will comply with all due legal demands that arise in relation to your use of UpdraftClone, and 3) we have the full and sovereign right to immediately terminate any or all UpdraftClone services to you (with or without a refund, depending on the nature of the case).
If you have somehow gained access to somebody else’s website, then you are forbidden to clone it using UpdraftClone without the explicit permission of the owner of that website. Note that in many jurisdictions, this is also a crime.
You are also forbidden to access an UpdraftClone for which the owner has not given you explicit permission to do so. Note that in many jurisdictions, this is also a crime.
You explicitly agree that, with respect to data processing laws, you are solely responsible for any and all data processing carried out by your WordPress installation or any linked services. In legal terms, you are the sole data controller for any data in or handled by your WordPress install or any linked servies.
If your UpdraftClone is deleted as a live instance due to running out of credit on your account, it will be imaged (backed-up) and the data stored before automatic deletion of the image after at most 28 days. This is for recovery purposes only (e.g. protects in situations in which you ran out of credit, and you did not see any or act upon any notifications, and the UpdraftClone was automatically deleted whilst you still wanted it). During this period this data is not processed (only stored). After the retention period all data is removed and your UpdraftClone can no longer be recovered. You can request earlier deletion if you desire. N.B. This precautionary backup is not officially a part of the paid service (it is intended as an extra protection for users); if you desire absolute protection against losing your work then you are advised to use UpdraftPlus within WordPress to take your own backups.
Technical restrictions
You are forbidden to circumvent or seek to circumvent the mechanisms below, or use other means to achieve the same ends, or to circumvent any other technical restriction in place on a clone.
- Your clone is set up to host one WordPress installation, on a URL of our choosing. It is not possible to host under your chosen domain, or add further sites.
- Sending of any email via any mechanism whatsoever is forbidden. Since clones are short-lived, the IP addresses are quickly recycled, and we have to maintain the IP address reputation as part of our good relationship with the physical datacentre. Note that, to enforce this, UpdraftClone is locked down to forbid sending of outgoing mail via SMTP or via WP’s
wp_mail()or PHP’smail()functions. You can use a suitable logging plugin to see what mail WordPress would have sent (you may find one already installed by default).
What is the largest site that I can clone with UpdraftClone?
Starter 25GB disk space
Size 2 50GB disk space
Size 3 80GB disk space
Size 4 160GB disk space
The clone package you need to select will depend on how big the site your cloning is. For example,; if your site takes up 30GB of space when backing up, then you will need the “Size 2” package to create a large enough clone to include all your site data.
For further information, please click on this link.
Does UpdraftClone have SSH and SFTP access?
Yes. One click SSH login and SFTP access allows you to easily manage and make changes to your clone.
Do unused UpdraftClone tokens expire?
No. Once you have purchased UpdraftClone tokens, they remain on your account until they are used.
The only exception to this is if no activity happens on your account for some years (no logins, no purchases, no use of UpdraftClone, UpdraftVault, UpdraftCentral, etc.), then for data privacy reasons you may eventually be deemed an ex-customer, and your account deleted.
How to clone a WordPress site using UpdraftClone
Full written and video instructions on how to clone a WordPress site using the 2 different UpdraftClone methods can be found at the following link: How to clone a WordPress site using UpdraftClone
Linode Cloud Storage (1)
How do I use UpdraftPlus with Linode Cloud Storage?
Linode is an object (i.e. file) cloud storage system that uses the S3 protocol. As such, it can be used with UpdraftPlus’ “S3 (Generic)” module. All you need to do, is to enter the correct settings.
- Get your API key
Generating
In order to generate an API key for your Linode account, please perform the following steps.
- Log in to the Linode Manager.
- Select the my profile link.
- Enter your password and click Authenticate.
- Select the API Keys tab.
- Optional: Type a label for the API key in the Label field.
- Optional: Set an expiration time using the Expires dropdown menu. By default, the key will never expire.
- Click the Create API Key button.

8. You will see a message appear at the top of the page, displaying your new API key. Copy this key and save it in a secure location.

Caution
This is the only opportunity you will have to view and copy the new API key. In the future, only the key prefix will be displayed on this page.
Now you have the API key for your Linode account. Note that this key is associated with your own Linode Manager account user, so it has the same permissions for interacting with your account.
You can create as many keys as desired with different labels and expiration times.
- Enter the settings into UpdraftPlus
Go to your UpdraftPlus settings page in WordPress, and go to the ‘Settings’ tab. Choose the “S3 (Generic)” storage option (not the Amazon S3 one):

In the settings, you need to enter the following 4 points:
- The end-point. This depends upon which Linode region you want to use for the storage. The end-point is (region).linodeobjects.com – e.g. us-east-1.linodeobjects.com.
- The access key, which you got in the earlier step.
- The secret key, also from the earlier step.
- In the “location” field, enter your bucket name (and if you like, a path). This is up to you… but if you get an error message back, then you probably either used a disallowed character, or you used a bucket name that another Linode user had already taken. (The name-space is shared globally). So, pick another one.
You can then press the ‘Test’ button, and hopefully you will get a positive result. If not, go back and double-check everything that you have entered.

UpdraftGold (15)
Tell me about my UpdraftPlus.Com account (including data protection and privacy issues)
N.B. Simple use of the UpdraftPlus plugin does not necessarily mean that you have an updraftplus.com account. You only have an updraftplus.com account if you created one (please see the details below).
Implications of having an updraftplus.com account
In order to buy UpdraftPlus add-ons, UpdraftPlus Premium or UpdraftVault storage space, or to purchase or use a free trial for UpdraftCentral Cloud, you have to create an updraftplus.com account. (In the cases of purchases, this is done when you go through the checkout in our shop). When you do so, you will be asked to give your email address and give yourself a password. With an account at updraftplus.com, you can use the purchased facility (if it is a software-as-a-service purchase like UpdraftVault or UpdraftCentral Cloud), or to download your software or invoices, or to claim support.
Creating an account in itself does not allow us to:
- Make purchases, or access your PayPal account in any way. That is technically impossible. All payments handled by PayPal are handled on their site (www.paypal.com). All that we get to know about it is that PayPal send us a notification that the payment has cleared – and our PayPal account balance then increases. All details of how you paid, bank accounts, bank cards, etc., remain entirely between you and PayPal. That’s PayPal’s design, it’s great, and we have no desire or power to change it. The exception to this is subscription purchases, which provide us with a secure token which can (only) be used to subsequently make a repeat purchase of the same item later.
- Do anything with your WordPress site. It is not your WordPress password. It can’t be used to log in to your WordPress site or do anything else on it. (Of course, if you subsequently explicitly connect a WordPress site to our remote control application, UpdraftCentral Cloud, then, the purposes of that applicationis remote control. We, however, have no legal right to exercise this facility; only you do, unless you specifically ask us to do so (e.g. as part of a support request)).
If someone gets hold of your updraftplus.com password, then what could they potentially do with it? In the normal case, not very much. Basically, they can log in to your UpdraftPlus.Com account. You can prevent that by turning on two-factor security. From there, they can view details of your purchases. They could also claim licences for software add-ons that you purchased on their sites. You’ll be able to see if they do this, because when you log in and see the list of which sites you’re using add-ons on, you’ll spot it. If you have connected other services, then they can do more. If you have purchased UpdraftVault storage space, then they could store their backups in your storage space. If you have connected sites to UpdraftCentral Cloud for remote control, then they could control your connected site. If you are using UpdraftCentral Cloud, then we would underline our recommendation of two-factor security.
You will need to type in your updraftplus.com username and password into your WordPress site when connecting to your updraftplus.com account, in order to claim your purchases. This then allows you to receive automatic updates to UpdraftPlus through the usual WordPress dashboard. If at any time you don’t wish to receive updates, or wish to not connect to your updraftplus.com account any more, then simply remove the username from your settings. It will not delete your already-downloaded add-ons. So removing it is quite safe.
Note that after you have successfully connected and activated your add-ons, you can then remove your password (i.e. enter a blank password and press the ‘Connect’ button again). Your password will then not be stored on the WordPress site, but it will still be able to access updates. (This is done automatically since version 1.11.1, August 2015).
Note that you can lock access to the UpdraftPlus settings page in your WordPress dashboard using the “lock admin” feature, which is part of UpdraftPlus Premium.
Data processing and privacy
Concerning data processing in relation to the use of UpdraftPlus, UpdraftVault, UpdraftCentral, site cloning and other features, and visiting our websites, please see the information on this page. You must agree to these uses in order to have an updraftplus.com account.
Right to deletion
You have a right to delete your account at any time. This will, out of technical necessity, mean that connected services (e.g. access to plugin updates, use of UpdraftVault space, use of UpdraftCentral) will stop working. It will not cause UpdraftPlus itself, installed on your WordPress site, to stop working (there is no requirement to maintain an updraftplus.com account in order for UpdraftPlus to operate). If you wish to delete your account, then please make a request here. We will need to authenticate your request to prevent abuse. Please note that we will need to retain some data on any purchases in order to comply with taxation and auditing laws (note that the EU’s GDPR regulation specifically recognises that the right to deletion does not apply to data that other laws require to be maintained).
Where is my data stored?
UpdraftVault will store multiple (i.e. redundant) copies of your backups at data-centres in multiple locations. Although we cannot guarantee the precise location of your data, it will be at the nearest possible location, prioritising data centres within your continent, and you can see where it is in your account. Currently there are data centres in the USA, Canada, India, South Korea, Singapore, Australia, Japan, Germany, Ireland, the UK, France, Sweden, Brazil and Hong Kong.
Is my WordPress backup data routed via your (UpdraftPlus)’s servers?
No. The UpdraftPlus plugin, installed on your website, will send your backup data directly to the storage cloud. It is not routed through any of our servers.
Is UpdraftVault data encrypted?
Yes: data is both sent over an encrypted connection to the storage cloud and stored encrypted on the server. Encrypted storage on the server requires your WordPress install to be running PHP 5.3 or later (which is very likely – the PHP version before that, 5.2, was end-of-lifed in January 2011).
You can also encrypt your database with a passphrase only known to you (whether for storing in UpdraftVault, or any other remote storage method) using the option in the ‘Settings’ tab in your UpdraftPlus page in your WordPress dashboard.
Can I install UpdraftPlus on my clients’ sites?
Yes, you can install UpdraftPlus on your clients’ sites. There are no technical or licensing restrictions preventing this – we are all in favour of it.
Since you are our customer (and your client is your customer), if there are support issues that come, then it is you who has the right to come to us for personal support. Your client, if they need to, will go to you for support. Of course, it is also very acceptable for your client to get their own UpdraftPlus licence so that they can get direct support, if you prefer that. Whatever works best for you is fine with us!
What happens when my Vault quota fills up?
If your quota allowance is full, no more backups can be sent to your UpdraftPlus Vault until either some space is made (e.g. by deleting some backups) or more quota is purchased. In the meanwhile, the backups will be kept on your webserver (and fully usable). Your UpdraftPlus backup report will inform you of this situation; make sure that you configure a backup report in your settings.
Will backups be deleted from my Vault if my quota fills up?
No. New backups will not be sent to UpdraftPlus Vault until quota is available (e.g. by deleting some backups, or purchasing more quota). They will remain stored and fully usable in the web hosting space for your website. Your UpdraftPlus backup report will inform you of this situation; make sure that you configure a backup report in your settings.
Can I resell access to my UpdraftVault?
Yes. You are welcome to set up your clients’ websites to back up to your UpdraftVault account and charge them whatever you like. After one-time authorisation using your updraftplus.com login, your updraftplus.com login details are never needed again and are not stored in the UpdraftVault settings on your clients’ websites (in its place is a unique token with no other usefulness).
What happens to my backups stored in UpdraftVault if I decided to cancel my UpdraftVault subscription?
Once your subscription period ends, your files will be deleted. Please save them to a different location before your subscription ends.
Note, you may have different subscriptions contributing to your UpdraftVault storage space. For example, you may have purchased storage on top of space given to you as part of an UpdraftPlus Premium purchase.
If you cancel one of those subscriptions, you’ll lose part of your storage space when that subscription period comes to an end. If you’re over your allowance at that time, UpdraftVault will delete backups until you’re back under your allowed storage limit.
UpdraftVault may delete backups that you don’t need, but it may delete backups that you do. It’s therefore safer to manually delete backups beforehand to ensure you keep your most important files.
Are there any special terms and conditions for use of UpdraftVault?
UpdraftVault is exclusively for the storage of backups created by the UpdraftPlus WordPress plugin, and use for any other purpose is strictly forbidden. Furthermore, any and all other FAQs about UpdraftVault which describe how UpdraftVault works constitute part of the user agreement in using UpdraftVault. Information on data privacy in relation to UpdraftVault is available here.
Do unused UpdraftClone tokens expire?
No. Once you have purchased UpdraftClone tokens, they remain on your account until they are used.
The only exception to this is if no activity happens on your account for some years (no logins, no purchases, no use of UpdraftClone, UpdraftVault, UpdraftCentral, etc.), then for data privacy reasons you may eventually be deemed an ex-customer, and your account deleted.
What are the terms and conditions for having an updraftplus.com account?
Our policy here comes down to: 1) understand that having an account means that some data that concerns you must be processed and stored (including by third parties whom we have authorised for appropriate and limited access) in order to operate the account and 2) you can lose your account if you behave badly.
- Firstly, you should understand and accept the implications of having an updraftplus.com account, as detailed on this page, together with the explanation of how data is processed and privacy is protected in the use of different UpdraftPlus/UpdraftCentral features.
- Terms and conditions for support responses are detailed here.
- It is understood and accepted that any fraudulent, corrupt, abusive or offensive behaviour towards any of our staff, delegates or representatives in any context (whether on a website that we host, or in any other virtual or physical setting), or towards any of our computer systems or networks, or any attempts to gain unauthorised access to any part of our website(s), database(s) or other physical or virtual resources, is grounds for immediate and unilateral termination of your account (together with all associated services), without requirement for notice or refund, at our absolute and sole discretion.
What are the terms and conditions for using UpdraftClone?
You must accept the following terms and conditions to use UpdraftClone.
UpdraftClone is intended for website owners to be able to easily create a quick clone of their WordPress website, for “internal” or development use. It is not intended for public website hosting or storage facility of any sort, or for any other purpose than the one given above, and use for any other purpose than this intended one is explicitly forbidden.
Furthermore, all hosting of any content either illegal or forbidden by any sort of statue (e.g. not just criminal law, but also copyright or intellectual property statues) or forbidden by us in any of your jurisdiction, the EU, the UK, the US, New York or any jurisdiction that you choose to host the clone in (should a regional hosting optional be made available) is also explicitly forbidden.
Content forbidden by us (for the purposes of the above paragraph) includes any content (whether video, audio, written or otherwise) that is pornographic, sexually explicit, in any way obscene or in any way abusive (regardless of whether or not those involved have given any form of consent to the material). If in doubt about you can and should ask us in advance for clearance. Failure to comply with this term means that you accept that any clones and your account may be deleted without further notice or refund. The sole exception to the above clause is for legally registered charities whose registered purposes include campaigning against sexual exploitation, and the clone is made as part of carrying on this purpose.
Furthermore, also explicitly forbidden is the running of any of the following: (i) trojans, (ii) key loggers, (iii) viruses, (iv) malware, (v) botnets, (vi) denial of service attacks, (vii) flood or mail bombs, (viii) logic bombs, or (ix) other actions which we reserve the sole right to determine to be malicious in intent.
You must, in all cases, agree that 1) you are entirely liable for all hosted content and that 2) we will comply with all due legal demands that arise in relation to your use of UpdraftClone, and 3) we have the full and sovereign right to immediately terminate any or all UpdraftClone services to you (with or without a refund, depending on the nature of the case).
If you have somehow gained access to somebody else’s website, then you are forbidden to clone it using UpdraftClone without the explicit permission of the owner of that website. Note that in many jurisdictions, this is also a crime.
You are also forbidden to access an UpdraftClone for which the owner has not given you explicit permission to do so. Note that in many jurisdictions, this is also a crime.
You explicitly agree that, with respect to data processing laws, you are solely responsible for any and all data processing carried out by your WordPress installation or any linked services. In legal terms, you are the sole data controller for any data in or handled by your WordPress install or any linked servies.
If your UpdraftClone is deleted as a live instance due to running out of credit on your account, it will be imaged (backed-up) and the data stored before automatic deletion of the image after at most 28 days. This is for recovery purposes only (e.g. protects in situations in which you ran out of credit, and you did not see any or act upon any notifications, and the UpdraftClone was automatically deleted whilst you still wanted it). During this period this data is not processed (only stored). After the retention period all data is removed and your UpdraftClone can no longer be recovered. You can request earlier deletion if you desire. N.B. This precautionary backup is not officially a part of the paid service (it is intended as an extra protection for users); if you desire absolute protection against losing your work then you are advised to use UpdraftPlus within WordPress to take your own backups.
Technical restrictions
You are forbidden to circumvent or seek to circumvent the mechanisms below, or use other means to achieve the same ends, or to circumvent any other technical restriction in place on a clone.
- Your clone is set up to host one WordPress installation, on a URL of our choosing. It is not possible to host under your chosen domain, or add further sites.
- Sending of any email via any mechanism whatsoever is forbidden. Since clones are short-lived, the IP addresses are quickly recycled, and we have to maintain the IP address reputation as part of our good relationship with the physical datacentre. Note that, to enforce this, UpdraftClone is locked down to forbid sending of outgoing mail via SMTP or via WP’s
wp_mail()or PHP’smail()functions. You can use a suitable logging plugin to see what mail WordPress would have sent (you may find one already installed by default).
Is the UpdraftPlus team able to provide additional documentation?
Our support team is able to provide additional documentation and assistance for purchases.
Please note, some additional services may incur an administration fee.
Documents which our support team are able to provide:
- Quotes
- Invoices/payment confirmations with additional information to comply with local tax authorities
- Our UK registered company and VAT information
- Our W-8BEN-E form
The following services require an additional administrative services fee.
- Signing non-disclosure agreements
- Signing additional data protection agreements
- Completing supplier account forms
- Processing purchase orders and/or taking payment via a direct bank transfer
To enquire about any of the above, please contact our support team via our pre-sales question form.
What happens if an automatic UpdraftGold payment fails?
If an automatic payment for UpdraftGold storage fails, you will be notified by email. You will then have the opportunity to pay for your next subscription period via card or PayPal. This can be done from your Account Page on updraftplus.com.
If you still haven’t paid by the time that your subscription period runs out, there is a grace period of approximately one week. After this, your UpdraftVault quota will be lost and you will need to take out a new subscription. You will also lose your UpdraftCentral Cloud and UpdraftPlus Premium licences, and will no longer be able to add sites to UpdraftCentral Cloud.
Please note that a chargeback (whether from PayPal or your card company) will automatically count as a cancelled payment, reducing your UpdraftVault quota immediately. Also, in terms of purchased support, once your paid period has expired, you are not entitled to any support with issues pertaining to UpdraftGold.
pCloud (1)
What is your privacy policy for the use of your pCloud app?
This privacy policy is published by the creators of UpdraftPlus, Updraft WP Software Ltd (UK) (please see the footer of this page for company registration number). It applies only if you are using our built-in app for authentication. If you configure UpdraftPlus to use your own app, then it does not apply, and in that case no data comes to any of our servers.
Use of pCloud with UpdraftPlus involves visiting our authentication server (website) as part of the authentication (OAuth) flow. Note that no backup data or other data from your WordPress site goes to our servers – this all remains on your server on which you are hosting WordPress. The authentication procedure will cause:
- Your IP address to be logged in our webserver logs. No further processing of these logs is carried out. These logs are kept for 6 months in accordance with UK law, and then automatically deleted. We carry out no further processing on them. They are not shared with any third party.
- (If authentication succeeds) your pCloud account identifier may be stored in the authentication server’s database, so that the necessary authentication token can be given to your site if it requests it again. We carry out no further processing on them. They are not shared with any third party. Note that at the time of writing, we do not currently perform this storage, as pCloud’s authentication procedures do not make it technically advantageous. (We merely reserve the right to do so if it becomes technically helpful in future).
No other data is sent or implicitly gathered by any of our servers in the process of using pCloud. Any changes to this privacy policy in future will be notified of on this page.